background image

3

2

Precautions

1

2

3

4

5

Precautions

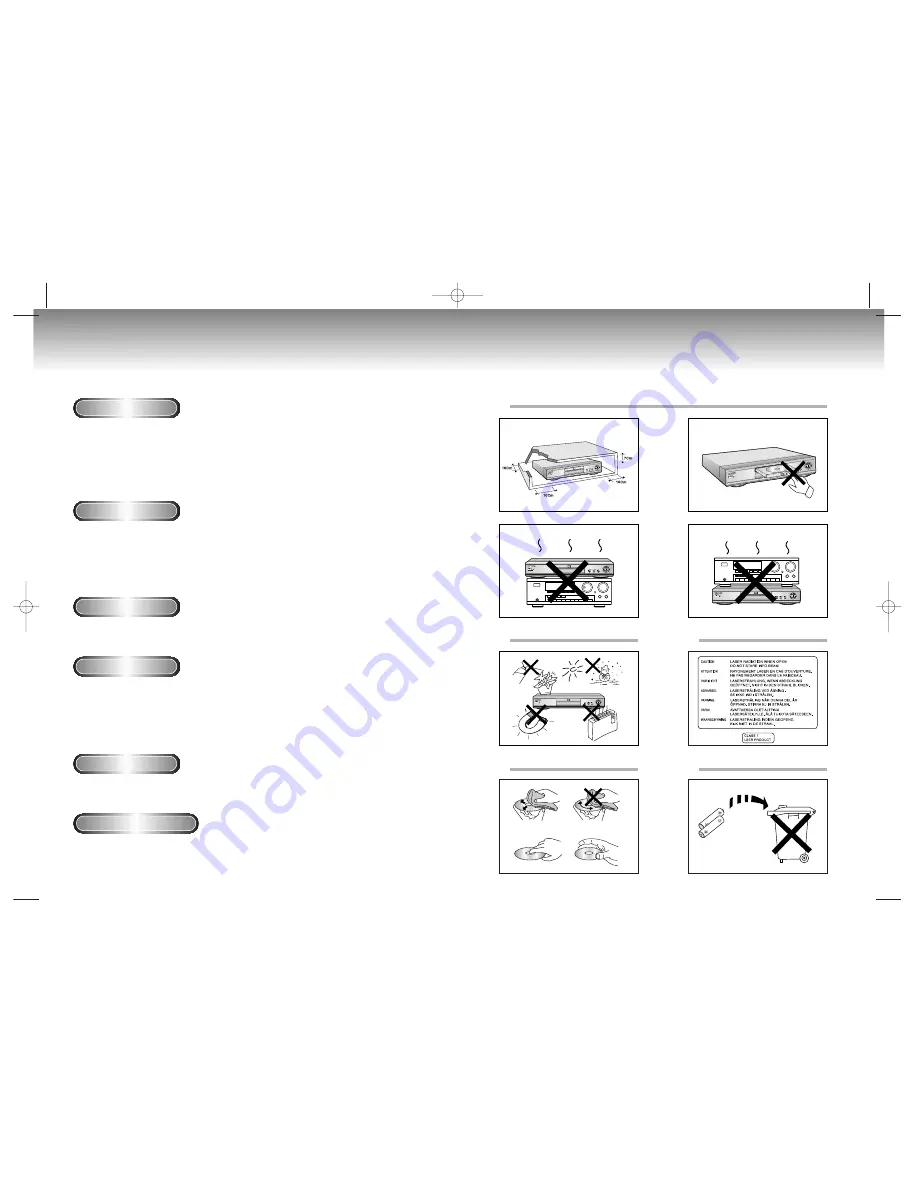
Ensure that the mains supply in your house complies whit that indicated on the identification sticker locat-

ed at the back of your play. Install  your player horizontally, on a suitable base (furniture), 

with

enough space around it for ventilation (7~10cm). Make sure the ventilation slots are not covered. 

Do not stack other, or heavy devices on top over the player. Do not place the player on amplifiers or

other equipmentwhich may become hot. Before moving the player ensure the disc tray empty.    

This player is designed for continuous use. Switching off the DVD player to the stand-by mode dose 

not disconnect the electricity supply In order to separate the player completely from the mains,it has 

to be disconnected by unplugging the main plug, especially when left   unused for a long period of time.   

1. Setting up  

Protect the player from moisture(dripping or splashing and that no objects filled with liquids,such as vases,

shall be placed on the player), and excess heat(e.g.fireplace) or equipment creating strong magnetic 

or electric fields (i.e.speakers...) disconnect the power cable from the mains electricity supply if the player

malfunction. Your player is not intended for industrial use but  for domestic purposes only. Use of this prod-

uct is for personal use only. Condensation If your player or disc have been stored in a cold atmosphsre. as

for example during transportation in the winter, wait for approximately 2 hours until they have reached

room temperature.

2. Caution 

Never open the player or any of its components. It can be dangerous for you or certain fragile components.

You could receive an electric shock or touch the laser beam. Do not place your eyes close to the opening of

the disc tray or any other opening to look inside the player.

3. For your safety

Be careful handle your discs with care. Hold a disc whit finger on the border or hole. Always place disc

with the label facing upward (in case of a single side disc ). Always use a soft cloth to clean disc if neces-

sary, wipe from the centre to the border. Always put disc back into their cases after playing and store in

vertical position. Always place the disc properly into the tray using the proper guide area. Never use record

cleaning sprays, benzine, static electricity liquids or any other solvent, if the disc surface is dirty. Wipe gen-

tly with a soft damp(water only) cloth, never wipe the disc in a circular motion, since circular scratches are

likely to occur and could case noise during playback.

4. Disc   

The battery used in this product contains the chemicals that are harmful to the environment.   

Do not dispose of batteries in the general household waster. It is recommended that the replacement 

of the battery should be done by technician. 

5. Battery   

For safety reasons, be sure to disconnect the AC power cord from the AC outlet.

• Do not use benzene, thinner, or other solvents for cleaning.

• Wipe the cabinet with a soft cloth.

6. Maintenance of cabinet 

M105(Au-ENG)  3/9/01 8:48 PM  Page 2

Summary of Contents for DVD-M105

Page 1: ...AH68 00719B DVD M105 AU AU M105 Au ENG Cover 3 9 01 8 48 PM Page 2 ...

Page 2: ...ring transportation in the winter wait for approximately 2 hours until they have reached room temperature 2 Caution Never open the player or any of its components It can be dangerous for you or certain fragile components You could receive an electric shock or touch the laser beam Do not place your eyes close to the opening of the disc tray or any other opening to look inside the player 3 For your ...

Page 3: ...n Rear Panel 9 Tour of the Remote Control 10 Choosing a Connection 12 Playing a Disc 14 Using the Search Skip Functions 16 Using the Display Function 17 Repeat Play 18 Program Play Random Play 19 S FIT Play 20 Digest Play 21 Slow Repeat play 22 Using the Disc View Function 23 Selecting the Audio Language 24 Selecting the Subtitle Language 25 Changing the Camera Angle 26 Using the Bookmark Function...

Page 4: ... system Various screen and audio functions can be easily select ed through the on screen menu VIDEO CD AUDIO CD 12 Cm 8 Cm 74 min 20 min 12 Cm 8 Cm 74 min 20 min Disc Types Logos Recording Types Disc Size Max Playing Time Characteristics DVD DO NOT play CD ROM CD I CD R and DVD ROM in this player CDGs play audio only not graphics DIGITAL SOUND STEREO PAL Play Region Number PAL broadcast system in ...

Page 5: ...he disc tray is open LOAD Player is loading disc information 1 2 3 4 5 6 7 1 2 3 4 5 6 7 8 9 10 11 12 13 14 Rear Panel 1 2 3 4 5 6 DIGITAL AUDIO OUT JACKS Use either an optical or coaxial digital cable to connect to a compatible Dolby Digital receiver Use to connect to an A V Amplifier that contains a Dolby Digital or DTS decoder MIXED AUDIO OUT JACKS Connect to the Audio input jacks of your telev...

Page 6: ...D SOUND Button DIGEST Button PLAY PAUSE Button Begin Pause disc play SKIP Buttons Use to skip the title chapter or track RETURN Button Returns to a previous menu DISPLAY Button Displays the current disc mode ENTER DIRECTION Button UP DOWN or LEFT RIGHT Button This button functions as a toggle switch ANGLE Button Use to access various camera angles on a DVD MODE Button Allows you to program a speci...

Page 7: ...ed Audio Out Digital Audio Out 2ch Amplifier Audio Input Jacks Dolby Digital Decoder Digital Audio Input Jacks AUDIO DVD TV Normal Widescreen Projection etc Good picture Basic Audio Better picture Best picture Method 1 Method 2 Method 3 R L V1 Audio Output Jacks OR OR OR AV Cable S Video Cable Video Cables Video Output Jack S Video Jack Component Video Jack DVD TV Method 1 DVD Player TV with Video...

Page 8: ...ill appear No sound is heard during STEP mode Press PLAY PAUSE to resume normal play You can only perform step motion play in the forward direction 8 8 Slow Motion Play Except CD Press the FWD SEARCH button on the remote during PAUSE or STEP mode By pressing the FWD SEARCH button you can select slow motion play for 1 8 1 4 or 1 2 of normal speed No sound is heard during slow mode Press PLAY PAUSE ...

Page 9: ...evious MENU or the previous Track View display See page 23 NOTE When in search mode 2X 4X 8X 16X 32X 128X on a DVD or high speed play 4X 8X on a VCD or 2X 4X 8X on a CD Depending on the disc audio may not be heard when a disc is in 2X play mode When Playing a DVD When Playing a CD VCD 1 1 During play press the DISPLAY button on the remote Current title chapter number and elapsed time will be displ...

Page 10: ...y not work If the title or track is completed before marking the end B the end of title or track becomes B automatically When in VCD 2 0 mode MENU ON mode this function does not work NOTE Depending on the disc the Program and Random Play function may not work When in VCD 2 0 mode MENU ON mode these functions do not work To resume normal play press the CLEAR button DVD VCD CD Program Play DVD VCD C...

Page 11: ...e the black bars in the top and bot tom of the screen when a movie is playing in the Widescreen format 16 9 Screen Fit will not work when the Zoom mode is active you can not remove the black bars on the screen However Zoom mode will work when Screen Fit is active NOTE Various aspect ratios are available only in multiple screen format discs This function does not work when a DVD has been recorded w...

Page 12: ...uttons to select INDEX VIEW Press the ENTER button 3 3 Select the desired view by pressing UP DOWN or LEFT RIGHT buttons 4 4 Press the ENTER button Disc View 1 Track View 2 Index View ENTER TRACK VIEW 01 04 07 02 05 08 03 06 09 INDEX VIEW 01 04 07 02 05 08 03 06 09 example example NOTE In stop mode on VCD press the TOP MENU button and the TRACK VIEW will be displayed When pressing the TOP MENU but...

Page 13: ... Refer to Setting Up the Language Features on page 31 Selecting the Subtitle Language You can select a desired subtitle quickly and easily with the SUBTITLE button Using the SUBTITLE button 1 1 Press the SUBTITLE button 2 2 Use the UP DOWN buttons to select the desired subtitle language 3 3 Use the LEFT RIGHT buttons to determine whether or not the subtitle will be displayed Initially the subtitli...

Page 14: ...VD or VCD MENU OFF mode so that you can quickly find the section at a later time Using the Bookmark Function DVD VCD 1 1 During play press the BOOKMARK button on the remote The Bookmark icons will be dis played 2 2 Use the LEFT RIGHT buttons to move to the desired bookmark icon 3 3 When you reach the scene you want to mark press the ENTER button The icon will change to a number 1 2 or 3 4 4 Press ...

Page 15: ...etup menu lets you customize your DVD player by allowing you to select various lan guage preferences set up a parental level even adjust the player to the type of television screen you have 1 1 With the unit in Stop mode press the SETUP button on the remote Player Menu Setup of the Display Language Use the Player preference menu to select the language for the player s on screen displays Disc Menu ...

Page 16: ...ns to SETUP MENU Setting Up the Language Features Using the Audio Language Using the Subtitle Language 1 1 With the unit in Stop mode press the SETUP but ton 2 2 Press the UP DOWN buttons to move to AUDIO 3 3 Press the ENTER button 4 4 Press the UP DOWN buttons to select English Select Original if you want the default soundtrack language to be the original language the disc is recorded in Select O...

Page 17: ...ns 1 1 With the unit in Stop mode press the SETUP but ton 2 2 Use the UP DOWN buttons to select AUDIO OPTIONS Then press the ENTER button 3 3 Use the UP DOWN buttons to select the desired item Then press the LEFT RIGHT buttons Dolby Digital Out 1 PCM Converts to PCM 2CH audio Select PCM when using the Analog Audio Outputs 2 Bitstream Converts to Dolby Digital Bitstream 5 1CH Select Bitstream when ...

Page 18: ...g aspect ratio 1 4 3 Letter Box Select when you want to see the total 16 9 ratio screen DVD supplies even though you have a TV with a 4 3 ratio screen Black bars will appear at the top and bottom of the screen 2 4 3 Pan Scan Select this for conventional size TVs when you want to see the central portion of the 16 9 screen Extreme left and right side of movie picture will be cut off 3 16 9 Wide You ...

Page 19: ...art with no disc in the unit Press the STOP and PLAY buttons simultaneously on the front panel for three seconds The Select Menu Language display will appear Select the desired language button Press the SETUP button on the remote control to select the Parental Mode The Parental Mode is now unlocked as indicated on the display Press the DOWN button to select Parental Press ENTER and the Create Pass...

Page 20: ...Memo Memo M105 Au ENG 3 9 01 8 48 PM Page 38 ...

Reviews: