background image

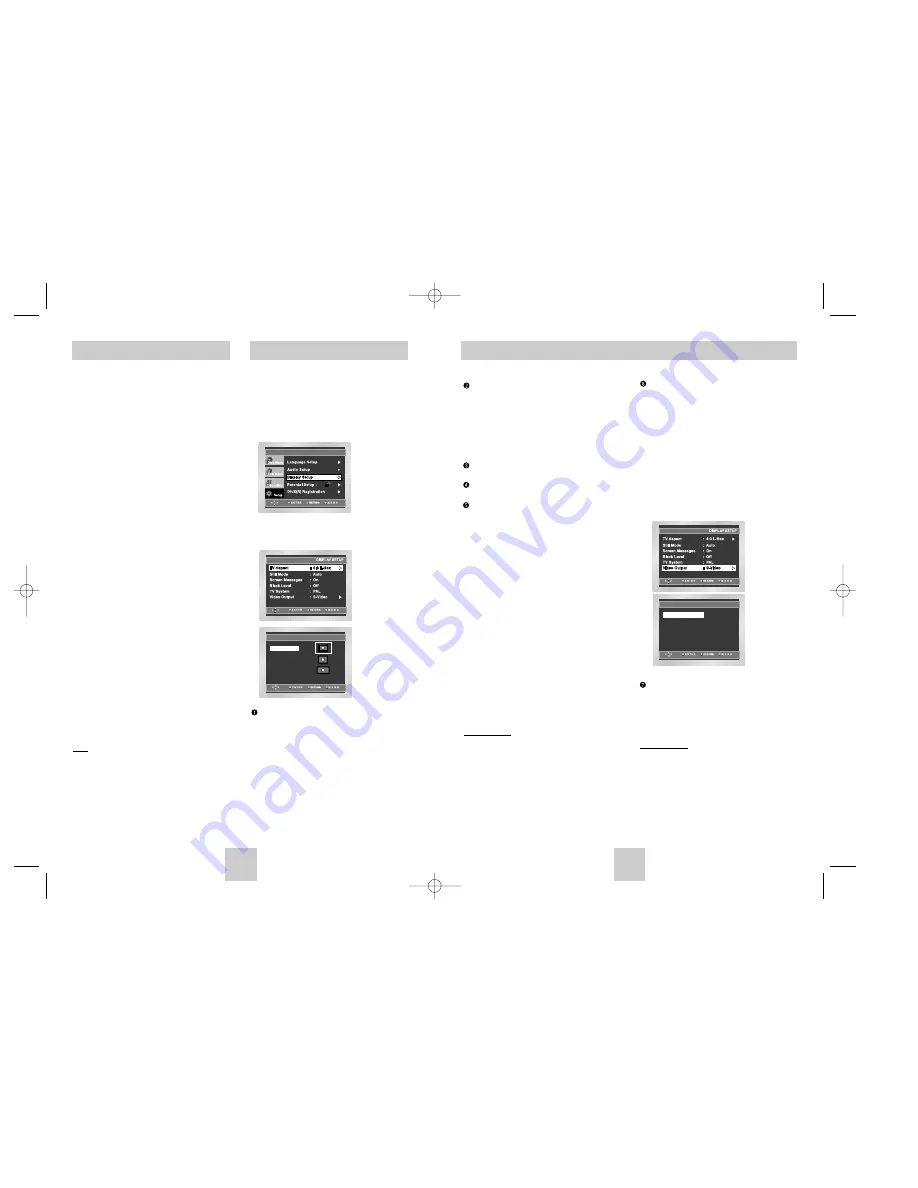
Video Output

Select Video Output.

1. S-Video : Select when you want to use Video and 

S-Video Out.

2. Component (I-SCAN) : Select when you want to use

Video and Component 525i(Interlace) Out.

3. Component (P-SCAN) & DVI : Select when you want

to use Component 525p(Progressive) Out or DVI.

* If you press the VIDEO SEL. button, Video output

mode is changed in regular sequence in 

no disc

mode.
(S-Video 

➝ 

I-SCAN 

➝ 

P-SCAN & DVI )

* If the Yes/No selection in the Display Setup sub Menu

is not made within 10 seconds, the screen returns to
the previous menu.

DVI Output

You can use this function to DVI output format.
• This function corrects a biased TV screen to secure a

normal view.

• If DVI Output is set incorrectly, the screen can be

biased.

Important Note

• Consult your TV User’s Manual to find out if your

TV supports Progressive Scan. If Progressive
Scan is supported, follow the TV User’s Manual’s
instructions regarding Progressive Scan settings in
the TV’s menu system.

• If Video Output is set incorrectly, the screen can

be blocked. (See page 40)

ENG-35

ENG-34

1. With the unit in Stop mode, press the MENU button.

2. Select 

Setup

using UP/DOWN buttons, then

press the RIGHT or ENTER button.

3. Select 

Display Setup

using UP/DOWN buttons,

then press the RIGHT or ENTER button.

4. Use the UP/DOWN buttons to select the desired

item. Then press the RIGHT or ENTER button.

TV Aspect  

Depending on the type of television you have, you may
want to adjust the screen setting (aspect ratio).

1. 4:3 Letter Box : Select when you want to see the total

16:9 ratio screen DVD supplies, even though you
have a TV with a 4:3 ratio screen. Black bars will
appear at the top and bottom of the screen.

2. 4:3 Pan Scan : Select this for conventional size TVs

when you want to see the central portion of the 16:9
screen. (Extreme left and right side of movie picture
will be cut off.)

3. 16:9 Wide : You can view the full 16:9 picture on your

widescreen TV.

Still Mode 

These options will help prevent picture shake in still
mode and display small text clearer.

1. Auto : When selecting Auto, Field/Frame mode will be

automatically converted.

2. Field : Select this feature when the screen shakes in

the Auto mode.

3. Frame : Select this feature when you want to see

small letters more clearly in the Auto mode.

Screen Messages

Use to turn on-screen messages On or Off.

Black Level

Adjusts the brightness of the screen.(On/Off)

TV System

1. NTSC Disc : In case of using NTSC disc

• If your TV system only has PAL-Video input, you

must choose “PAL”. When you choose “PAL”,
Interlace output format is PAL 60 Hz output.

• If your TV system only has NTSC, input you must

choose “NTSC Output”.

• If you set up the NTSC TV system, DVI output frame

rate is 60 Hz.

2. PAL Disc : In case of using PAL disc 

• If your TV system only has NTSC-Video input, you

must choose “NTSC Output”.

• If your TV system only has PAL input, you must

choose “PAL Output”.

• If you set up the PAL TV system, DVI output frame

rate is 50 Hz.

Important Note

• In case of differ from your TV and TV system set-

ting value video output may be blocked.

• You have to setup TV system correctly. 

• Refer to your TV user's manual.

• If you use NTSC disc at PAL TV system, motion

picture may be distorted. 

• If you use PAL disc at NTSC TV system, motion

picture may be distorted.  

Setting Up the Display Options

Setting Up the Display Options

DVI Output

:  Mode B

DISPLAY SETUP

S-Video

Component (I-SCAN)

Component (P-SCAN) & DVI

DVI Output

:  Mode B

The default settings : FRONT L, R (Small),
CENTER (Small), SURROUND (Small). 
Select the size of the speakers to be connected.

• Front (FL, FR)

Large

: Normally select this.

Small

: When the sound distorts or the surround

sound effects are difficult to hear, select this. 
This activates the Dolby Digital bass redirection
circuitry and outputs the bass frequencies of the
speaker from the subwoofer.

• Center

None

: If you do not connect a center speaker,

select this.

Large

: Normally select this.

Small

: When the sound distorts, select this. 

This activates the Dolby Digital bass redirection
circuitry and outputs the bass frequencies of the
center speaker from other speakers.

• 

Surround (SL, SR)

None

: If you do not connect a center speaker,

select this.

Large (Rear/Side)

: Normally select either of these

according to the rear speaker’s position.

Small (Rear/Side)

: When the sound distorts or the

surround sound effects are difficult to hear, select
either of these according to the rear speaker’s
position. This activates the Dolby Digital bass
redirection circuitry and outputs the bass
frequencies of the rear speaker from other
speakers.

Setting up TEST

The test output signals come clockwise starting from
the Front Speaker(L). Adjust Channel Balance to
match to the volume of test signals memorized in
the system.

FRONT(L)

➝ 

CENTER

➝ 

SUBWOOFER

FRONT(R)

➝ 

SURROUND(R)

➝ 

SURROUND(L)

Note

How to make the SETUP menu disappear or return
to menu screen during set up. Press RETURN or
LEFT button.

• The subwoofer test output signal is lower than the

other speakers.

• The MPEG Multichannel logo is a trademark 

registered by PHILIPS Corporation.

• If you set Front (L, R) “Small”, LFE(Subwoofer) is

set “On” automatically.

Surround Sound Speaker Setup

TV ASPECT

4:3 Pan Scan

16:9 Wide

4:3 Letter Box

DVD-HD746-XSG(00517H)gb  7/15/04 11:44 AM  Page 34

Summary of Contents for DVD-HD746

Page 1: ...DVD Player DVD HD746 ENG AK68 00517H DVD HD746 XSG 00517H Cover 7 15 04 11 44 AM Page 1 ...

Page 2: ...e Install your player in a cabinet with adequate ventilation holes 7 10cm Do not block ventilation holes on any of the components for circulation of air Do not push the disc tray by the hand Do not stack components Be sure to turn all components off before moving the player Before connecting other components to this player be sure to turn them off Be sure to remove the disc and turn off the player...

Page 3: ...ct matter etc Various On Screen Menu Functions You can select various languages Audio Subtitle and screen angles while enjoying movies EZ VIEW DVD Easy View can convert Letter Box images to full screen viewing on your conventional TV Digital Photo Viewer JPEG You can view Digital Photos on your TV Repeat You can repeat a song or movie simply by pressing the REPEAT button MP3 WMA This unit can play...

Page 4: ...d in Setup Menu progressive scan and DVI mode will not work Important Note Consult your TV User s Manual to find out if your TV supports Progressive Scan If Progressive Scan is supported follow the TV User s Manual s instructions regarding Progressive Scan settings in the TV s menu system If Component P SCAN DVI Video Output is selected in Setup Menu Video and S Video will not work See page 35 to ...

Page 5: ...EAR Button Use to remove menus or status displays from the screen 20 INSTANT SKIP Button This function skips playback ahead 10 seconds 21 INSTANT REPLAY Button This function is used to replay the previous 10 seconds of a movie from the current position 22 CH buttons Channel selection 23 OPEN CLOSE Button To open and close the disc tray 24 DVI SEL Button DVI Output resolution setup 25 SKIP Buttons ...

Page 6: ...sing a Connection TV DVD Player Method 1 Method 2 Progressive scan Basic Audio Digital Video DVI Audio Input Component Jacks Digital Video Out ENG 10 Choosing a Connection Connection to a TV For Video TV Normal Widescreen Projection etc 1 Connect a cable with the desired method 2 Turn on your TV and DVD Player 3 Set your TV the correct video input by pressing TV VIDEO button on See page 38 4 Selec...

Page 7: ... to resume normal play This icon indicates an invalid button press ENG 12 Choosing a Connection DVI VIDEO Specifications When you press the DVI SEL button in case of PAL TV system in setup menu 576p 720p 768p 1080i 50Hz are selected in order When you press the DVI SEL button in case of NTSC TV system in setup menu 480p 720p 768p 1080i 60Hz are selected in order The first press of the DVI SEL butto...

Page 8: ...ing play press the INFO button on the remote 2 Use the UP DOWN buttons to select the desired item 3 Use the LEFT RIGHT buttons to make the desired setup and then press ENTER You may use the number buttons of the remote control to directly access a title chapter or to start the playback from the desired time 4 To make the screen disappear press the INFO button again Using the Search Skip Functions ...

Page 9: ... RANDOM PROGRAM RANDOM PROGRAM 01 Track 05 06 07 08 09 10 11 12 13 14 15 16 Program Order 01 02 03 04 CLEAR Slow Repeat Play ENG 16 Repeat Play Repeat the current track chapter title a chosen section A B or all of the disc 1 Press the REPEAT button on the remote Repeat screen appears 2 Select Chapter Title or A B using the LEFT RIGHT buttons Chapter repeats the chapter that is playing Title repeat...

Page 10: ...ched Zoom Fit The top bottom left and right of the screen are cut off and the central portion of the screen is enlarged 2 For 4 3 aspect ratio discs Normal Screen Displays the content of the DVD title in 4 3 aspect ratio Screen Fit The top and bottom of the screen are cut off and the full screen appears The picture would look vertically stretched Zoom Fit The top bottom left and right of the scree...

Page 11: ...rks See page 14 Depending on a disc the Bookmark function may not work ENG 20 Using the Instant Replay Skip Function Changing the Camera Angle When a DVD contains multiple angles of a particular scene you can use the ANGLE function Using the ANGLE button If the disc contains multiple angles the ANGLE mark appears on the screen 1 Press the ANGLE button then ANGLE icon will appear with the current a...

Page 12: ... VCD 1 During play or pause mode press the ZOOM button on the remote A Zoom mark will be displayed on screen 2 Use the UP DOWN or LEFT RIGHT buttons to select the part of the screen you want to zoom in on 3 Press the ENTER button During DVD play press ENTER to zoom in 2X 4X 2X Normal in order During VCD play press ENTER to zoom in 2X Normal in order SACD Playback SACD Playback 1 Open the disc tray...

Page 13: ...with the DVD AUDIO you can see this icon To access the desired page you can use this Function If a slide show is included with the DVD AUDIO you can see this icon In this case you cannot use PAGE PRE NEXT buttons If a video zone is included with the DVD AUDIO you can see this icon In this case you cannot use PAGE PRE NEXT buttons Allows playback of the music from a desired time by using the number...

Page 14: ...ent of the file that you select 00 00 23 O f f Wo n d e r f u l Off FD 01 A B REPEAT ENTER T F F T CD R MP3 WMA discs When you record MP3 or WMA files on CD R please refer to the following Your MP3 or WMA files should be ISO 9660 or JOLIET format ISO 9660 format and Joliet MP3 or WMA files are compatible with Microsoft s DOS and Windows and with Apple s Mac This format is the most widely used When...

Page 15: ... file size is the higher resolution is displayed If the file resolution is small it scales up automatically So you can see the larger screen Title Time Audio Subtitle Size Using the Display Function 1 During play press the INFO button on the remote 2 Use the UP DOWN buttons to select the desired item 3 Use the LEFT RIGHT buttons to make the desired setup and then press ENTER You may use the number...

Page 16: ...ode press the MENU button on the remote Select Setup using UP DOWN buttons then press the RIGHT or ENTER button Language Setup Setup of the Language Audio Setup Setup of the Audio Options Display Setup Setup of the Display Options Use to select which type of screen you want to watch and several display options Parental Setup Setup of the Parental Level Allows users to set the level necessary to pr...

Page 17: ...he SETUP menu disappear or return to menu screen during set up Press RETURN or LEFT button Manufactured under license from Dolby Laboratories Dolby and the double D symbol are trademarks of Dolby Laboratories DTS and DTS Digital Out are trademarks of Digital Theater Systems Inc DVD AUDIO Outputs 2 channel digital audio only Some DVD AUDIO discs do not downmix so they will not output 2 channel digi...

Page 18: ...AL Interlace output format is PAL 60 Hz output If your TV system only has NTSC input you must choose NTSC Output If you set up the NTSC TV system DVI output frame rate is 60 Hz 2 PAL Disc In case of using PAL disc If your TV system only has NTSC Video input you must choose NTSC Output If your TV system only has PAL input you must choose PAL Output If you set up the PAL TV system DVI output frame r...

Page 19: ...button The Change Password screen appears Enter your new password Enter the new password again Note How to make the SETUP menu disappear or return to menu screen during set up Press RETURN or LEFT button If you have forgotten your password see page 40 Setting Up the Rating Level 1 With the unit in Stop mode press the MENU button 2 Select Setup using UP DOWN buttons then press the RIGHT or ENTER bu...

Page 20: ... to control every model TV of the brands listed If you replace the remote control s batteries set the brand code again Firmware upgrade 4 Press the ENTER button Firmware upgrade starts 5 In the middle of the writing the tray will open automatically After taking out the disc please wait for about 2 minutes 6 If the unit was successfully updated the unit will turn off and on after closing the tray a...

Page 21: ...nel sound Check whether the disc being played has the Dolby 5 1 ch mark on the outside Check if your audio system is connected and working properly In a SETUP Menu is the Audio Output set to Bitstream The features or action cannot be completed at this time because 1 The DVD s software restricts it 2 The DVD s software doesn t support the feature e g angles 3 The feature is not available at the mom...

Page 22: ...yer Disc 135 min Reading Speed 4 8 5 6 m sec Maximum Play Time 74 min Reading Speed 4 8 5 6 m sec Maximum Play Time 20 min Reading Speed 4 8 5 6 m sec Maximum Play Time 74 min Video Audio 1 channel 1 0 Vp p 75 Ω load Y 1 0 Vp p 75 Ω load Pr 0 70 Vp p 75 Ω load Pb 0 70 Vp p 75 Ω load Luminance Signal 1 0 Vp p 75 Ω load Chrominance Signal 0 3 Vp p 75 Ω load Digital Visual Interface L 1 L R 2 R F L F...

Reviews: