background image

The User’s Manual is for common use.

Make use of the User’s Manual depending upon your washing machine model.

8

INSTALLATION & MAINTENANCE

•  

If the washer is not leveled with the ground, it makes the machine tremble more or be out of order. 

So, make sure that the washer is leveled properly.

ENVIRONMENT
Leave some space 
Maintain at least 10cm between the washer and the wall.
Place the washer on a sturdy flat surface.
If the washer is placed on an uneven or weak surface,
noise or vibration occurs. (Allowable is 1˚)
Adjust the legs for even placement.

Never install the washer near water.
Do not place the washer in steamy rooms or where  the
washer is directly exposed to rain.Moisture may destroy the
electrical insulation causing an electrical shock hazard.
Avoid direct sunlight or heaters.
As plastic and electrical components are affected by direct
heat,never place the washer near furnaces, boilers, etc. 
Do not place under direct sunlight.

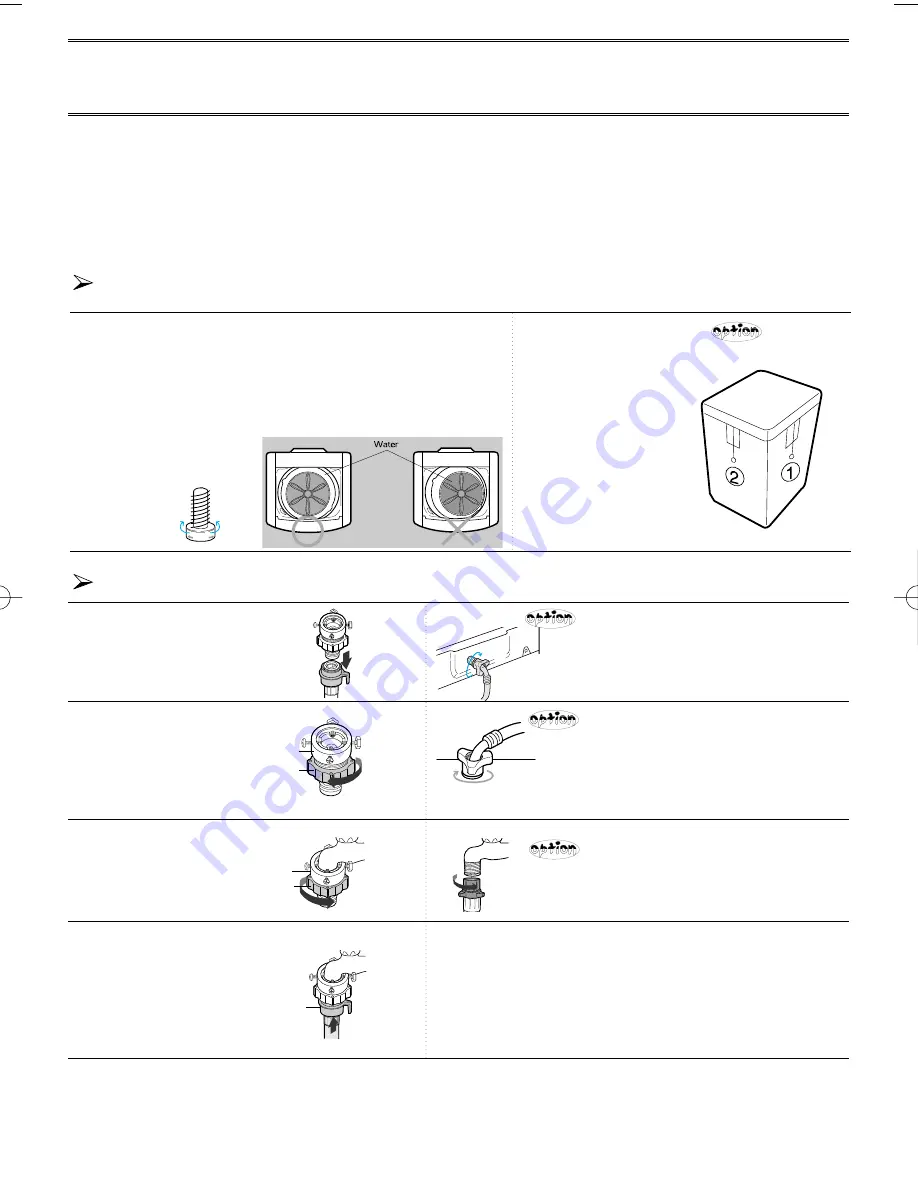
LEVELLING

Lock

Loosen

SEE IF THE MACHINE IS PLACED LEVEL BY CHECKING 
THE POSITION OF THE WASHING TUB.

1. Adjust the side horizontally 

first and the front 
in same direction 

next.

2. If the thread is not 

within the limit, adjust 
the height of
the legs.

•  

Open the lid of the machine, pour water into the tub up to the level  

just below the pulsator, and adjust the legs so that the pulsator is 
positioned at the center of the water as shown in the figure.

•  

Place the machine more than 

10cm away from the wall.

•  

Adjust the legs on feet 

for levelling .

Note : The appliance is to be connected to the water mains using new hose-sets and that old hose-sets should not be

used.

1. Remove the adaptor

from the water supply hose.

2. First,using a "+" type screw

driver, loosen the four screws
on the adaptor. Next,take the
adaptor and  turn part(b) fol-
lowing the arrow for gap about
5mm between them.

3. Connect adaptor to the

water tap by tightening the
screws firmly.  Then, turn
part (b) following the arrow
and put (a) and (b)together.

4. Connect the water supplyhose

to the adaptor. Pull down the
part (c) of the water supply
hose .When the part (c)is
released, the hose is automati-
cally connected to the adaptor
making a 'click' sound.

a

b

a

b

c

CONNECTING THE WATER SUPPLY HOSE

5. Connect the other end of the water 

supply hose to the inlet water valve 
at the back of the washer.
Screw the hose clockwise all the 
way in.

5-1.Connect the other end of the water 

supply hose to the inlet water valve 
at the top of the washer.  

Screw the hose clockwise all the way in.

If the water tap is a screw type,assemble 

a water supply hose that fits to the 
tap as shown.

NOTICE After completing connection, if water leaks from the hose,
then repeat the same steps.
Use the most conventional type of faucet for water supply. 
In case the faucet is square or too big,remove the spacing 
ring before inserting the faucet into the adaptor.

Summary of Contents for DC68-02154A

Page 1: ... of pump drained washer 9 Connecting the drain hose 9 How to put the detergent in 9 Water supply connector filter 10 Cleaning the filter net 10 How to clean the filter 10 TROUBLESHOOTING 11 SPECIFICATIONS Please read this manual before using and note how to use in the proper manner Please be careful of keeping the manual Otherwise it should be bought separately WASHING MACHINE User s Manual The Us...

Page 2: ...he tub pushing down any clothes that float right under the water surface It is this Waterfall Flow that enables this washing machine to effectively wash large and heavy items such as bluejeans and blankets MAGIC FILTER This unique magic Filter ensures that all the lint inside the tub is captured for top quality filtering results to deliver consistently effective cleaning results SUPER CLEAN Use fo...

Page 3: ...ase unplug the power supply cord when you do not use it An electric shock or a fire may take place If there is dust or water on the power supply plug and its connected part please remove it completely An electric shock or a fire may take place Do not make your kids look into the inside of the washer If your kid falls into the washer his life could be in danger Ventilate immediately without touchin...

Page 4: ...TERGENT BOX The User s Manual is for common use Make use of the User s Manual depending upon your washing machine model GROUND LEAD When the water pipe is metal make sure to cover the end of the ground wire POWER CORD WATER DRAIN HOSE RAT PROTECTION PANEL SPIN BASKET ADJUSTABLE LEGS Adjust the length of the legs when installing the washer FRONT CONTROL PANEL PULSATOR SILVER WASH SYSTEM ...

Page 5: ...DY WOOL FUZZY DIGITAL SILVER WASH BUTTON A course where silver water is supplied in washing as well as the last rinse featuring sterilization and antibacterial coating This is available for all courses except the Wool course FUNCTION SELECT BUTTON With every press of this button the function changes SOAK WASH RINSE SPIN WASH RINSE SPIN WASH RINSE RINSE SPIN WASH RINSE SPIN SOAK WASH RINSE SPIN WAT...

Page 6: ...ted MAXIMUM MEDIUM 4 Close the lid The washing finishes by the time you reserved The tempering feature is included in the Super Clean course This is why the additional tempering course is not selected Select the Silver Wash button to perform anti bacteria washing SPEEDY COURSE Because washing is speedy it is good for light or less stained laundry 1 Press the power button to ON 2 Press the course s...

Page 7: ...served SILVER WASH BUTTON A course where bacteria hidden inside the laundry are removed before it is Silver Wash coated for avoiding the propagation of harmful germs 1 Press the power button to ON 2 Press the SILVER WASH button 3 Press the START HOLD button 4 Close the lid This can only be selected when WASH RINSE and SPIN are all selected When the Silver Wash course is selected manual ly selectin...

Page 8: ... HOLD button once Washing goes on for 18 minutes When the FUNCTION button is pressed during washing the wash time can be changed to between 3 and 25 minutes in duration RINSE ONLY Press the FUNCTION button three times Press the START HOLD button once Rinsing goes on for 15 minutes When the FUNCTION button is pressed during rinsing the rinse times can be changed to between 1 to 5 times in duration ...

Page 9: ...the pulsator is positioned at the center of the water as shown in the figure Place the machine more than 10cm away from the wall Adjust the legs on feet for levelling Note The appliance is to be connected to the water mains using new hose sets and that old hose sets should not be used 1 Remove the adaptor from the water supply hose 2 First using a type screw driver loosen the four screws on the ad...

Page 10: ...BLING THE RAT PROTECTION PANEL 1 Insert the rat protection panel to the assembling hole on front side to the end 2 If you have difficulty inserting the panel lift up the washer a little and insert it 90 100cm 1 Open the detergent box by pulling in the direction of the arrow as shown in the figure and then put the powder detergent in the detergent box 2 Put in one time amount of detergent evenly so...

Page 11: ...as shown in the figure 3 Clean the filter 4 Close the cover and insert the lower part of the filter in the basket first and then push the filter with click sound HOW TO CLEAN THE FILTER 1 Place a rag under the washer filter not to wet the floor 2 Rotate the filter counterclockwise and pull out the filter 3 Remove dirts and rotate the filter clockwise until it locks in position pump drained washer ...

Page 12: ... a buzzer will sound and the remaining time indicator will show 4E Water dose not drain Is the drain hose down No pump Is the drain hose frozen Is the drain hose clogged If the water dose not drain in 15 minutes a buzzer will sound and the remaining time indicator will show 5E Spinning does not work Is the laundry spread out evenly in the washer Is the washer set on a sturdy flat surface Water is ...

Page 13: ...AGE 140 l 113 rpm WASHING TYPE Stirring Type PULSATOR ROTATING SPEED SPECIFICATIONS IN CASE THE NEED FOR SERVICING ARISES If any problem occurs with your products do not hestitate to call any nearby Name address telephone number is required SPIN WASH HIGH MED LOW EXTRA LOW 49 l MAXIMUM 55 l 330W 43 l 35 l 27 l W573xD632xH908 ...

Page 14: ...LIA INDIA MALAYSIA Country Customer Care Center 3030 8282 1600 1100 11 Web Site www samsung com au www samsung com in www samsung com my 1 800 588 889 1800 10 SAMSUNG 7267864 PHILIPPINES SINGAPORE VIETNAM 1800 SAMSUNG 7267864 www samsung com ph www samsung com sg www samsung com vn 0860 7267864 SAMSUNG RUSSIA SOUTH AFRICA 8 800 200 0400 www samsung com ru www samsung com za ...

Reviews: