background image

EN

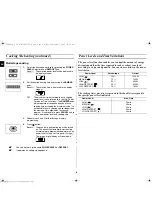
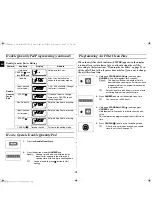
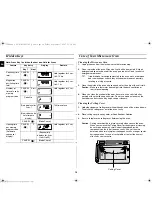
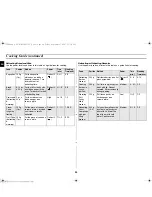
Memory Pads Programming

One-stage 

1.

Hold down 

PROGRAM LOCK

(

) and then press 

PROGRAM

(

) pad. Hold together for 2 sec.

Be sure to press the pads firmly.

Result : 

PROG indicator appears in the digital display.

2.

Press appropriate 

NUMBER

 pad for the desired memory 

number.
Result : 

Selected memory program code appears 
below the PROGRAM indicator.

3.

Select power level by pressing the 

POWER LEVEL

 pad 

or 

DEFROST

 pad.

Result : 

Default power level HIGH appears in the 
display at first press of the 

POWER LEVEL


pad.

Press the 

POWER LEVEL

 pad or 

DEFROST


pad one or more times until you get the desired 
power level.

4.

Press 

NUMBER

 pads to set the cooking time.

The maximum time according to each cooking 
power level can be referred to in the title “Power 
Levels and Time Variations” on page 6. The 

NUMBER

 pads will not operate or respond when 

you press a cooking time exceeding the 
maximum value.
It is not possible to set a cooking time for longer 
than the maximum time allowed on the chosen 
program. It is advisable to press 

CANCEL

 and to 

enter a new power level and cooking time.

5.

Hold down 

PROGRAM LOCK

(

) and then press 

PROGRAM

(

) pad. Hold together for 2 sec once again.

Result : 

PROG indicator and memory number indicator 
blink 3 times in the digital display with a beep 
sound. And then the display goes blank.

Caution:  Be sure to press the pads firmly in the right 

position.

6.

When you want to program more, repeat the procedures 
above again.

Memory programs are available up to 20 items. 
Make sure the unit is properly programmed.
After programming is finished, all you have to do 
for memory cooking is to press the 

NUMBER


pad. Then the selected memory program 
automatically starts cooking.

jtXWY`h†whuGl|yvTWY\^Wj†luU”GGwˆŽŒG`GGm™‹ˆ SGzŒ—›Œ”‰Œ™G^SGYWW^GGXXaX]Ght

Summary of Contents for CM1029A

Page 1: ...sec Pad 8 Using the Defrost Feature 8 Memory Pads Programming 9 How to Operate Memory Cooking 11 Double Quantity Pad Programming 11 How to Operate Double Quantity Pad 12 Programming Air Filter Clean Time 12 Controlling Beep Tone 13 Error Codes 13 Hidden Keys 14 Care of Your Microwave Oven 14 Replacement of Lamp 15 Cookware Guide 16 Cooking Guide 17 Cleaning Your Microwave Oven 21 Storing and Repai...

Page 2: ...ime Memory Programming 5 POWER LEVEL SELECTOR PAD 6 DEFROST SELECTOR PAD 7 DOUBLE QUANTITY PAD 8 30sec PAD One Touch Cook Pad 9 STOP CANCEL PAD 10 START BUTTON POWERLEVEL INDICATORS DEFROST INDICATORS DOUBLE QUANTITY INDICATOR DATA CHECK INDICATOR POWER SOURCE CHECK INDICATOR When it shows heating does not work AIR FILTER CHECK INDICATOR TIME DISPLAY PROGRAM INDICATOR MEMORYPAD NUMBER INDICATOR ST...

Page 3: ...t not be operated until it has been repaired by a competent person WARNING It is hazardous for anyone other than a competent person to carry out any service or repair operation that involves the removal of a cover which gives protection against exposure to microwave energy WARNING Liquids and other foods must not be heated in sealed containers since they are liable to explode WARNING Microwave hea...

Page 4: ...nterest to children should not be stored or hidden just above the oven This appliance is not intended for use by persons including children with reduced physical sensory or mental capabilities or lack of experience and knowledge unless they have been given supervision or instruction concerning use of the appliance by a person responsible for their safety Children should be supervised to ensure tha...

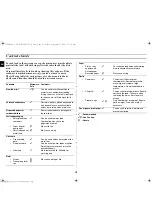
Page 5: ... goes off 1 min later If you leave the oven door open for more than 1 min the oven beeps once every minute and after 5 min the power source check indicator ON appears in the display window 1 Select the desired power level by pressing the Power Level Selector pad Result The selected power level will be displayed in the display window 2 Set the desired heating time by pressing the NUMBER pads Result...

Page 6: ...aximum time according to each cooking power level can be referred to in the title Power Levels ans Time Variations The NUMBER pads will not operate or respond when you press a cooking time exceeding the maximum value It is not possible to set a cooking time for longer than the maximum time allowed on the chosen program It is advisable to press CANCEL and to enter a new power level and cooking time...

Page 7: ...door and press again Completely Press the pad twice Result The cooking settings are cancelled 1 You can repeat the previous cooking setting regardless of manual or automatic memory heating by pressing the START button The oven starts with exactly the same heating time and power level that were used in the last operation Repeat feature is available for display show 0 You can use repeat feature for ...

Page 8: ...wave safe Open the door Place the frozen food in the centre of the plate tray Close the door When the oven was operating for longer than 25 min under Defrosting cycle you can NOT change the power level from Defrosting to Heating Cooking Reheating mode Before operating the oven times can be increased decreased using either the time pads or 30sec button During the operating time may only be added by...

Page 9: ...ns on page 6 The NUMBER pads will not operate or respond when you press a cooking time exceeding the maximum value It is not possible to set a cooking time for longer than the maximum time allowed on the chosen program It is advisable to press CANCEL and to enter a new power level and cooking time 5 Hold down PROGRAM LOCK and then press PROGRAM pad Hold together for 2 sec once again Result PROG in...

Page 10: ... will not operate or respond when you press a cooking time exceeding the maximum value It is not possible to set a cooking time for longer than the maximum time allowed on the chosen program It is advisable to press CANCEL and to enter a new power level and cooking time 5 Repeat steps 3 and 4 for II or III stage memory programming 6 Hold down PROGRAM LOCK and then press PROGRAM pad Hold together f...

Page 11: ...d ON appears in the display window 2 Open the door The oven lamp will be turned on 3 Put the food into a suitable container place it in the centre of the oven and then close the door securely Result The oven lamp will go off 4 Press NUMBER pad Result The selected memory program automatically starts heating But NUMBER pad 1 2 operate after 2 seconds 1 Hold down and then press pad Hold together for ...

Page 12: ...his step if not necessary CANCEL Mode cancel This exits the editing mode 1 Press the Double Quantity pad 2 Press the desired memory NUMBER pad Result Cooking time which was multiplied by the preset factor appears in the display and cooking starts with time digits counting down You don t need to press button to start heating 1 Hold down PROGRAM LOCK and then press NUMBER 3 pad Hold together for 2 s...

Page 13: ...y Error 50 60Hz E1 Power frequency is other than 50 Hz Unplug the power cord plug and check if the power frequency is 50 Hz Plug the power cord in 50 Hz power source and see If E1 appears If the error code is displayed again even after the correct power source is provided contact the nearest service centre EEPROM Error E5 One long beep for 2 sec Memory IC EEPROM IC is not working correctly In this...

Page 14: ...down Then take the ceiling cover out of the oven cavity 2 Rinse ceiling cover in soapy water or Food Sanitizer Solution 3 Be sure to replace the ceiling cover before using the oven Caution Ceiling cover must be in place securely when you use the oven When you removed the Ceiling Cover for the purpose of cleaning be sure to be extremely careful about the exposed inside components on the top of the ...

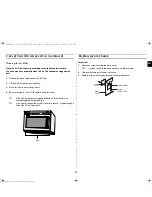
Page 15: ...Air Filter before using the oven If the Air Filter becomes clogged with debris this will cause an overheating problem on the oven If the want to change the air filter clean time refer to Programming Air Filter Clean Time in page 12 Replacement of Lamp Important 1 Remove a screw securing the lamp cover You don t need to remove outer panel to replace lamp 2 Remove the lamp by rotating it clockwise 3...

Page 16: ...ags or newspaper Recycled paper or metal trims Can be used to warm food Overheating may cause the polystyrene to melt May catch fire May cause arcing Glassware Oven to table ware Fine glassware Glass jars Can be used unless decorated with a metal trim Can be used to warm foods or liquids Delicate glass may break or crack if heated suddenly Must remove the lid Suitable for warming only Metal Dishes...

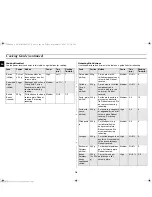
Page 17: ...dd 60 75 ml cold water 4 5 tbsp High 4 4 3 Brussel sprouts 500 g Add 120 150 ml 8 10 tbsp water High 5 5 3 Carrots 500 g Cut into even sized slices Add 60 75 ml cold water 4 5 tbsp High 4 5 3 Cauliflower 500 g Cut into even sized florets Add 60 75 ml cold water 4 5 tbsp High 5 5 3 Green Beans 500 g Cut into slices Add 60 75 ml cold water 4 5 tbsp High 5 5 3 Potatoes 500 g Cut the peeled potatoes i...

Page 18: ...edium 3 4 3 Chicken Curry Rice chilled 300 g Plate a meal of 2 chilled components on a ceramic dish e g rice and curry Reheat covered Medium 2 3 3 Pasta plain chilled 500 g Put the plain pasta in a glass pyrex bowl with lid Reheat covered Stir once ore twice during reheating Medium 4 5 1 2 Pasta with sauce chilled 350 g Put pasta e g spaghetti or egg noodles on a flat ceramic plate Reheat covered ...

Page 19: ...ic plate or bowl Reheat covered Stir during reheating Medium 3 4 2 3 Chilli chilled 350 g Pour into a deep ceramic plate Reheat covered Stir during reheating Medium 4 4 2 3 Soup frozen 500 g Pour into a glass pyrex dish with lid Reheat covered Stir during reheating High 10 12 2 3 Food Portion Method Power Time min Standing Time min Cheeseburger frozen 150 g 1pc Put burger on kitchen paper on a cer...

Page 20: ...ake slight de frosting 100 g 1pc Put the piece of cake on a ceramic plate Let stand until cream is totally defrosted Defrost 1 1 1 10 20 Fruit Cake defrosting warming 100 g 1pc Put the piece of cake on a ceramic plate Defrost 2 1 2 5 10 Food Portion Method Power Time min Standing Time min Defrosting Berries frozen 250 g Distribute berries on a flat glass pyrex dish Defrost 2 5 6 5 10 Cooking Berri...

Page 21: ...t maximum power DO NOT spill water in the vents NEVER use any abrasive products or chemical solvents Take particular care when cleaning the door seals to ensure that no particles Accumulate Prevent the door from closing correctly Clean the microwave oven cavity right after each use with a mild detergent solution but let the microwave oven cool down before cleaning in order to avoid injury Storing ...

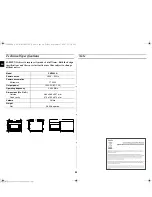
Page 22: ...thout notice Note Model CM1029A Power source 230 V 50 Hz Power consumption Microwave 1700 W Output power 1000 W IEC 705 Operating frequency 2 450 MHz Dimensions W x H x D Outside Oven cavity 464 x 368 x 557 mm 370 x 190 x 370 mm Volume 26 litre Weight Net 26 5 Kg approx 514 1000 368 444 10 464 486 530 43 26 557 jtXWY h whuGl yvTWY Wj luU GGw GYYGGm SGz G SGYWW GGXXaX Ght ...

Page 23: ...jtXWY h whuGl yvTWY Wj luU GGw GYZGGm SGz G SGYWW GGXXaX Ght ...

Page 24: ...jtXWY h whuGl yvTWY Wj luU GGw GY GGm SGz G SGYWW GGXXaX Ght ...

Reviews: