background image

4-2

Samsung Electronics

Disassembly and Reassembly

4-3 Replacement of Door Assembly

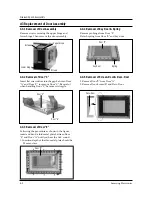
4-3-1 Removal of Door Assembly

Remove screws securing the upper hinge and
lower hinge. Then remove the door assembly.

Insert flat screwdriver into the gap between Door
"A" and Door "C" to remove Door "C". Be careful
when handling Door "C" because it is fragile.

Following the procedure as shown in the figure,
insert and bend a thin metal plate between Door
"E" and Door "A" until you hear the 'tick' sound.
1. Insertion depth of the thin metal plate should be

0.5mm or less.

4-3-4 Removal of Key Door & Spring

Remove pin hinge from Door "E"
Detach spring from Door "E" and key door.

4-3-2 Removal of Door "C"

4-3-3 Removal of Door "E"

Door "C"

Door "A"

Door "E"

Key Door

Spring

Door "E"

Upper Hinge

Lower Hinge

Screws

Screws

4-3-5 Removal of Screen-Door & Deco-Door

1. Remove Door"E" from Door"A".
2. Remove Door-Screen"B" and Deco Door.

Deco-Door

Summary of Contents for CK95

Page 1: ...ROWAVE OVEN CONTENTS 1 Precaution 2 Specifications 3 Operating Instructions 4 Disassembly and Reassembly 5 Alignment and Adjustments 6 Troubleshooting 7 Exploded Views and Parts List 8 PCB Diagrams 9 Schematic Diagrams Auto Auto 1min GB F D E I NL R Auto C ...

Page 2: ...ce technicians should remove their watches while repairing an MWO 11 To avoid any possible radiation hazard replace parts in accordance with the wiring diagram Also use only the exact replacements for the following parts Primary and secondary interlock switches interlock monitor switch 12 If the fuse is blown by the Interlock Monitor Switch Replace all of the following at the same time Primary and...

Page 3: ...nal of the high voltage capacitor to the oven chassis Use a screwdriver 3 High voltage is maintained within specified limits by close tolerance safety related components and adjustments If the high voltage exceeds the specified limits check each of the special components 1 2 Pretaution Samsung Electronics 1 2 Special Servicing Precautions Continued 1 3 Special High Voltage Precautions Touch chassi...

Page 4: ...R IEC 705 TEST PROCEDURE OPERATING FREQUENCY 2 450MHz MAGNETRON OM75PH 31 COOLING METHOD COOLING FAN MOTOR OUTSIDE DIMENSIONS 517 W x 310 H x 511 D NET WEIGHT 24 5 Kg SHIPPING WEIGHT 27 5 Kg 2 2 Comparison Chart MODEL FEATURE MORE LESS O AUTO REHEAT O AUTO DEFROST O TIME COOK O POWER LEVEL O CONVECTION O GRILL O MICROWAVE CONVECTION O MICROWAVE GRILL O PREHEAT O MULTE LANGUAGE O CLOCK O HOLD DELAY...

Page 5: ...vection Mode Temperature Selection Start Cooking Time Adjustment Button Combined Mode Selection Microwave Convection Clock Setting Language Mode Selection Auto Auto 1min GB F D E I NL R Auto C 3 Operating Instructions 3 1 Control Panel Samsung Electronics 3 1 3 2 Features External Views Door Ventilation Holes Light Safety Interlock Holes Control Panel Guide Roller Coupler Grill Rack Glass Plate Do...

Page 6: ...e screws from the back panel 8 Remove the assy noise filter 9 Take out the fan motor 10 Remove the oven lamp by pulling out from hole of air cover carefully NOTE1 When removing the magnetron make sure that its antenna does not hit any adjacent parts or it may be damaged NOTE2 When replacing the magnetron be sure to remount the magnetron gasket in the correct position and make sure the gasket is in...

Page 7: ...ing the procedure as shown in the figure insert and bend a thin metal plate between Door E and Door A until you hear the tick sound 1 Insertion depth of the thin metal plate should be 0 5mm or less 4 3 4 Removal of Key Door Spring Remove pin hinge from Door E Detach spring from Door E and key door 4 3 2 Removal of Door C 4 3 3 Removal of Door E Door C Door A Door E Key Door Spring Door E Upper Hin...

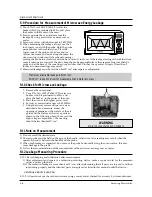
Page 8: ...ve motor and coupler 7 When replacing the drive motor be sure to remount it in the correct position with the coupler 8 Connect all the leads to the drive motor 9 Screw the drive motor cover to the base plate with a screw driver 4 4 Replacement of Fuse 4 5 Replacement of Drive Motor Screw Drive Motor Cover Base Plate Drive Motor 4 3 6 Reassembly Test After replacement of the defective component par...

Page 9: ...static electricity from your body and avoid touching the Touch control clrcuitry 2 Disconnect the connectors from the control circuit board 3 Remove screws securing the control circuit bord 4 Lift up the control circuit board from right side and remove the hooks holding the contol circuit board to the box assembly SCREWS ...

Page 10: ...ween each filament terminal and magnetron case should read open 1 The low voltage transformer is located on the control circuit board 2 Remove the low voltage transformer from the PCB Ass y and check continuity 3 Normal resistor reading is shown in the table PRECAUTION 1 High voltage is present at the high voltage terminals during any cook cycle 2 It is neither necessary nor advisable to attempt m...

Page 11: ... oven assembly adjust the Latch Body by moving it so that the oven door will not have any play in it Check for play in the door by pulling the door assembly Make sure that the latch keys move smoothly after adjustment is completed Completely tighten the screws holding the Latch Body to the oven assembly 4 Reconnect to Monitor switch and check the continuity of the monitor circuit and all latch swi...

Page 12: ...ONDUCTING MICROWAVE ENERGY The output power of the magnetron can be measured by performing a water temperature rise test Equipment needed Two 1 liter cylindrical borosilicate glass vessel Outside diameter 190 mm One glass thermometer with mercury column NOTE Check line voltage under load Low voltage will lower the magnetron output Make all temperature and time tests with accurate equipment 1 Fill ...

Page 13: ...pair of a radiarion preventing device make a repair record for the measured values and keep the data 2 If the radiation leakage is more than 4 mW cm2 after determining that all parts are in good condition functioning properly and the identical parts are replaced as listed in this manual notift that fact to CENTRAL SERVICE CENTER 5 13 2 At least once a year have the microwave energy survey meter ch...

Page 14: ...witch 3 Defective monitor switch NOTE1 4 Shorted HVCapacitor 5 Shorted HVTransformer NOTE2 NOTE 1 All of these switches must be replaced at the same time refer to adjustment instructions Check continuity of power relay contacts and if it has continuity replace power relay also NOTE 2 When HVTransformer is replaced check diode and magnetron also Oven does not accept 1 Key input is not in Sequence R...

Page 15: ...d 1 Loose fan and fan motor Tighten screws of fan motor 2 Loose screws on H V Transformer Tighten screws of H V Transformer 3 Shorted H V Diode Replace H V Diode Turntable motor does not rotate 1 Open or loose wiring of turntable motor Check the wire of turntable motor 2 Defective turntable motor Replace turntable motor Oven stops operation during cooking 1 Open or loose wiring of primary Adjust d...

Page 16: ...7 1 M1 M2 M3 M54 M53 M48 M27 M28 M5 M39 M40 M41 M42 M43 M38 M37 M36 M46 M56 M58 M59 M60 M61 M65 M66 M47 M50 M49 M51 M45 M44 M62 M63 M64 M52 M55 M4 M6 M7 M9 M8 M10 M11 M13 M14 M17 M15 M20 M18 M67 M68 M19 M26 M25 M24 M29 M21 M22 M23 M57 M16 M12 M30 M31 M33 M34 M35 NC NO COM ...

Page 17: ...093A ASSY NOISE FILTER SN E10D 250V 10A 1 M 19 DE31 10156A MOTOR FAN SMF 945EA 230 50 2400 M97G45 1 M 20 DE39 40758A WIRE HARNESS A 230V50HZ CK95 1 M 21 DE62 90102A ADIABATIC RIGHT SUPER FINE INSULATIO T3 W213 3 1 M 22 DE71 60447A COVER ADIABATIC SECC T0 6 W220 3 L305 1 CK95 1 M 23 DE74 20022A TRAY OIL GLASS NEOREX T5 P1210 600G 1 CK97B CK98F M 24 DE47 20009A THERMOSTAT PW2N 520PB 160 60 250V 7 5A...

Page 18: ...3 DE39 40409A WIRE HARNESS E 230V50HZ M9G45 CTW 1 M 54 DE39 40759A WIRE HARNESS B 230V50HZ CK95 1 M 55 DE47 20009A THERMOSTAT PW2N 520PB 160 60 250V 7 5A M 1 M 56 DE92 40215A ASSY DOOR CK95 WHT 1 M 57 DE93 30577A ASSY CONTROL BOX 230V50Hz CK95 WHT 1 M 58 DE74 20105B TRAY CRUSTY T5 P1300 H30 830G TEFLON COAT 1 CK96T CK98F M 59 DE74 20015B TRAY COOKING GLASS T6 0 PI318 1050G MW5630T 1 M 60 DE92 9018...

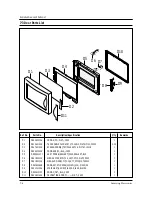
Page 19: ... DE67 20184A SCREEN DOOR B TEMP GLASS T3 2 W376 7 L241 8 1 D 4 DE64 40320A DOOR SUB PC BLK CK95 1 D 5 DE92 50127J ASSY DOOR E SEALANT CK95 SEALANT BLK 1 D 6 DE61 80002A HINGE UPPER SCP1 T2 3 26 77 ZPC3 WHT CE945 1 D 7 DE61 80003A HINGE LOWER SCP1 T2 3 26 77 ZPC3 WHT CE945 1 D 8 DE64 40264B DOOR KEY NYLON 66 2021SW 40G M959 XS 1 D 9 DE61 70148A SPRING KEY HSWR3 PI6 0 D0 8 L34 4 BLUING 1 D 10 DE64 4...

Page 20: ...1 C 2 DE66 20276A BUTTON MORE PC WHT CK95 1 C 3 DE66 20277A BUTTON DEFROST PC WHT CK95 1 C 4 DE66 20278A BUTTON SELECT A PC WHT CK95 1 C 5 DE66 20280A BUTTON SELECT B PC WHT CK95 1 C 6 DE66 20279A BUTTON CANCEL PC WHT CK95 1 C 7 DE72 70206A CONTROL PANEL PC WHT CK95 1 C 8 DE91 10565A ASSY PCB MAIN RC CK95 00 230V50HZ VFD CK95 1 C 9 DE64 10132C KNOB PC WHT PI28 CK95 1 C 10 DE93 30583A ASSY CONTROL ...

Page 21: ...ER CONVECTION 230V 1680W 30 7 7 1 4 DE61 50484A BRACKET HEATER STS430 T0 8 W27 2 L26 CE115K 2 5 DE92 90487A ASSY COVER CASING CE115K 230V50HZ 1 6 DE62 90098B ADIABATIC CASING T8 W245 L336 8 CK95 1 7 DE72 30016B BUSH MOTOR MSWR3 D5 6 L15 7 CE115K ZP3 1 9 DE31 90020A BLADE FAN ALSTAR T0 6 W250 L250 1 8 DE60 40026B WASHER PLAIN ID5 5 OD12 T1 0 SBC1 ZNC3 1 9 DE31 90020A BLADE FAN ALSTAR T0 6 W250 L250...

Page 22: ...60 10082H SCREW A 2S 4X12 TOOTHED 2 CN BOX DE60 10082H SCREW A 2S 4X12 TOOTHED 2 LATCH DE60 10082H SCREW A 2S 4X12 TOOTHED 5 PN OUT DE60 10098A SCREW ASSY TAP TITE PH TC M4X8 SWRCH18A ZPC2 GLD W 1 CV TCO DE60 10098A SCREW ASSY TAP TITE PH TC M4X8 SWRCH18A ZPC2 GLD W 2 M DRIV DE60 10122A SCREW TAP TH TAP TH 2 4X8 FE FN 2 C CEIL DE60 20063A BOLT FLANGE M4 10 ZPC3 YEL MSWR 2 HI LOW DE60 20063A BOLT F...

Page 23: ...8 P C B Diagrams 8 1 P C B Diagrams Samsung Electronics 8 1 ...

Page 24: ...5 1 8W AA TP 1 R32 P20 2001 000780 R CARBON 470OHM 5 1 8W AA TP 3 R01 R02 R17 P21 2001 000786 R CARBON 47KOHM 5 1 8W AA TP 8 R24 R25 R26 R27 R28 R29 R30 R31 P22 2001 000904 R CARBON 620OHM 5 1 8W AA TP 1 R19 P23 2001 001102 R CARBON S 200OHM 5 1 2W AA TP 3 R03 R04 R05 P24 2004 000195 R METAL 100Kohm 1 1 8W AA TP 1 8x3 2m 1 R13 P25 2004 000900 R METAL 4 7Kohm 1 1 8W AA TP 1 8x3 2m 1 R12 P26 2202 00...

Page 25: ...RG ORG BRN RED WHT YEL BRN COM 0V GRILL RELAY YEL WHT WHT BLU BLU CONV HEATER CONV RELAY FM H V T H V D H V C MONITER FUSE 1 6A H V FUSE 0 8A 1mH L V T PRIMARY LATCH SWITCH DOOR SENSING SWITCH MONITOR SWITCH KEY BOARD CONDITION OF OVEN DOOR IS OPENED BRN BROWN WHT WHITE RED RED Y G YELLOW GREEN BLU BLUE ORG ORANGE YEL YELLOW PNK PINK COOK OFF WIRING COLOR A S S Y M A I N P C B Thermistor Sensor Th...

Reviews: