background image

31

Title/Chapter/Time Selection

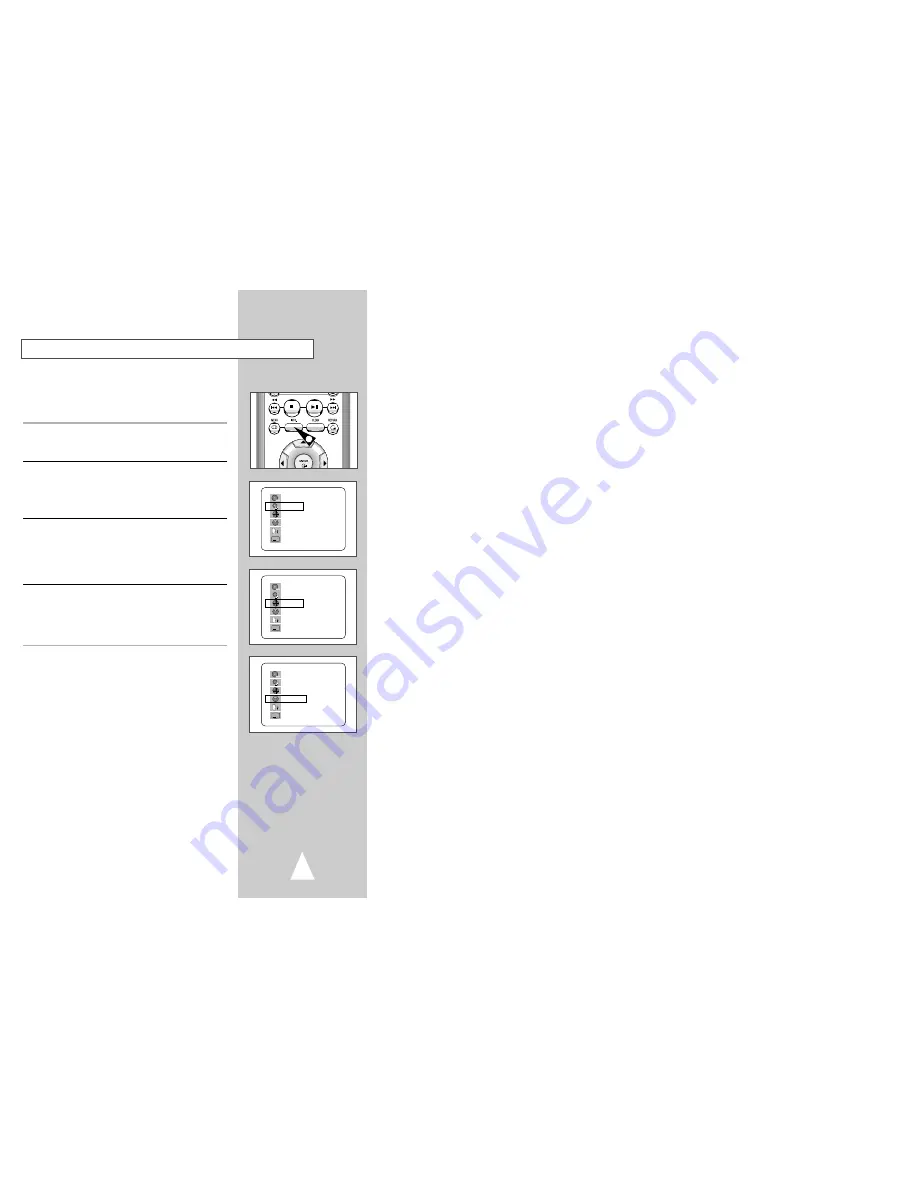
If you press the INFO. button during DVD playback, you can view
the current Title, Chapter/Track, and counter position. You can
also use this screen as shortcut to select any Title, Chapter/Track,
or counter position on the disc.

1

View DVD/CD INFO.

Press the INFO. button on the remote control during DVD/CD
playback.

2

Select Title

Press the up/down and left/right buttons to select Title, then press
ENTER to change among all available titles on the disc.

•  The “TITLE” icon will light on the Front Panel Display, followed by

the current title number, hours, minutes, and seconds.

3

Select Chapter or Track

Press the up/down and left/right buttons to select Chapter or Track,
then press ENTER to change among all available Chapters/Tracks
on the disc.

•  The “CHAP” icon will light on the Front Panel Display, followed

by the current title number, hours, minutes, and seconds.

4

Select Counter Position

Press the up/down and left/right buttons to select the counter
position indicator, then use the number buttons (0-9) to enter the
desired counter position in the format HH:MM:SS (H = Hours, M =
Minutes, S = Seconds). 
Then press ENTER to enter the desired counter position.

1

A

DVD

T : 01

C : 02

0 : 01 : 09

ENG 5.1CH

ENG

➛❿

A

DVD

T : 01

C : 02

0 : 01 : 09

ENG 5.1CH

ENG

➛❿

A

DVD

T : 01

C : 02

0 : 01 : 09

ENG 5.1CH

ENG

Summary of Contents for CHT-420

Page 1: ...Instruction Manual CHT 420 Unit DVD CM420 Speakers SP 420 ...

Page 2: ...rsing the plug If the plug should still fail to fit contact your electrician to replace your obsolete outlet Do not defeat the safety purpose of the polarized plug 13 Alternate Warnings This produck is equipped with a three wire grounding type plug a plug having a third grounding pin This plug will only fit into the outlet contact your electrician to replace your obsolete outlet Do not defeat the ...

Page 3: ...h System 41 8 VCR Recording 42 Basic Recording 42 Special Recording Features 43 One Touch Recording OTR 44 Record Speed 44 4 Table of Contents Safety 2 Safety Instructions 2 Welcome 7 Feature Summary 7 Unpacking 7 Disc Type and Characteristics 8 1 System Overview 9 Front Panel Overview 9 Front Panel Display 9 Rear Panel 10 Remote Control Overview 11 Insert Remote Control Batteries 11 Using the TV ...

Page 4: ... 8 event 1 month timer recording Time remaining counter real time counter Speakers 2 Way Front Surround speakers Center speaker with 2 3 8 full range driver Subwoofer with 8 driver Note Discs which cannot be played with this player Ability to play back may depend on recording DVD ROM DVD RAM conditions CD ROM CDV DVD R CD RW CDI DVD RW RW HD layer of super Audio CD CDGs play audio only not graphic...

Page 5: ...ollowing types of discs with the corresponding logos DIGITAL SOUND STEREO NTSC Play Region Number NTSC broadcast system in U S A Canada Korea Japan etc Dolby Digital disc Stereo disc Digital Audio disc DTS disc MP3 disc Both the DVD player and the discs are coded by region These regional codes must match in order for the disc to play If the codes do not match the disc will not play The Region Numb...

Page 6: ...SPEAKER 16 SCREEN FIT 17 TITLE SPEED 18 MODE REPEAT 19 TV POWER 20 0 9 21 ZOOM ATR 22 FM AM SELECT 23 TV SELECT 24 AMP VOLUME 25 CH TRK 26 AUDIO 27 INPUT SEL 28 FAST FORWARD SKIP NEXT 29 PLAY PAUSE 30 RETURN 31 CLEAR 32 UP 33 ENTER 34 RIGHT 35 TV VCR 36 DOWN 37 SOUND EFFECT 38 SOUND MODE 39 DISC MENU 40 SUBTITLE TIMER 41 MARK SEARCH 10 Rear Panel 1 RADIO FM ANTENNA INPUT 2 RF ANTENNA INPUT 3 LINE ...

Page 7: ...on the remote control or on the DVD VCR s front panel 5 Turn On TV Press the POWER button on your TV 6 Set TV to Channel 3 4 or Line Be sure to use the same channel you selected in Step 2 If you used the Line Connection set your TV to its Line Input RADIO ANT AM FM 75 COAXAL IN FROM ANT OUT TO TV RF VIDEO AUDIO DVD VCR LINE IN 1 LINE IN 2 LINE OUT R L RADIO ANT AM FM 75 COAXAL IN FROM ANT OUT TO T...

Page 8: ... panel when you want to control the VCR deck The VCR indicator will light on the Front Panel Display to show that the VHS deck is selected 4 INPUT SEL Button Press the INPUT SEL button repeatedly to cycle through all of your input sources including the Tuner Ch Line 1 Line 2 Deck Control Buttons 2 3 4 1 1 3 OPEN CLOSE REC S MODE S EFFECT 1 3 4 OPEN NES REC S MODE S EFFECT Follow these instructions...

Page 9: ...French or Spanish 1 Open MENU With the DVD in stop mode press the MENU button 2 Set Language Using the Up Down and Left Right buttons move the selection arrow to Language Idioma Langue then press ENTER button 3 Set menu Language Move the selection bar to your desired Language then press ENTER button The on screen menu system allows you to set all functions for your DVD VCR The following buttons ar...

Page 10: ...R Tuner Band Setting This feature allows you to manually set the DVD VCR s tuner band to Antenna or Cable whichever you connected to the Antenna In jack during initial setup Use this setting only if Auto Setup detected the incorrect tuner band i e channels are coming in on the wrong channel numbers 1 Open MENU With the DVD in stop mode press the MENU button 2 Select Install Using the up down and l...

Page 11: ...ve the selection bar to Channel add delete then press ENTER to select 5 Select Channel to add delete Use the CH buttons to tune in the channel number you wish to add or remove 6 Select Channel add delete Press right to add or press left to remove the channel from your channel list Repeat steps 4 and 5 to add or remove additional channels CHANNEL SETUP Ant Cable Cable TV Auto channel memory Channel...

Page 12: ...D VCR will automatically default to the language you choose if it is available on a given DVD 1 Open MENU With the DVD in stop mode press the MENU button 2 Select DVD Using the up down and left right buttons move the selection cursor to DVD Setup then press ENTER to select 3 Select Disc Menu Move the selection bar to Disc Menu then press ENTER to select 4 Set Disc Menu Language Preference Move the...

Page 13: ...the level you select will also be blocked e g if you block Level 6 then Levels 7 and 8 will also be blocked Press ENTER to confirm your selection If you forgot your password press power on from a cold start with no disc in the unit Press the REW and F F buttons simultaneously on the front panel for 5 seconds The reset ok message will appear Press the power button and the DVD VCR will go to the Aut...

Page 14: ...ic Parental Unlocked Audio Options Display Options RETURN ENTER DISPLAY OPTIONS TV Aspect Wide Black Level Low Alt Video Out S Video RETURN ENTER TV ASPECT 4 3 Letter Box 4 3 Pan Scan 16 9 Wide Dynamic Compression Dynamic Compression constrains the dynamic range i e the difference between the quietest and loudest passages of a DVD soundtrack This enables you to limit loud noises such as explosions...

Page 15: ...e reference level of black in the video signal to one of two choices Low Standard NTSC black level Yields consistent contrast through all sources High Enhanced black level for increased contrast during DVD playback 1 Open MENU With the DVD in stop mode press the MENU button 2 Select DVD Using the up down and left right buttons move the selection cursor to DVD Setup then press ENTER to select 3 Set...

Page 16: ... the Disc menu 4 TITLE Button Press to access the DVD s Title menu if applicable 1 SCREEN FIT Button During play press SCREEN FIT button on the remote control Allows you to eliminate the black bars in the top and bottom of the screen when a movie is playing in the Widescreen format 16 9 Screen Fit will not work when the Zoom mode is active you can not remove the black bars on the screen However Zo...

Page 17: ...d by the current title number hours minutes and seconds 3 Select Chapter or Track Press the up down and left right buttons to select Chapter or Track then press ENTER to change among all available Chapters Tracks on the disc The CHAP icon will light on the Front Panel Display followed by the current title number hours minutes and seconds 4 Select Counter Position Press the up down and left right b...

Page 18: ...agnifying Glass During Playback or Still mode press the ZOOM button to display the Magnifying Glass icon on the screen 2 Position Magnifying Glass Use the buttons to move the magnifying glass to any position on the screen you want to zoom 3 Zoom In Press the ENTER button repeatedly to zoom in at 2X 4X 2X and normal magnification Zoom 1 Angle Some DVDs allow you to view the same scene from differen...

Page 19: ...r track 4 Select Title Press the left right buttons to select Title Title will highlight when Title Repeat is selected 5 Repeat Title Press the ENTER button to repeat the title disc Repeat Chapter Title Audio 1 1 DVD CD A B Repeat The A B Repeat function allows you to repeat any segment of a DVD or CD Simply mark the beginning point A and the ending point B of the segment you want to review 1 Sele...

Page 20: ... playback mode press the CLEAR button on the remote control to cancel Programmed Play 1 PROGRAM 01 Track 01 02 03 04 05 06 07 08 09 10 11 12 13 14 15 16 Program Order 01 PROGRAM 02 Track 01 02 03 04 05 06 07 08 09 10 11 12 13 14 15 16 Program Order 01 RETURN CLEAR ENTER PLAY RETURN CLEAR ENTER PLAY Random Playback CD You can insert up to three Bookmarks on your DVDs so you can jump quickly to your...

Page 21: ... Your DVD VCR can playback MP3 files burned onto a CD R disc 1 Insert Disc Insert a CD R with MP3 files into the DVD deck The MP3 main menu will appear after a few seconds and the first song on the disc will begin playing 2 Select Folder Press the up down buttons to select the folder on the CD R which contains the MP3 files you want to hear then press Enter to select If there are more than 8 folde...

Page 22: ...pe Length Press the left button to select the video cassette length This information is usually printed on the tape box The menu cycles through T120 T160 or T180 Once the type of cassette is set the VCR can display the amount of time remaining on the tape when you press the INFO button 5 Auto Repeat In the VCR Function Setup Auto Repeat sets the VCR to play a tape repeatedly unless a tape control ...

Page 23: ...the PLAY button to view that program If you don t press PLAY the VCR automatically searches for the next index or until the end of the tape is reached 2 Go to 0 00 00 stop Use this feature when you want to search for the 0 00 00 counter position on a cassette Press the CLEAR button at the point on the tape where you want to set the counter to 0 00 00 Later while a cassette is stopped press up arro...

Page 24: ...C button repeatedly see page 45 NOTE Be sure you videotape has a Record Safety Tab If the tab is missing you can cover the opening with a small piece of tape Warning Do not cover this opening unless you are sure you want to record over the tape Before You Begin Power on the DVD VCR Power on the TV Set the TV to channel 3 or 4 1 Insert Tape Insert a blank VHS tape into the VCR deck Make sure the ta...

Page 25: ...y week Daily MO FR You can record TV programs on the same channel at the same time every day Monday through Friday MAIN MENU Set Timer Recording RETURN ENTER Program Clock Install Exit DVD VCR Options Language Program CH START END DATE SPD _ _ _ _ _ _ _ _ _ _ _ _ _ _ _ _ _ _ _ _ _ _ _ _ _ _ _ _ _ _ _ _ _ _ _ _ _ _ _ _ _ _ _ _ _ _ _ _ _ _ _ _ _ _ _ _ _ _ _ _ _ _ _ _ _ _ _ _ _ _ _ _ _ _ _ _ _ _ _ _ ...

Page 26: ... 2 AM antenna connections Connect the AM loop antenna to the AM and terminals on the back of the unit Rotate the loop antenna until you have the best reception The S Video or Component Video connection is only for the DVD player The tuner and VCR will still be viewed through the RF or line inputs You must follow the Alt Video Out instructions on page 28 to activate your alternative S Video Compone...

Page 27: ...ed The LINE OUT AUDIO will be output continuously while the Headphone is connected MAIN MENU Installation RETURN ENTER Program Clock Install Exit DVD VCR Options Language Install INSTALLATION Channel setup Volume light Auto RETURN Auto On Connect the front center and surround speakers and the subwoofer to the speaker terminals on the back of the main unit 1 Connect the speakers to the speaker outp...

Page 28: ...o the distance of Ds set the delay time to 0 ms Otherwise change the value according to the table shown on the right B Df Ds 1 Center speaker Place the speaker directly over or under the TV But ideally the center speaker should be positioned with the top surface flush with the front speakers 2 Front speakers Place the front speakers so that their tweeters high range are aligned at about the same h...

Page 29: ... using other connections Dolby Pro Logic II is a new format for playing multichannel audio signals that offers improvement over conventional Dolby Pro Logic It can be used to decode not only sources recorded in Dolby Surround but also regular stereo sources into five channels front left right center and surround left right In addition various parameters can be set according to the type of source a...

Page 30: ... 2 LINE OUT R L You can automatically or manually tune in to FM and AM stations to listen to radio broadcasts 1 Press the FM AM button Each time you press the button the frequency band alternates between FM and AM 2 Tune in to a station Automatic tuning Hold down l l to begin the automatic tuning Manual tuning Press l to tune in to a lower frequency or press l to tune in to a higher frequency The ...

Page 31: ...EM ENVIRONMENT 41 104ºF 5 40ºC 10 75 humidity WEIGHT 13 0 lbs Combo 22 5 lbs SPEAKER 35 5 lbs FM AM RECEIVER SENSITIVITY 15 dB 64 dB S N RATIO 60 dB 35 dB THD 0 5 2 FREQ RESPONSE 20 Hz 20 kHz AMP S N RATIO 75 dB CHANNEL SEPERATION 50 dB Connecting Other Video Equipment You can connect a wide variety of audio video equipment to your DVD VCR including An additional VCR Laser Disc Player DVD Player C...

Page 32: ... FRONT CENTER SURROUND SUBWOOFER SPEAKER IMPEDANCE 6Ω X 5 3Ω FREQ RESPONSE 55Hz 23kHz 30Hz 400Hz O S L 87dB W M 86dB W M SIZE FRONT SURROUND 100 W x129 D x100 H 250 W x 250 D x 380 H CENTER 150 W x129 D x100 H WEIGHT FRONT SURROUND 1 59 lbs x 4 6 36 lbs 13 0 lbs CENTER 2 4 lbs ...

Reviews: