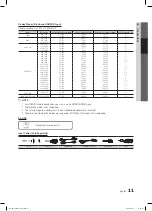
background image

16

English

Basic Features

Changing the Picture Options


¦

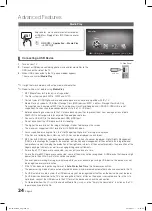
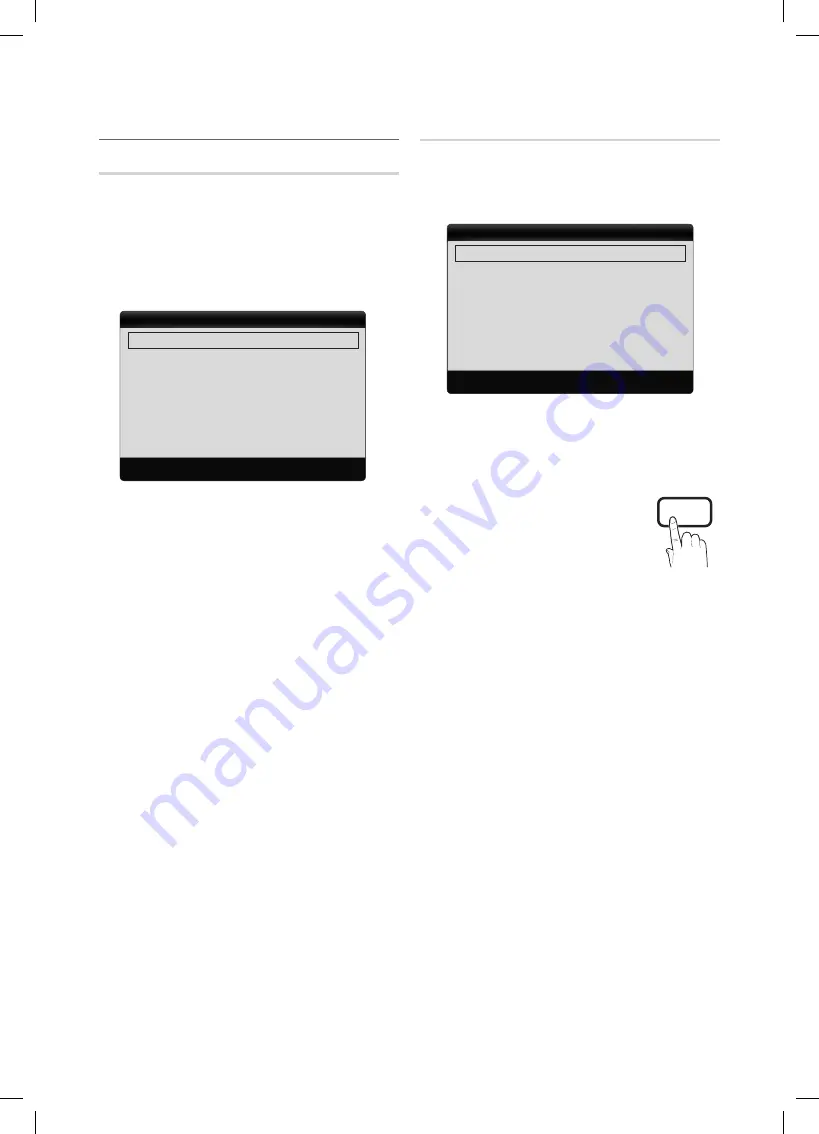
Advanced settings

MEnU


O

m


Picture


Advanced settings


EnTER

E

(available in 

standard / Movie

 mode)

Compared to previous models, new Samsung TVs have a 
more precise picture.

In PC mode, you can only make changes to 


Dynamic 

Contrast, 

gamma

 and 

White Balance

.

Black Tone (Off / Dark / Darker / Darkest)


: Select the 

black level to adjust the screen depth.

Dynamic Contrast (Off / low / Medium / high)


:  

Adjust the screen contrast. 

shadow Detail


: Increase the brightness of dark images.

Disabled under PC mode.


gamma


: Adjust the primary color intensity.

RgB Only Mode (Off / Red / green / Blue)


: Displays the 

Red, Green and Blue color for making fine adjustments to 

the hue and saturation.

Color space (Auto / native)


: Adjust the range of colors 

available to create the image. 

White Balance


: Adjust the color temperature for a more 

natural picture.

R-Offset / g-Offset / B-Offset

: Adjust each color's (red, 

green, blue) darkness.

R-gain / g-gain / B-gain 

: Adjust each color's (red, 

green, blue) brightness.

Reset

: Resets the 

White Balance

 to it's default settings.

Flesh Tone


: Emphasize pink "flesh tone".

Edge Enhancement (Off / On)


: Emphasize object 

boundaries. 

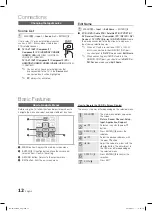
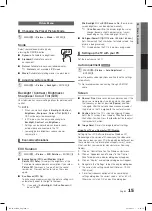
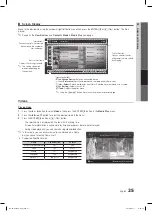
Picture Options

MEnU


O

m


Picture


Picture Options


EnTER

E

In PC mode, you can only make changes to the 


Color 

Tone, size 

and 

Auto Protection Time

.

Color Tone (Cool / normal / Warm1 / Warm2) 


Warm1


 or 

Warm2

 will be deactivated when the 

picture mode is 

Dynamic

.

Settings can be adjusted and stored for each 


external device connected to an input on the TV.

size


: Your cable box/satellite receiver may 

have its own set of screen sizes as well. 
However, we highly recommend you use 
16:9 mode most of the time.

16:9

: Sets the picture to 16:9 wide mode.

Zoom1

: Use for moderate 

magnification.

Zoom2

: Use for a stronger magnification.

Wide Fit

: Enlarges the aspect ratio of the picture to fit 

the entire screen.

4:3

: Sets the picture to basic (4:3) mode.

Do not watch in 4:3 format for a long time, traces 


of borders displayed on the left, right and center 
of the screen may cause image retention(screen 
burn) which are not covered by the warranty.

screen Fit

: Displays the full image without any cut-off 

when HDMI (720p / 1080i / 1080p) or Component 
(1080i / 1080p) signals are input.

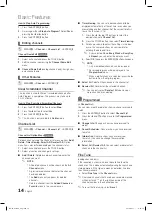
nOTE


After selecting 


x

Zoom1, Zoom2

 or 

Wide Fit

1.  

Press the 

 button to select 

Position

.

2. 

 Press the 

EnTER

E

 button. 

3. 

Press the 

 or 

 button to move the picture up 

or down.

4. 

Press the 

EnTER

E

 button. 

5. 

Press the 

 button to select 

Reset

.

6. 

Press the 

EnTER

E

 button to reset the picture 

to its default position. 

Advanced Settings

Black Tone  

: Off 


Dynamic Contrast 

: Medium

Shadow Detail 

: 0

Gamma 

: 0

RGB Only Mode 

: Off

Color Space 

: Native

White Balance

U

 Move   

 E

 Enter    

R

 Return

P

POWER

FAV.CH

CHLIST

MEDIA.P

P.MODE

S.MODE

P.SIZE

CC

MTS

INFO

SLEEP

TOOLS

Picture Options

Color Tone 

: Normal 


Size 

: 16:9

Digital Noise Filter  

: Auto

MPEG Noise Filter 

: Auto

HDMI Black Level 

: Normal

Film Mode 

: Off

Auto Protection Time  

: 2 hours

U

 Move    

E

 Enter   

 R

 Return

BN68-02540A_Eng.indb   16

2010-08-31   �� 4:20:39

Summary of Contents for BN68-02540A-04 BN68-02540A-04

Page 1: ...unta o comentario en relación con los productos de Samsung comuníquese con el centro de atención al cliente de SAMSUNG Country Customer Care Center Web Site Address CANADA 1 800 SAMSUNG 726 7864 www samsung com Samsung Electronics Canada Inc Customer Service 55 Standish Court Mississauga Ontario L5R 4B2 Canada Samsung Electronique Canada Inc Service à la Clientèle 55 Standish Court Mississauga Ont...

Page 2: ...iginal Purchaser only The above described warranty repairs must be performed by a SAMSUNG Authorized Service Center Along with this Statement the Original Limited Warranty Statement and a dated Bill of Sale as Proof of Purchase must be presented to the Service Center Transportation to and from the Service Center is the responsibility of the purchaser Conditions covered are limited only to manufact...

Page 3: ... 17 Sound Settings 17 Setup Menu y y 18 Setting the Time 18 Using the Sleep Timer 19 Setting the On Off Timer 19 Locking Programs 19 Other Features 21 Picture In Picture PIP 22 Support Menu y y 22 Advanced Features Media Play y y 24 Connecting a USB Device 24 Screen Display 25 Playing Multiple Files 28 Media Play Additional Functions 28 Anynet y y 30 Setting Up Anynet 31 Switching between Anynet D...

Page 4: ...apes may vary depending on the models Remote Control BN59 00996A Batteries AAA x 2 y y Owner s Instructions y y Warranty Card Safety Guide Quick Setup Guide y y Cleaning Cloth BN63 01798B y y Power Cord y y 46 inch TV Blanking Bracket BN63 06339A y y LN32C530 BN63 06389A Holder Ring 4ea y y BN61 04529A Installing the LCD TV Stand Components When installing the stand use the provided components and...

Page 5: ...ld use the ENTERE button on the remote control MENU Displays an on screen menu the OSD on screen display of your TV s features y Adjusts the volume In the OSD use the y buttons as you would use the and buttons on the remote control z Changes the channels In the OSD use the z buttons as you would use the and buttons on the remote control Power Indicator Blinks and turns off when the power is on and...

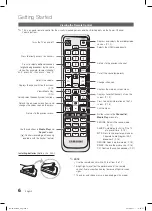
Page 6: ...hen press and 3 Adjusts the volume Turns the TV on and off Use these buttons in Media Play and Anynet modes controls recording on Samsung recorders with the Anynet feature Press to directly access to channels Press to display information on the TV screen P 18 Changes channels Returns to the previous channel Cut off the sound temporarily Displays the main on screen menu Exit the menu Buttons used i...

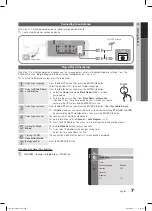
Page 7: ...utton on the TV When you see the volume in the OSD press and hold MENU for 5 sec 3 Selecting an antenna Press the or button then press the ENTERE button Select Air Cable or Auto In Cable mode you can select the correct signal source among STD HRC and IRC by pressing the or button then press the ENTERE button 4 Selecting a channel The channel search will start automatically For more information ref...

Page 8: ...equired for audio The picture may not display normally if at all or the audio may not work if an external device that uses an older x x version of HDMI mode is connected to the TV If such a problem occurs ask the manufacturer of the external device about the HDMI version and if out of date request an upgrade Be sure to purchase a certified HDMI cable Otherwise the picture may not display or a conn...

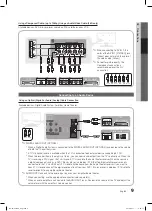
Page 9: ...DVD Blu ray player cable box STB satellite receiver directly to an amplifier or home theater AUDIO OUT Connects to the audio input jacks on your amplifier home theater When connecting use the appropriate connector sold separately x x When an audio amplifier is connected to the x x AUDIO OUT jacks Decrease the volume of the TV and adjust the volume level with the amplifier s volume control DVD Home...

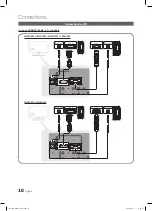
Page 10: ... Y AUDIO OUT R AUDIO L PR PB Y AUDIO OUT Connecting to a PC Using an HDMI DVI Cable a D sub Cable R AUDIO L PR PB Y DVI OUT R AUDIO L PR PB Y PC OUT R AUDIO L PR PB Y DVI OUT R AUDIO L PR PB Y PC OUT LN32C530 LN37C530 LN40C530 LN46C530 LN40C540 LN46C540 BN68 02540A_Eng indb 10 2010 08 31 4 20 35 ...

Page 11: ... 75 000 1024 x 768 60 023 75 029 78 750 1152 x 864 67 500 75 000 108 000 1280 x 1024 63 981 60 020 108 000 1280 x 1024 79 976 75 025 135 000 1280 x 800 49 702 59 810 83 500 1280 x 800 62 795 74 934 106 500 1280 x 960 60 000 60 000 108 000 1280 x 720 45 000 60 000 74 250 1360 x 768 47 712 60 015 85 500 1440 x 900 55 935 59 887 106 500 1440 x 900 70 635 74 984 136 750 1680 x 1050 65 290 59 954 146 2...

Page 12: ...I IN 1 DVI port you should set to DVI PC or DVI Devices mode under Edit Name FAV CH MEDIA P P MODE S MODE P SIZE CC MTS SLEEP TOOLS How to Navigate Menus Before using the TV follow the steps below to learn how to navigate the menu and select and adjust different functions PRE CH CHLIST HDMI TOOLS MEDIA P FAV CH INFO P MODE S MODE P SIZE CC SLEEP MTS MENU RETURN EXIT 1 2 3 4 1 MENU button Displays ...

Page 13: ...Channel Channel List ENTERE Add to Favorite Delete from Favoritet Set channels you watch frequently as Favorites 1 Select a channel and press the TOOLS button 2 Add or delete a channel using the Add to Favorite or Delete from Favorite menu respectively Memorizing channels MENU O O m Channel ENTERE Antenna Air Cable t Before your television can begin memorizing the available channels you must speci...

Page 14: ...nother channel Set the current time first to use this function P 18 1 Press the buttons to select the desired channel in Channel List 2 Press the TOOLS button then select Timer Viewing 3 Scroll up or down to adjust the settings in the box or use the numeric buttons on your remote for entering the date and time If you selected Once Every Week or Every Day in Repeat you can enter the date you want 4...

Page 15: ...y No Signal Power Off Off 15 min 30 min 60 min Sets how quickly the TV switches to standby mode if no picture is being received Disabled when the PC is in power saving mode Setting up the TV with your PC Set the input source to PC Auto Adjustment t MENU O O m Picture Auto Adjustment ENTERE Adjust frequency values positions and fine tune the settings automatically Not available when connecting thro...

Page 16: ...e mode is Dynamic Settings can be adjusted and stored for each external device connected to an input on the TV Size Your cable box satellite receiver may have its own set of screen sizes as well However we highly recommend you use 16 9 mode most of the time 16 9 Sets the picture to 16 9 wide mode Zoom1 Use for moderate magnification Zoom2 Use for a stronger magnification Wide Fit Enlarges the aspe...

Page 17: ...een depth Available only in HDMI mode RGB signals Film Mode Off Auto1 Auto2 Sets the TV to automatically sense and process film signals from all sources and adjusts the picture for optimum quality Available in TV AV COMPONENT 480i 1080i and HDMI 480i 1080i Auto Protection Time 2 hours 4 hours 8 hours 10 hours Off If the screen remains idle with a still image for a certain period of time defined by...

Page 18: ...nal Speaker On x x If there is no video signal both speakers will be mute SPDIF Output SPDIF Sony Philips Digital Interface is used to provide digital sound reducing interference going to speakers and various digital devices such as an A V Receiver Home theater Audio Format During the reception of a digital TV broadcast you can select the Digital Audio output SPDIF format from the options PCM or D...

Page 19: ...r function does not operate correctly When there is only one photo file in the USB the Slide Show will not play If a folder name is too long the folder cannot be selected Each USB you use is assigned its own folder When using more than one of the same type of USB make sure the folders assigned to each USB have different names Repeat Select Once Everyday Mon Fri Mon Sat Sat Sun or Manual to set at ...

Page 20: ...Adult programming The V Chip will automatically block any category that deals with more sensitive material For example if you block the G category then PG 14 and 18 will automatically be blocked Canadian French You can block TV programs depending on their French Canadian rating G General 8 ans Programming generally considered acceptable for children 8 years and over to watch on their own 13 ans Pr...

Page 21: ...e Default White Black Red Green Blue Yellow Magenta and Cyan You can change the color of the letter The default is White Background Color Options include Default White Black Red Green Blue Yellow Magenta and Cyan You can change the background color of the caption The default is Black Foreground Opacity This adjusts the opacity of text Options include Default Transparent Translucent Solid and Flash...

Page 22: ...ou can choose the desired sound Main or Sub in PIP mode Support Menu MENU O O m Support ENTERE Self Diagnosis Picture Test Use to check for picture problems If the problem continues to occur check the Color pattern Yes If the test pattern does not appear or there is noise in the test pattern select Yes There may be a problem with the TV Contact Samsung s Call Center for assistance 1 800 SAMSUNG No...

Page 23: ...lly after completing the firmware upgrade When software is upgraded video and audio settings you have made will return to their default settings We advise you to write down your settings so that you can easily reset them after the upgrade Alternative Software Not available HD Connection Guide Refer to this information when connecting external devices to the TV Contact Samsung View this information...

Page 24: ...te cannot be played Digital Rights Management x x DRM is a technology that supports the creation distribution and management of the content in an integrated and comprehensive way including the protection of the rights and interests of the content providers the prevention of the illegal copying of contents as well as managing billings and settlements If more than 2 PTP devices are connected you can...

Page 25: ...are not displayed During video playback you can search using and button In this mode you can enjoy movie clips contained on a Game but you cannot play the Game itself Supported Subtitle Formats y y Name File extension Format MPEG 4 time based text ttxt XML SAMI smi HTML SubRip srt string based SubViewer sub string based Micro DVD sub or txt string based Movie 01 avi 00 04 03 00 07 38 1 1 SUM EPaus...

Page 26: ...2 1920x1080 24 25 30 30 mpg mpeg PS MPEG1 1920x1080 24 25 30 30 AC3 MPEG LPCM AAC MPEG2 1920x1080 24 25 30 30 H 264 1920x1080 6 30 25 ts tp trp TS MPEG2 1920x1080 24 25 30 30 AC3 AAC MP3 DD HE AAC H 264 1920x1080 6 30 25 VC1 1920x1080 6 30 25 Other Restrictions NOTE If there are problems with the contents of a codec the codec will not be supported x x If the information for a Container is incorrec...

Page 27: ... the same USB device If the sound is abnormal when playing MP3 files adjust the Equalizer in the Sound menu An over modulated MP3 file may cause a sound problem Photos Viewing a Photo or Slide Show 1 Press the or button to select Photos then press the ENTERE button in the Media Play menu 2 Press the button to select the desired photo in the file list 3 Press the ENTERE button or Play button While ...

Page 28: ...oto by selecting the folder c c c Title Sorts and displays the file title in Symbol Number Alphabet Special order c c c Preference Sorts and displays the file by preference You can change the file preference in the file list section using the Green button c c c Latest Date Sorts and shows files by the latest date c c Earliest Date Sorts and shows files by the earliest date c c Artist Sorts the mus...

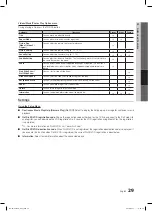
Page 29: ...he slide show speed during the slide show c Background Music You can set and select background music when watching a Slide Show c Zoom You can zoom into images in full screen mode c Rotate You can rotate images in full screen mode c Information You can see detailed information about the played file c c c Settings Using the Setup Menu Continuous Movie Play Help Resume Play On Off Select to display ...

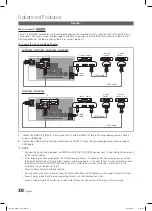
Page 30: ...IGITAL AUDIO OUT OPTICAL jack on your TV and the Digital Audio Input on the Home Theater When following the connection above the Optical jack only outputs 2 channel audio You will only hear sound from x x the Home Theater s Front Left and Right speakers and the subwoofer If you want to hear 5 1 channel audio connect the DIGITAL AUDIO OUT OPTICAL jack on the DVD Satellite Box i e Anynet Device 1 or...

Page 31: ...ay not turn off if recording is in progress May not be enabled depending on the device Switching between Anynet Devices 1 Anynet devices connected to the TV are listed If you cannot find a device you want press the red button to refresh the list 2 Select a device and press the ENTERE button You can switch to the selected device Only when you set Anynet HDMI CEC to On in the Application menu the De...

Page 32: ...lay initial setup etc When connecting or removing the HDMI cable please make sure to search devices again or turn your TV off and on again Check if the Anynet Function of Anynet device is set on I want to start Anynet Check if the Anynet device is properly connected to the TV and check if the Anynet HDMI CEC is set to On in the Anynet Setup menu Press the TOOLS button to display the Anynet menu an...

Page 33: ...esk or chair 2 Slide the end of the cable with the lock attached through the looped end of the Kensington lock cable 3 Insert the locking device into the Kensington slot on the product 1 4 Lock the lock These are general instructions For exact instructions see the User manual supplied with the locking device The locking device has to be purchased separately The location of the Kensington slot may ...

Page 34: ...h the VESA standard screw specifications x x Do not use screws that are longer than the standard dimension or do not comply with the VESA standard screw x x specifications Screws that are too long may cause damage to the inside of the TV set For wall mounts that do not comply with the VESA standard screw specifications the length of the screws may differ x x depending on the wall mount specificati...

Page 35: ...gnated for your TV Make sure to use only the appropriate supplied screw If you use a different screw you can damage your TV 2 Firmly fasten the screw you provided size M4xL20 or similar to the wall or cabinet where the TV is to be installed If you fasten the screw to the wall we recommend you drive the screw into a stud If that is not possible use a molly to anchor the screw 3 Tie the TV Holder co...

Page 36: ...mode Color Brightness Sharpness P 15 Adjust Energy Saving option in the TV menu go to MENU Picture ECO Solution Energy Saving P 15 Try resetting the picture to view the default picture setting go to MENU Picture Picture Reset P 17 There is a dotted line on the edge of the screen If the picture size is set to Screen Fit change it to 16 9 Change cable satellite box resolution The picture is black an...

Page 37: ...ptions STD HRC and IRC P 13 Verify the Antenna is positioned correctly No Caption on digital channels Check Caption Setup menu Try changing Caption Mode Service 1 to CC1 P 21 Some channels may not have caption data The picture is distorted macroblock error small block dots pixelization Compression of video contents may cause picture distortion especially on fast moving pictures such as sports and ...

Page 38: ...icture settings every 30 minutes Please change from Store Demo mode to Home Use mode in the Plug Play procedure Press the SOURCE button to select TV mode go to MENU Setup Plug Play ENTERE You have intermittent loss of audio or video Check the cable connections and reconnect them Loss of audio or video can be caused by using overly rigid or thick cables Make sure the cables are flexible enough for ...

Page 39: ... 3 1 X 26 3 inches 1102 4 X 78 7 X 667 3 mm 43 4 X 10 2 X 28 9 inches 1102 4 X 260 1 X 733 2 mm Weight Without Stand With Stand 32 Ibs 14 5 kg 38 4 Ibs 17 4 kg 39 0 Ibs 17 7 kg 47 4 Ibs 21 5 kg Design and specifications are subject to change without prior notice This device is a Class B digital apparatus For information about power supply and more about power consumption refer to the label attache...

Page 40: ...7 9 LN37C530 12 4 3 2 3 3 24 6 7 9 7 9 LN40C530 LN40C540 13 2 2 7 4 0 27 6 7 9 7 9 LN46C530 LN46C540 16 1 3 7 4 0 31 8 15 7 15 7 NOTE All drawings are not necessarily to scale Some dimensions are subject to change without prior notice Refer to the dimensions prior to performing installation of your TV Not responsible for typographical or printed errors 2010 Samsung Electronics America Inc LN32C530...

Page 41: ...V CH button 6 13 Favorite Channel 13 H HDMI 8 30 Home theater 9 30 L License 39 M Media Play 24 Melody 22 Menu Language 21 MP3 Play 27 O Optimal resolution 11 P Photo view 27 PIN number 21 PIP 22 Power Indicator 5 R Remote Control 6 RGB 16 S Sleep Timer 19 Slide Show 27 Software Upgrade 23 Source List 12 Speaker Select 18 Standby mode 5 T Timer 19 V Video play 25 Volume 5 6 19 W Wall Mount 33 BN68...

Reviews: