background image

English


63

07
DTV Functions

• 

Subtitle

 : You can set it to 

On

 or 

Off

If you select 

On

, the 

Subtitle Mode

 and 

Subtitle Language

 will be activated.

• 

Subtitle Mode

 : Select the desired subtitle 

mode.

• 

Subtitle Language

 : Select the desired 

subtitle language.

Viewing the Guide Screen 

The EPG (Electronic Programme Guide) information 

is provided by broadcasters. Using channel 

schedules provided by broadcasters, you can 

specify channels you want to watch in advance 

so that the channel automatically changes to the 

selected channel at the specified time. Channel 

entries may appear blank or out of date depending 

on a channel status.

You can also operate this function by

pressing the 

GUIDE

 button on the 

remote control.

1. 

Press the 

MENU

 button. 

The home menu will be displayed.

2. 

Press the ◄► buttons to select the 

Watch 

TV

.

3. 

Press the ▲▼ buttons to select the 

Guide

then press the 

ENTER

 button. 

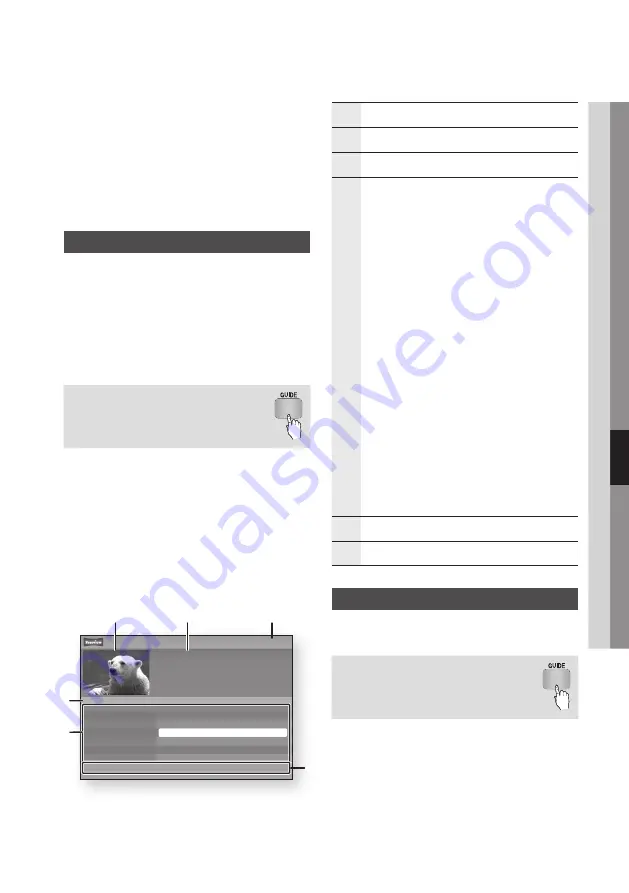
The guide screen will be displayed.

• 

Guide Screen

1

Displays the channel screen.

2

Displays the channel information.

3

Displays the current date and time.

4

Nevigation Help 

: Displays remote control buttons 

available.

• 

RED (A)

 : To set the programme schedule.

• 

YELLOW (C)

 : It displays channel from now to 24 

hours after. 

If you select 

YELLOW (C) 

button, 

GREEN (B)


button will be displayed. Press this to display the 

list of channels before 24 hours.

• 

BLUE (D)

 : To change the Channel View (All, TV, 

Radio, Data/Other, Favourites 1,2,3...) 

• 

PROG

 (

,

/

.

) buttons : Go to previous page or 

next page.

• 

ENTER

 button


-

When you select a programme currently 

being broadcast, you can watch the selected 

channel in the full screen.


-

When you select a programme scheduled to 

broadcast, you can set the Timer viewing or 

Timer recording. Press the ◄► button to 

select the Timer viewing or Timer recording, 

then press the 

ENTER

 button again. The Timer 

icon appears on the guide screen.

5

Displays the Stored channels.

6

Displays view mode.

Schedule Manager

Make sure that clock must be set before operating 

this function. (See page 47)

You can also operate this function by

pressing the 

GUIDE

 button on the 

remote control.

1. 

Press the 

MENU

 button. 

The home menu will be displayed.

2. 

Press the ◄► buttons to select the 

Watch 

TV

.

3. 

Press the ▲▼ buttons to select the 

Guide

then press the 

ENTER

 button. 

The guide screen will be displayed.

a

 Sche.Mgr    

c

 +24 Hours    

d

 Ch. Mode    

ƒ

 Page    

"

 Watch

7:11 Sat 1 Jan

Guide

No Information

DTV Air 814 Discovery

Channel View - All

814 Discovery

  812 

Class News 

No Information


813 

Coming Soon 

No Information

 814  Discovery 

No Information


815 

DiscoveryH&L 

No Information


816 

five 

No Information

  817 

heat 

No Information

4

1

2

3

5

6

15:00

Today

15:30

16:00

16:30

Summary of Contents for BD-D6900A

Page 1: ...agine the possibilities Thank you for purchasing this Samsung product To receive a more complete service please register your product at www samsung com register Blu ray Disc Player user manual BD D6900M ...

Page 2: ...can download various for pay or free of charge applications through a network connection These applications provide a range of Internet services and content including news weather forecasts stock market quotes games movies and music AllShare You can play videos music and photos saved on your devices such as your PC mobile phones or NAS through a network connection Playing multimedia files You can ...

Page 3: ... shock or personal injury CAUTION TO REDUCE THE RISK OF ELECTRIC SHOCK DO NOT REMOVE COVER OR BACK NO USER SERVICEABLE PARTS INSIDE REFER SERVICING TO QUALIFIED SERVICE PERSONNEL This symbol indicates important instructions accompanying the product IMPORTANT NOTE The mains lead on this equipment is supplied with a molded plug incorporating a fuse The value of the fuse is indicated on the pin face ...

Page 4: ... instructions 8 Do not install near any heat sources such as radiators heat registers stoves or other apparatus including AV Receivers that produce heat 9 Do not defeat the safety purpose of the polarized or grounding type plug A polarized plug has two blades with one wider than the other A grounding type plug has two blades and a third grounding prong The wide blade or the third prong are provide...

Page 5: ...de by Side Same screen duplicates horizontally Top Bottom Same screen duplicates vertically 3D programme reception recording and playback of this model may not fully support 3D due to the 3D broadcast format is not yet standardized worldwide It is not the product s malfunction or disorder Disc Storage Management Disc Handling Disc Shape Use discs with regular shapes If you use an irregular disc a ...

Page 6: ... outlet the product will still draw power standby mode when it is turned off Apparatus shall not be exposed to dripping or splashing and no objects filled with liquids such as vases shall be placed on the apparatus The main plug is used as a disconnect device and shall stay readily operable at any time Do not touch the power plug with a wet hand Otherwise it can cause an electric shock Do not shar...

Page 7: ...on Code 13 Copyright 14 Supported File Formats 16 Connect a USB device before using the Time shift and Recorded TV functions 17 Logos of Discs the Product Can Play 17 Accessories 18 Front Panel 19 Rear Panel 20 Remote Control 20 Tour of the Remote Control 21 Setting the Remote Control to Operate Your TV 22 TV Control Codes Connections 23 Connecting to a TV with an Audio Video cables and RF cable 2...

Page 8: ...9 Connecting to the Network 29 Cable Network 30 Wireless Network Setup 31 Before Starting Plug Play 31 Accessing the Settings Menu 32 Watch TV 32 Channel List 33 Channel Manager 34 Settings 34 Display 38 Audio 41 Channel 43 Network 47 System 48 Language 49 Security 49 General 50 Support 51 Contact Samsung Basic Functions 52 Playing a Video 52 Playback 52 3D Converter 53 Disc Structure 53 Using the...

Page 9: ...stening to Music 57 Playing an Audio CD CD DA MP3 58 Repeat an Audio CD CD DA MP3 58 Playlist 59 Playing back a Pictures 59 Playing JPEG files 59 Using the TOOLS button 60 Playing back a USB Storage Device DTV Functions 61 Display Screen 61 Using the TOOLS button 61 Picture Settings 61 Selecting the Audio Language 62 Selecting the Dual I II 62 Lock current channel 62 Switch to Cable 62 Add to Favo...

Page 10: ...67 Time Shift function 68 Playing the Recorded Title Network Services 69 Using Smart Hub 69 Starting Smart Hub for the First Time 72 The Settings Menu BLUE D 74 The Edit Mode Menu YELLOW C 76 The Sort Menu GREEN B 76 Samsung Apps 76 For Pay Apps 78 BD LIVE 78 Using the AllShare Function Appendix 79 Troubleshooting 81 Repairs 82 Index 83 Specifications ...

Page 11: ... USB storage media containing MP3 or WMA contents PHOTO G Indicates a function available in a CD RW R DVD RW R BD RE R disc or a USB storage media containing JPEG contents NOTE The product may not play certain CD RW R and DVD R because of the disc type or recording conditions If a DVD RW R disc has not been recorded properly in DVD video format it will not be playable Your product will not play co...

Page 12: ...ray Disc DVD or CD discs in this product Also refer to rest of this user manual for additional information on playback restrictions Blu ray Disc Compatibility Blu ray Disc is a new and evolving format Accordingly disc compatibility issues are possible Not all discs are compatible and not every disc will play back For additional information refer to the Compliance and Compatibility Notice section o...

Page 13: ...y Corporation NOTE Some AVCHD format discs may not play depending on the recording condition AVCHD format discs need to be finalized x v Colour offers a wider colour range than normal DVD camcorder discs Some DivX MKV and MP4 format discs may not play depending on the video resolution and frame rate condition Region Code Both products and discs are coded by region These regional codes must match f...

Page 14: ...t to Off automatically when connected with each other Need to Know List before using Media Play Media Play only supports USB Mass Storage Class MSC devices MSC is a Mass Storage Class Bulk Only Transport device Examples of MSC are Thumb drives Flash Card Readers Both USB HDD and HUB are not supported MSC supports Music Photo and Video files while a PTP device supports Photo files only MTP Media Tr...

Page 15: ...30 8 Motion JPEG 1920x1080 6 30 8 wmv ASF Window Media Video v9 1920x1080 6 30 25 WMA mp4 MP4 H 264 BP MP HP 1920x1080 6 30 25 MP3 ADPCM AAC MPEG4 SP ASP 1920x1080 6 30 8 3gp 3GPP H 264 BP MP HP 1920x1080 6 30 25 ADPCM AAC HE AAC MPEG4 SP ASP 1920x1080 6 30 8 vro VRO VOB MPEG2 1920x1080 24 25 30 30 AC3 MPEG LPCM MPEG1 352x288 24 25 30 30 mpg mpeg PS MPEG1 352x288 24 25 30 30 AC3 MPEG LPCM AAC MPEG...

Page 16: ... range 5kbps to 384kbps Connect a USB device before using the Time shift and Recorded TV functions Do not use a USB memory stick We do not support a USB memory stick We recommend using a USB HDD with at least 5400 rpm but a USB HDD of RAID type is not supported To use the Time shift mode or the Recorded TV function a connected USB device must be execute the Device Format function to proper form fo...

Page 17: ...ck for the supplied accessories below BD HDD TV 2D 3D 0000 000000 POWER 1 2 3 4 5 6 7 8 9 DISC MENU TITLE MENU 0 TTX MIX BD TV TIME SHIFT TV VOL PROG TV SOURCE 1 1 CH LIST SMART GUIDE i MENU 2D 3D FULL SCREEN A B C D INFO TOOLS EXIT RETURN HUB SEARCH AD SUBTITLE REC PAUSE REC AUDIO TV MUTE TV POWER Audio Video cable RF cable for TV Remote Control Batteries for Remote Control AAA Size User Manual Q...

Page 18: ...arts a disc 8 EJECT BUTTON Ejects a disc 9 common Interface Slot To watch paid channels insert the CI CAM with CI or CI CARD 10 USB HOST It can be used for software upgrades and MP3 JPEG DivX MKV MP4 playback NOTE When the product displays the Blu ray Disc menu you may not start the movie by pressing the Play button on the product or the remote To play the movie you must select Play Movie or Start...

Page 19: ...Panel 1 ANT OUT TO TV Connects RF cable to TV antenna input 2 ANT IN Connects RF cable from antenna 3 HDMI OUT Using an HDMI cable connect this HDMI output terminal to the HDMI input terminal on your TV for the best quality picture or to your AV receiver for the best quality sound 4 DIGITAL AUDIO OUT OPTICAL Connects to an AV receiver 5 LAN Use for network based services See pages 69 78 BD LIVE an...

Page 20: ...information of TV channel These buttons are used both for menus on the product and also several Blu ray Disc functions Press to search backwards or forwards Press to skip backwards or forwards Stops playback or recording TV volume adjustment Mutes the speakers of your TV Displays channel lists on the screen Press this to pause a playback or pause the Time Shift function Press this to play or start...

Page 21: ...ff Number Used to input number directly TV VOL Used to adjust the volume of the television TV MUTE Used to toggle the sound on and off PROG Used to select the desired channel TV SOURCE Used to select an external source connected to the TV In case of Samsung TV below buttons are also compatible with this remote control Button Function MENU Used to move to the TV menu TOOLS Used to display Tools men...

Page 22: ...TV POWER 06 57 MAGNAVOX TV POWER 40 METZ TV POWER 57 MITSUBISHI TV POWER 06 48 62 65 MIVAR TV POWER 52 77 NEC TV POWER 83 Brand Code NEWSAN TV POWER 68 NOBLEX TV POWER 66 NOKIA TV POWER 74 NORDMENDE TV POWER 72 73 75 PANASONIC TV POWER 53 54 74 75 PHILIPS TV POWER 06 55 56 57 PHONOLA TV POWER 06 56 57 PIONEER TV POWER 58 59 73 74 RADIOLA TV POWER 06 56 RADIOMARELLI TV POWER 57 RCA TV POWER 45 46 R...

Page 23: ...ct sends only signals of TV You must connect the Audio Video cables to watch output from your product Noise may be generated if the audio cable is placed too close to the power cable If you want to connect to an AV receiver please refer to the AV receiver connection pages See pages 27 28 The number and position of terminals may vary depending on your TV set Please refer to the user manual of your ...

Page 24: ...0p 1080i or 1080p output mode you must use a High speed category 2 HDMI cable HDMI outputs only a pure digital signal to the TV If your TV does not support HDCP High bandwidth Digital Content Protection random noise appears on the screen Depending on your TV certain HDMI output resolutions may not work Please refer to the user manual of your TV When you connect the product to the TV using the HDMI...

Page 25: ...he input selector on your TV remote control until the COMPONENT signal from the product appears on the TV screen If you have set the remote control to operate your TV See pages 21 22 press the TV SOURCE button on the remote control and select COMPONENT as the external source of the TV NOTE Depending on the manufacturer the component terminals on your TV may be marked R Y B Y Y or Cr Cb Y instead o...

Page 26: ... operate your TV See pages 21 22 press the TV SOURCE button on the remote control and select VIDEO as the external source of the TV NOTE Noise may be generated if the audio cable is placed too close to the power cable If you want to connect to an AV receiver please refer to the AV receiver connection pages See pages 27 28 The number and position of input terminals may vary depending on your TV set...

Page 27: ...ver Case 1 Connecting to an Audio System HDMI supported AV receiver Best Quality Recommended 1 Using an HDMI cable connect the HDMI OUT terminal on the rear of the product to the HDMI IN terminal of your AV receiver 2 Using an HDMI cable connect the HDMI OUT terminal of the AV receiver to the HDMI IN terminal of your TV 3 Turn on the product TV and AV receiver 4 Press the input select button of th...

Page 28: ... Component or Video Case 3 Connecting to an Audio System Stereo Amplifier Good Quality 1 Using the audio cables connect the AUDIO OUT white and red terminals on the rear of the product to the AUDIO IN white and red terminals of your Stereo Amplifier 2 Using the video signal cable s connect the HDMI COMPONENT or VIDEO OUT terminals on the rear of the product to the HDMI COMPONENT or VIDEO IN termin...

Page 29: ...able connect the LAN terminal of the product to the LAN terminal of your modem or router 2 To set the network options see pages 43 47 NOTE Internet access to Samsung s software update server may not be allowed depending on the router you use or your ISP s policy For more information contact your ISP Internet Service Provider For DSL users please use a router to make a network connection To use the...

Page 30: ...nnection in compliance with new Wi Fi certification specifications If your AP supports WPS Wi Fi Protected Setup you can connect to the network via PBC Push Button Configuration or PIN Personal Identification Number WPS will automatically configure the SSID and WPA key in either mode You can setup a wireless network three ways Wireless general Using WPS PBC One Foot Connection Wireless general inc...

Page 31: ...ption then press the button to select the Search button 6 Press the buttons to select the desired Region and then press the ENTER button 7 Press the buttons to the select the Network Settings or Watch TV then press the ENTER button For more information about Network settings please refer to pages 43 47 NOTE When the product is connected to the TV for the first time the product turns on automatical...

Page 32: ...tton 4 Press the buttons to select the desired item then press the ENTER button 5 Press the EXIT button to exit the menu Channel List You can see all channels searched 1 Press the CH LIST button on the remote control The Channel List will be displayed Channel List Screen 1 Shows the stored channels 2 Navigation Help Displays remote control buttons available RED A Selects Air or Cable YELLOW C Disp...

Page 33: ... option is not displayed in the Channel Manager set it to Enable in the channels menu See page 42 This menu will be displayed only when you set the antenna source type and country as below Antenna source Country Air Ireland Delete Select this to delete the Channel Deselect All Select this to deselect all channel Select All Select this to select all channel NOTE For satellite broadcasting editing t...

Page 34: ...ter the actual screen size of your TV so that the product can adjust the image according to the screen size and display an optimal 3D image For 3D displays bigger than 116 inches simply setting it as 116 is a safe choice CAUTION If you want to enjoy 3D content connect a 3D device 3D compliant AV receiver or TV to the product s HDMI OUT port using a high speed HDMI cable Put on 3D glasses before pl...

Page 35: ...amsung Products only BD Wise is Samsung s latest inter connectivity feature When you connect a Samsung product and a Samsung TV with BD Wise to each other via HDMI and BD Wise is on in both the product and TV the product outputs video at the video resolution and frame rate of the Blu ray Disc DVDs Off The output resolution stays fixed at the resolution you set previously in the Resolution menu reg...

Page 36: ... Movie Frame Auto 24Fs 1080p 24F 1080p 24F 480i 1080i 1080i 1080i 576i 480i 576i 480i 576p 480p 576i 480i 720p 720p 720p 576i 480i 576i 480i 576p 480p 576i 480i 576p 480p 576p 480p 576p 480p 576i 480i 576i 480i 576p 480p 576i 480i 576i 480i 576i 480i 576i 480i 576i 480i DVD playback Output Setup HDMI connected HDMI not connected HDMI Mode Component VIDEO Mode Component Mode VIDEO Mode BD Wise 576i...

Page 37: ...efault Follow the steps on the previous page to access each mode and select the Display Setup that your TV will support When the factory default settings are restored all stored user BD data is deleted The Blu ray Disc must have the 24 frame feature for the product to use the Movie Frame 24Fs mode If both HDMI and Component jacks are connected and you are currently viewing Component output the res...

Page 38: ... DVD you re watching Video Select for the best picture quality from concert or TV show DVDs Audio Digital Output You set the Digital Output to match the capabilities of the AV receiver you ve connected to the product PCM Choose if you have connected an HDMI supported AV receiver Bitstream Unprocessed Select if you have connected an HDMI supported AV receiver with Dolby TrueHD and DTS HD Master Aud...

Page 39: ...coded Dolby Digital DTS HD High Resolution Audio Up to PCM 7 1ch PCM 2ch DTS HD High Resolution Audio DTS Re encoded DTS Re encoded Dolby Digital DTS HD Master Audio Up to PCM 7 1ch PCM 2ch DTS HD Master Audio DTS Re encoded DTS Re encoded Dolby Digital Audio Stream on DVD PCM PCM 2ch PCM 2ch PCM 2ch PCM 2ch PCM 2ch PCM 2ch Dolby Digital Up to PCM 5 1ch PCM 2ch Dolby Digital Dolby Digital Dolby Di...

Page 40: ...u select how the product will downmix multi channel audio into fewer channels Normal Stereo Downmixes the multi channel audio into two channel stereo Choose when connected to equipment that does not support virtual surround functions such as Dolby Pro Logic Surround Compatible Downmixes multi channel audio into surround compatible stereo Choose when connected to equipment that supports virtual sur...

Page 41: ...orizing the available channels you must specify the type of signal source that is connected to the this product Air Select Air for receiving digital broadcasts Cable Select Cable for receiving digital broadcasts Country Select this to change the country Enter the desired 4 digit password using the number buttons 1 Press the buttons to select the desired country then press the ENTER button 2 Press ...

Page 42: ...ou should connect a USB storage to use this function Enter your 4 digit PIN number when the PIN input screen appears Import from USB Import channel list from USB Export to USB Export channel list to USB This function is available when USB is connected Edit Channel Number Select this to edit the channel number in the channel manager See page 33 Disable Select disable if you do not want to edit chan...

Page 43: ...work with CI and CI CAM But in case of some local DVB T association this device doesn t have perfect compatibility with all kinds of CAM If there is a problem pull the CAM CARD out of the Set and insert it into the slot again Network Before you begin contact your ISP to find out if your IP address is static or dynamic If it is dynamic and you are using a wired or wireless connection we recommend u...

Page 44: ...d Manual setup procedures Setting Up the Wireless Network Connection Auto Most wireless networks have an optional security system that requires devices that access the network to transmit an encrypted security code called an Access or Security Key The Security Key is based on a Pass Phrase typically a word or a series of letters and numbers of a specified length you were asked to enter when you se...

Page 45: ...ears click the Local Area Connection or Wireless Network Connection depending on your network connection 4 On the Support tab click the Details button The Network settings are displayed NOTE Depending on your Windows version the information may differ To enter the Network settings into your product follow these steps 1 Follow Steps 1 through 4 in the Setting Up the Wireless Network Connection Auto...

Page 46: ...ished Network Status Check whether a connection to the network and the Internet have been established SWL Samsung Wireless Link Mobile devices with Samsung Wireless Link capability can be connected to your network via this product Off Set Samsung Wireless Link off On Set Samsung Wireless Link On 1 If you select On press the buttons to select the Connect SWL then press the ENTER button Please follo...

Page 47: ...anual and change time manually Timer Viewing and Timer Recording function can be limited or work abnormally Anynet HDMI CEC Anynet is a convenient function that offers linked operations with other Samsung products that have the Anynet feature To operate this function connect this product to a Samsung TV with an HDMI cable With Anynet on you can operate this product using a Samsung TV remote contro...

Page 48: ...n the menu Current Device Displays the current device Total Size Displays the total size of the device Storage Available Size Displays the available size of the device Storage Delete BD Data Press this to delete the BD data Select Device Change the location of desired memory to store BD data NOTE The total size of BD Data Management may differ depending on the conditions DivX Video On Demand View ...

Page 49: ...k of DVDs with specific numerical ratings unless a password is entered A larger number indicates that the programme is intended for adult use only For example if you select up to Level 6 discs that contain Level 7 8 will not play Change PIN Change the 4 digit password used to access security functions If you forgot your password 1 Press the MENU button to display home menu with no disc inserted 2 ...

Page 50: ...the Upgrade Query window appears with three choices Upgrade Now Upgrade Later or Don t Upgrade 4 If you select Upgrade Now the product upgrades the software turns off and then turns on automatically 5 If you do not make a selection in one minute or select Upgrade Later the product stores the new upgrade software You can upgrade the software later using the Via Download function 6 If you select Don...

Page 51: ...oftware has been downloaded you will see the software version number to the right of Via Download 2 Select Via Download and then press the ENTER button 3 The product displays a message asking if you want to upgrade Select Yes The product begins the upgrade 4 When the update is complete the product turns off automatically and then turns on NOTE When the system upgrade is done check the software det...

Page 52: ...sting the 3D Depth The 3D Depth function lets you adjust the 3D depth of 2D to 3D conversions Values range from 1 to 10 The higher the number the deeper the 3D depth 1 When you are viewing converted 3D contents press the TOOLS button 2 Press the buttons to select 3D Depth and then press the ENTER button 3 Adjust the 3D Depth using the buttons Playing a Video Playback 1 Push a disc into the Blu ray...

Page 53: ...ection and then press the ENTER button NOTE Depending on the disc the menu items may differ and this menu may not be available Using the Title Menu Z 1 During playback press the TITLE MENU button on the remote control 2 Press the buttons to make the desired selection then press the ENTER button NOTE Depending on the disc the menu items may differ and this menu may not be available Playing the Titl...

Page 54: ...button a new frame appears To return to normal speed playback press the PLAY button NOTE The product does not play sound in Step mode Using the Popup Menu h 1 During playback press the POPUP MENU button on the remote control 2 Press the buttons or ENTER button to select the desired menu NOTE Depending on the disc the menu items may differ and this menu may not be available Using the Search and Ski...

Page 55: ...OOLS button 2 Press the buttons to select Repeat Mode 3 Press the buttons to select Repeat A B then press the ENTER button 4 Press the ENTER button at the point where you want repeat play to start A 5 Press the ENTER button at the point where you want repeat play to stop B 6 To return to normal play press the TOOLS button again 7 Press the buttons to select Repeat Mode 8 Press the buttons to selec...

Page 56: ...lish If you press the AUDIO button on the remote control Audio bar appears Press the RETURN button to remove the Audio bar Selecting the Subtitle Language hZx You can also operate this function by pressing the AD SUBTITLE button on the remote control 1 During playback press the TOOLS button 2 Press the buttons to select Subtitle 3 Press the buttons to select the desired subtitle language NOTE Depe...

Page 57: ...ew function is not available Depending on discs black outline may be shown Listening to Music ow Playing an Audio CD CD DA MP3 1 Insert an Audio CD CD DA or an MP3 Disc For an Audio CD CD DA the first track plays automatically For an MP3 disc press the buttons to select Music then press the ENTER button Audio CD CD DA MP3 Screen Elements 1 Displays the music information 2 Displays the playlist 3 D...

Page 58: ...usic List press the STOP or RETURN button The Music List screen appears 3 Press the YELLOW C button 4 Press the buttons to move to a desired track and then press the ENTER button A check appears on the track Repeat this procedure to select additional tracks 5 To remove a track from the list move to the track and then press the ENTER button again The check on the track is cancelled 6 When done pres...

Page 59: ...clockwise Picture Settings Select this if you want to adjust the picture quality Information Shows the picture information including the name and size etc NOTE To enable the background music function the photo file must be in the same storage media as the music file However the sound quality can be affected by the bit rate of the MP3 file the size of the photo and the encoding method Using the Sli...

Page 60: ... pages 52 59 NOTE You must remove the USB storage device safely by performing the Safely Remove USB function in order to prevent a possible damage to the USB memory Press the MENU button to move to the Home menu select the YELLOW C button and then press the ENTER button If you insert a disc when playing a USB storage device the device mode changes to DVD or CD automatically d WPS PBC My Devices In...

Page 61: ...Functions Using the TOOLS button Press the TOOLS button while you are viewing a channel Tools Menu Screen Picture Settings 1 Press the TOOLS button while you are viewing a channel 2 Press the buttons to select Picture Settings then press the ENTER button For more information about this menu please refer to pages 55 56 Selecting the Audio Language 1 Press the TOOLS button while you are viewing a ch...

Page 62: ...el 2 Press the buttons to select Switch to Cable then press the ENTER button Add to Favourites 1 Press the TOOLS button while you are viewing a channel 2 Press the buttons to select the Add to Favourites then press the ENTER button 3 Press the buttons to edit the desired channel then press the ENTER button 4 Press the buttons to select the OK then press the ENTER button Signal Information 1 Press ...

Page 63: ...elect YELLOW C button GREEN B button will be displayed Press this to display the list of channels before 24 hours BLUE D To change the Channel View All TV Radio Data Other Favourites 1 2 3 PROG buttons Go to previous page or next page ENTER button When you select a programme currently being broadcast you can watch the selected channel in the full screen When you select a programme scheduled to bro...

Page 64: ...D effect with all live TV programme and recorded TV programme 1 During watching the TV programme or playing recorded TV programme press the 2D 3D button on your remote control The 3D menu will appear 2D 3D Changes a 2D image to 3D Side by Side Displays two images next to each other Top and bottom Displays one image above another 2 Press the buttons to select the desired 3D mode then press the ENTE...

Page 65: ... be selected in the same way To display the previous or next page press the corresponding coloured button 5 1 sub page Displays the available sub page 6 2 page up Displays the next Teletext page 7 3 page down Displays the previous Teletext page 8 6 index Displays the index contents page at any time while you are viewing Teletext 9 0 mode Selects the Teletext mode LIST FLOF If pressed during LIST m...

Page 66: ...pleted will appear Playback control during recording During recording a TV channel you can search scene or move to the beginning point of recording 1 SEARCH buttons Search the desired scene 1 2 3 4 5 6 7 1 2 3 4 5 6 7 2 SKIP button Return to the beginning point of recording 3 SKIP button Jump to the same scene with Live TV 4 button Jump to 20 sec from current positon 5 button Jump to 20 sec from c...

Page 67: ...sed and then Time Shift bar will appear Pause is displayed on the left side of Time Shift bar Start Time Shift with PLAY button 1 When you are watching a TV channel press the PLAY button 2 The Time Shift function starts and the Time Shift bar will appear Live TV is displayed on the left side of Time Shift bar Time Shift information You can see current information about Time Shift function 1 Press ...

Page 68: ...AST mode Time Shift mode will be changed into Live TV when you press STOP button first time 4 Press STOP button again then same message with above image appears 5 Select Yes then press the ENTER button Playing the Recorded Title 1 In the Home menu press the buttons to select the My Contents 2 Press the buttons to select the Recorded TV and then press the ENTER button The Recorded TV List will be d...

Page 69: ... button 3 The Smart Hub screen appears In a few cases the Country screen appears immediately after 4 If the Country screen has appeared press the buttons to select your country then press the ENTER button NOTE Certain applications are available only in certain countries 5 The Terms of Service Agreement screen appears If you want to agree press the buttons to select Agree then press the ENTER butto...

Page 70: ...sonal gallery of applications which you can add to modify and delete NOTE Samsung Electronics takes no legal responsibility for any interruption of the Smart Hub service caused by the service provider for any reason The Smart Hub service downloads and processes data via the Internet so that you can enjoy the Internet contents on your TV screen If the Internet connection is unstable the service may...

Page 71: ...ount follow these steps 1 Press the RED A button on your remote control The Create Account screen appears 2 Press the buttons to select Create Account and then press the ENTER button 3 On the next screen select Smart TV ID and then press the ENTER button An entry screen and keypad appear 4 Use the keypad to enter your e mail address This will serve as your ID NOTE The keypad works like the keypad ...

Page 72: ...e Smart Hub main screen displayed on your TV press the RED A button on your remote The Create Account screen appears 2 Select the Down Arrow next to the Smart TV ID field and then press the ENTER button 3 Select your ID from the list that appears and then press the ENTER button The Create Account screen re appears 4 Select Password and then press the ENTER button An entry screen and a keypad appea...

Page 73: ...ice Provider 6 When you are done press the RETURN button Change Password The Change Password function lets you change your Smart Hub password To change the password follow these steps 1 Select Change Password and then press the ENTER button 2 Enter your current password The next screen appears 3 On the next screen enter a new password on the first line Enter it again on the second line to confirm ...

Page 74: ...he screen 2 Press the to select a menu item and then press the ENTER button The functions in the Edit Mode Menu bar are described below NOTE Some menu items may not appear on the screen To see these items press the to move to the screen edge and then press one more time to reveal the items You can close the bar by highlighting the X on the bottom right side and then pressing the ENTER button Move ...

Page 75: ... ENTER button The New Folder window and a keypad appear 3 Use the keypad to enter the name of the folder and then press the ENTER button The New Folder screen closes and the New Folder appears on the Smart Hub screen Rename Folder The Rename Folder function lets you rename folders To use the Rename Folder function follow these steps 1 Press the YELLOW C button on your remote 2 Press the to select ...

Page 76: ...n on your remote 2 Press the to select a sorting method and then press the ENTER button Smart Hub sorts the applications by the method you have chosen Samsung Apps Samsung Apps lets you download for pay or free of charge applications and services to your product and view or use them on your TV These applications and services include videos music photos games news sports etc Applications for the ne...

Page 77: ...th videos Game Displays various games such as sudoku and chess Sports Displays various sports media services such as match information images and short length videos Lifestyle Includes various lifestyle media services such as music personal photo management tools and social networking such as Facebook and Twitter Information Includes various information services such as news stocks and weather Oth...

Page 78: ...ed by the disc manufacturer NOTE The way you use BD LIVE and the provided contents may differ depending on the disc manufacturer Using the AllShare Function AllShare lets you play music video and photo files located in your PC or your DLNA compatible mobile phone or NAS on the product To use AllShare with your product you must connect the product to your network See pages 29 30 To use AllShare wit...

Page 79: ...when an invalid button is pressed The Blu ray Disc DVD s software doesn t support the feature e g angles You ve requested a title or chapter number or search time that is out of range Play mode differs from the Setup Menu selection Some of the functions selected in the Setup Menu may not work properly if the disc is not encoded with the corresponding function The screen ratio cannot be changed The...

Page 80: ... the product Check if your TV supports 576p 480p 720p 1080i 1080p HDMI input resolution Abnormal HDMI output screen If random noise appears on the screen it means that TV does not support HDCP High bandwidth Digital Content Protection AllShare function I can see folders shared through AllShare but I cannot see the files AllShare shows only files corresponding to the Image Music and Movie categorie...

Page 81: ...age appears and also Timer recording and Time Shift function does not work Using lower quality USB storage device not supporting Recording function can cause this kind of problem It is recommended to use USB HDD storage device Recommended specification of USB HDD is at least 5400 rpm USB HDD of RAID type is not supported NOTE When the factory default settings are restored all stored user BD data i...

Page 82: ...HDMI Deep Color 38 J JPEG 59 K Keypad 71 M Movie Frame 24Fs 38 MP3 57 58 N Network Settings 43 47 P PCM Downsampling 40 Plug Play 31 Popup Menu 54 Progressive Mode 38 R Recording 66 68 Region Code 13 Remote Control 20 Remote Control Sensor 18 Resolution 35 37 S Samsung Apps 76 77 Schedule Manager 63 64 Slide Show 59 Smart Hub 69 76 Software Upgrade 50 51 Subtitle Language 56 T 3D Settings 34 Telet...

Page 83: ...put Composite Video 1 Channel 1 0 Vp p 75Ω load Blu ray Disc DVDs 576i 480i Component Video Y 1 0 Vp p 75Ω load PR 0 70 Vp p 75Ω load PB 0 70 Vp p 75Ω load Blu ray Disc 576i 480i DVD 576p 480p 576i 480i Video Audio HDMI 1080p 1080i 720p 576p 480p PCM audio Bitstream audio Audio Output Analogue Audio Output 2 Channel 2Vrms 10 Digital Audio Output Optical Network Ethernet 10 100BASE TX Terminal Wire...

Page 84: ...le features may be subject to delayed availability some discs bearing the BD ROM BD RE R DVD VIDEO DVD RW R DVD RW R and CD RW R logos may still be non standardized discs some discs may not be played depending on their physical state or recording conditions problems and errors can occur during the creation of Blu ray Disc DVD software and or the manufacture of discs this product operates different...

Page 85: ...wner or service provider you may not modify copy republish upload post transmit translate sell create derivative works exploit or distribute in any manner or medium any content or services displayed through this device THIRD PARTY CONTENT AND SERVICES ARE PROVIDED AS IS SAMSUNG DOES NOT WARRANT CONTENT OR SERVICES SO PROVIDED EITHER EXPRESSLY OR IMPLIEDLY FOR ANY PURPOSE SAMSUNG EXPRESSLY DISCLAIM...

Page 86: ...e trademarks of their respective owners Rovi Flow Down Licence Terms Terms of Use This application incorporates software and technology of Rovi Corporation Rovi The Rovi software and technology collectively the Rovi Technology allows End Users to access music related data Rovi Data over the Internet and otherwise from proprietary Rovi databases the Rovi Databases located on Rovi servers the Rovi S...

Page 87: ... Rovi Database THE ROVITECHNOLOGY AND EACH ITEM OF ROVI DATA ARE LicenceD TO YOU AS IS ROVI MAKES NO REPRESENTATIONS OR WARRANTIES EXPRESS OR IMPLIED REGARDING THE ACCURACY OF ANY ROVI DATA ON THE ROVI SERVERS ROVI DISCLAIMS ALL WARRANTIES EXPRESS OR IMPLIED INCLUDING BUT NOT LIMITED TO IMPLIED WARRANTIES OF MERCHANTABILITY FITNESS FOR A PARTICULAR PURPOSE TITLE AND NON INFRINGEMENT ROVI DOES NOT ...

Page 88: ...r work will not be covered by this warranty 4 This product is not considered to be defective in materials nor workmanship by reason that it requires adaptation in order to conform to national or local technical or safety standards in force in any Country other than the one for which the product was originally designed and manufactured This warranty will not cover and no re imbursement will be made...

Page 89: ...Area Contact Centre Web Site Serbia 0700 Samsung 0700 726 7864 www samsung com Slovakia 0800 SAMSUNG 726 7864 www samsung com Spain 902 1 SAMSUNG 902 172 678 www samsung com Sweden 0771 726 7864 SAMSUNG www samsung com Switzerland 0848 SAMSUNG 7267864 CHF 0 08 min www samsung com ch www samsung com ch_fr French U k 0330 SAMSUNG 7267864 www samsung com Eire 0818 717100 www samsung com Lithuania 8 8...

Page 90: ...commerce de Verance Corporation Copyright 2004 2010 Verance Corporation Tous droits réservés par Verance Il est interdit de tenter de démonter l appareil et d en étudier le fonctionnement en vue de le reproduire Português Nota da Cinavia Esse produto usa tecnologia Cinavia para limitar o uso de cópias não autorizadas de filmes e vídeos produzidos comercialmente e sua trilha sonora Quando se detect...

Page 91: ...rcial da Verance Corporation Direitos de autor 2004 2010 Verance Corporation Todos os direitos reservados pela Verance É proibido qualquer procedimento de desmontagem ou montagem Español Aviso de Cinavia Este producto utiliza tecnología Cinavia para limitar el uso de copias no autorizadas de algunas películas de producción comercial vídeos y sus bandas sonoras Cuando se detecta el uso de una copia...

Page 92: ...ozornění k technologii Cinavia Tento přístroj využívá technologii Cinavia k omezení použití neoprávněných kopií některých komerčních filmů a videí a jejich zvukových stop Při zjištění zakázaného použití neautorizované kopie se zobrazí hlášení a přehrávání nebo kopírování je přerušeno Další informace o technologii Cinavia naleznete v Online středisku informací pro spotřebitele na webu http www cina...

Page 93: ...uje družba Verance Obratno inženirstvo in razstavljanje sta prepovedana Български Бележка за Cinavia Този продукт използва технологията Cinavia за да ограничи използването на неоторизирани копия на някои филми видеоклипове и саундтраци Когато се засече забранено ползване на неоторизирано копие ще се покаже съобщение и възпроизвеждането или копирането ще се прекъсне Повече информация за технологият...

Page 94: ...r Information Centre P O Box 86851 San Diego CA 92138 USA Бұл Verance корпорациясының лицензиясы бар жекеменшік технологияны қамтиды және АҚШ тың 7 369 677 патентімен әрі шығарылған және күтудегі басқа АҚШ және дүниежүзілік патенттермен сондай ақ авторлық құқықтармен және осындай технологияның белгілі бір жақтарын құпия қорғаныспен қорғалған Cinavia Verance корпорациясының сауда белгісі Авторлық қ...

Page 95: ...เทคโนโลยีเอกสิทธิ เฉพาะภายใต การอ นุญาตจาก Verance Corporation และได รับความคุ มครอง โดยสิทธิบัตรสหรัฐฯ เลขที 7 369 677 และสิทธิบัตรสหรัฐ ฯ อื นๆ และทั วโลกที ประกาศแล วและรอการพิจารณา รวม ทั งลิขสิทธิ และการป องกันความลับทางการค าในบางด าน ของเทคโนโลยีดังกล าว Cinavia เป นเครื องหมายการค าข อง Verance Corporation ลิขสิทธิ 2004 2010 Verance Corporation สงวนสิทธิ ทั งหมดโดย Verance ห ามดำเนิน การทา...

Page 96: ...thông tin kha c vê Cinavia qua thư ha y gư i mô t danh thiê p ke m theo đi a chi nhâ n thư cu a ba n đê n Cinavia Consumer Information Centre P O Box 86851 San Diego CA 92138 USA Sa n phâ m na y ti ch hơ p công nghê đô c quyê n theo giâ y phe p cu a Verance Corporation va đươ c ba o hô bơ i Bă ng sa ng chê Hoa Ky 7 369 677 va ca c bă ng sa ng chê cu a Hoa Ky va trên toa n thê giơ i kha c đa đươ c ...

Page 97: ...y safe recycling Business users should contact their supplier and check the terms and conditions of the purchase contract This product and its electronic accessories should not be mixed with other commercial wastes for disposal Correct disposal of batteries in this product Applicable in the European Union and other European countries with separate battery return systems This marking on the battery...

Reviews: