background image

11

GB

10

CONNECTIONS

• Never touch speaker terminals while the power is on. 

Doing so could result in electric shock.

• Make sure the polarities (+ and -) are correct.

MAIN UNIT

AV-R620

FRONT SPEAKER

PS-AF620

CENTER SPEAKER

PS-AC620

SURROUND SPEAKER

PS-AR620

PASSIVE SUBWOOFER

PS-AW620

SYSTEM MODEL NAME : HT-AS620

√ 

Connecting Speaker Wire

PASSIVE

SUBWOOFER

PS-AW620

ACTIVE SUBWOOFER

(not supplied)

FRONT (R)
PS-AF620

FRONT (L)

PS-AF620

SURROUND (R)

PS-AR620

SURROUND (L)

PS-AR620

MAIN UNIT
AV-R620

CENTER 

PS-AC620

1

Press the tab of the 
speaker connector. 

2

Insert the black wire into the black(-)
terminal and the gray wire into the
red(+) terminal.

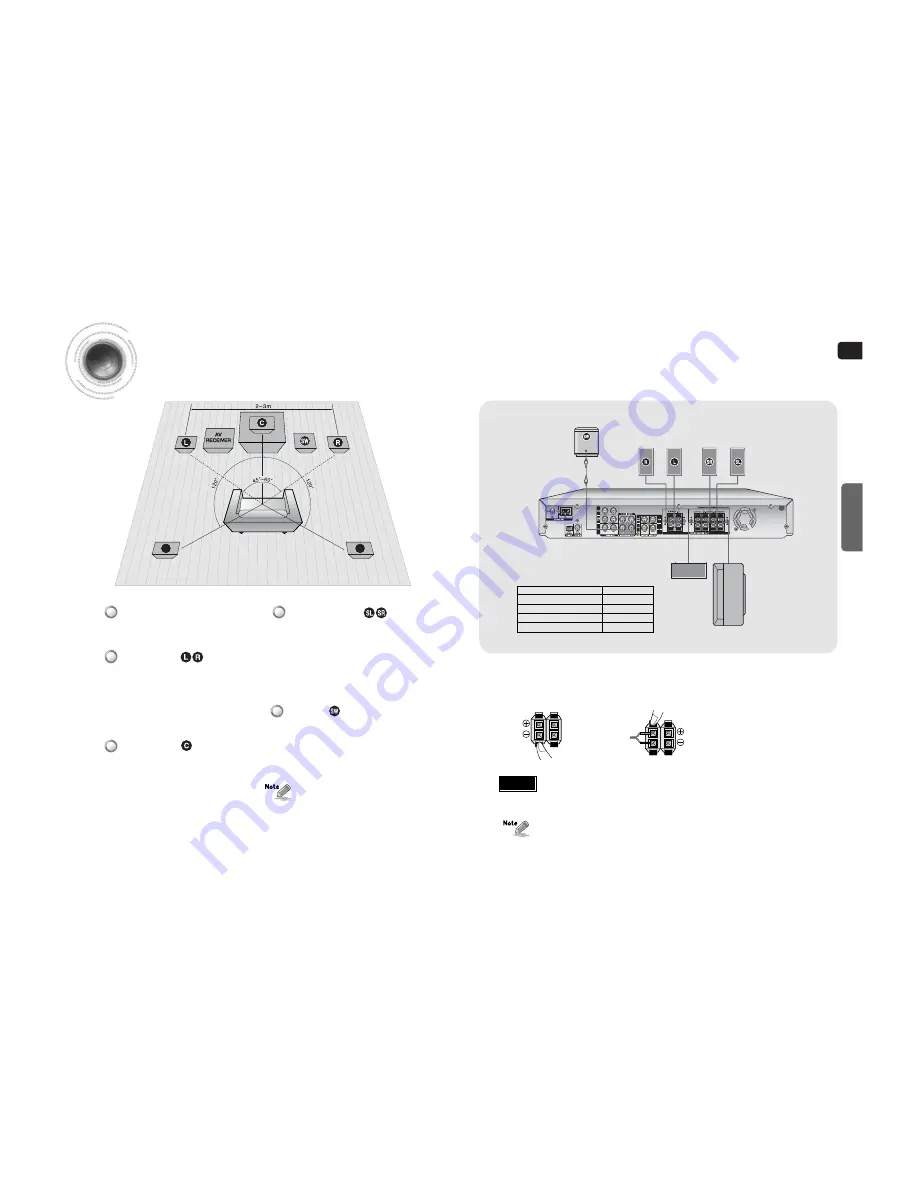
Connecting the Speakers

Before moving or installing the product, be sure to turn off the power and disconnect the power cord.

• Place these speakers behind your listening position.
• If there isn't enough room, place these speakers so they

face each other.

• Place them about 60 to 90cm (2 to 3feet) above your ear,

facing slightly downward.

❈ 

Unlike the front and center speakers, the surround

speakers are used to handle mainly sound effects and
sound will not come from them all the time.

Surround Speakers

SL

SR

• Place these speakers in front of your listening

position, facing inwards (about 45°) toward you.

• Place the speakers so that their tweeters will be at

the same height as your ear.

• Align the front face of the front speakers with the

front face of the center speaker or place them
slightly in front of the center speakers.

Front Speakers

• It is best to install it at the same height as the front

speakers.

• You can also install it directly over or under the TV.

Center Speaker

• Place AV Receiver on a dedicated stand or rack.

Position of AV Receiver

• The position of the subwoofer is not so critical. 

Place it anywhere you like.

Subwoofer

• When you attach the speakers to a wall, make sure to

fasten them tightly so they do not fall off.

• If more bass is desired, you can

connect an additional active
subwoofer (not supplied) to the
Subwoofer 1or 2 port. Since the
signal on the Subwoofer 1and 2 ports
is not stereo,  you will hear the same
mono bass sound regardless of the
port you connect to. 

• Keep the subwoofer speaker out of reach of children to prevent them from inserting their hands or objects

into the duct (hole) of the subwoofer speaker.

Caution

Summary of Contents for AV-R620

Page 1: ...Instruction Manual Digital Surround AV Receiver System HT AS620 THIS APPLIANCE IS MANUFACTURED BY AV R620 AH68 02012B ...

Page 2: ...lug with the fuse cover removed If the cover is detachable and a replacement is required it must be of the same colour as the fuse fitted in the plug Replacement covers are available from your dealer If the fitted plug is not suitable for the power points in your house or the cable is not long enough to reach a power point you should obtain a suitable safety approved extension lead or consult your...

Page 3: ...ions 39 About RDS broadcasting 40 MISCELLANEOUS Convenient Functions 42 Operating your TV with the Remote Controll 44 Operating your VCR DVD with the Remote Control 46 Before Calling for Service 48 Specifications 50 PREPARATION Dolby Pro Logic II Dolby Pro Logic II is a new form of multi channel audio signal decoding technology that improves upon existing Dolby Pro Logic DTS Digital Theater System...

Page 4: ...INPUT JACK CENTER SPEAKER TERMINALS SURROUND SPEAKER TERMINALS Description Front Panel Display POWER button HEADPHONE Jack SELECT button TUNING button POWER STANDBY Indicator SETUP button FUNCTION button SURROUND button VOLUME CONTROL INPUT MODE button SPEAKER INDICATOR DOLBY PRO LOGIC II INDICATOR RADIO BROADCASTING RECEIVING INDICATOR RADIO STEREO INDICATOR DIGITAL INDICATOR RADIO FREQUENCY INDI...

Page 5: ... batteries Batteries that look similar may differ in voltage Always replace both batteries at the same time Do not expose batteries to heat or flame PREPARATION Description VOLUME CONTROL button MUTE button MENU button POWER button NUMBER 0 9 buttons INFO button SUBWOOFER button SLEEP button MO ST button TUNER button SFE MODE button STEREO button SPK LEVEL button SPK DISTANCE button EXTERNAL DEVIC...

Page 6: ...dle mainly sound effects and sound will not come from them all the time Surround Speakers SL SR Place these speakers in front of your listening position facing inwards about 45 toward you Place the speakers so that their tweeters will be at the same height as your ear Align the front face of the front speakers with the front face of the center speaker or place them slightly in front of the center ...

Page 7: ...nd white cable to the white jack CONNECTIONS Connecting External Components DVD Player Before moving or installing the product be sure to turn off the power and disconnect the power cord Connecting Video Component Video Projector Disconnect the power plug from the outlet if you will not use this unit for a long period of time Even though the Digital Audio inputs are labelled DVD and CD you can con...

Page 8: ...e following cautions for your safety Make sure the unit is well ventilated If the unit has poor ventilation the temperature inside may rise and cause damage to it Do not obstruct the cooling fan or ventilation holes If the cooling fan or ventilation holes are covered with a newspaper or cloth heat may build up inside the unit and fire may result Connecting the FM and AM Antennas FM antenna connect...

Page 9: ...ER button You can directly select CD VCR SAT DVD or TUNER OPERATION FunctionsofDedicatedRemoteControl Connect the power plug to the outlet 1 Press the POWER button of the main unit This unit will be turned on or set to Standby mode 2 MAIN UNIT REMOTE CONTROL You can operate your AMP this AV receiver TV DVD and VCR with this remote control See pages 44 47 for more details Press the POWER button of ...

Page 10: ...ICAL or COAXIAL will be selected based on the DVD setup you made on page 26 Press the INPUT MODE ANALOG button CD ANALOG will be selected CD setup is not required before selecting the CD Analog mode or or The product is set to DVD OPTICAL CD COAXIAL by factory default MAIN UNIT For DVD Function Follow steps 1 4 in DVD setup on page 26 before selecting the DVD Input Mode Press the INPUT MODE button...

Page 11: ...moving or installing the product be sure to turn off the power and disconnect the power cord Frequency response from the speaker will be adjusted according to your speaker configuration and whether certain speakers are used or not Press SPK SELECT button to select the speaker you want Each time you press this button F SPK C SPK S SPK SW SPK CROVR SPK MODE OFF will be selected in turn Press button ...

Page 12: ...tton SETUP MODE OFF appears on the display and Setup Mode is exited MAIN UNIT 1 2 4 3 OPERATION Setting the Speaker Listening Distance Press the SPK DISTANCE button to select the speaker you want Each time you press this button F L CEN F R S R S L S W DIST OFF will be selected in turn Press button to set the speaker distance For F L CEN F R S W S R S L Speaker you can set the distance from the spe...

Page 13: ...You must set the digital input for a DVD or CD player to either Optical or Coaxial depending on which Digital input you have your player connected to Press SETUP button SETUP MODE appears on the display and enters into Setup Mode Press FUNCTION button 3 times DIGITAL IN appears on the display Press SURROUND button to select DVD Press SELECT button to set the digital input Each time you press this ...

Page 14: ...er output level from 10 to 10 dB by 1 step MAIN UNIT 1 2 3 To Stop Test Tone Press SETUP button 1 time SETUP MODE OFF appears on the display and test tone stops F L Front Left 10 10dB CEN Center 10 10dB F R Front Right 10 10dB S R Surround Right 10 10dB S L Surround Left 10 10dB S W Subwoofer 10 10dB Test Tone Output Press SETUP button SETUP MODE appears on the display and the unit enters into Set...

Page 15: ... button to set to the speaker level you want You can adjust it from 10 to 10dB by 1 step The sound gets smaller at 10dB and louder at 10dB Default setting value is 00dB Setting Speaker Level MAIN UNIT 1 2 4 3 OPERATION Setting Speaker Level You can set the balance and level of speakers Press SPK LEVEL button to select the speaker you want Each time you press this button F L CEN F R S R S L S W SPK...

Page 16: ...ime you press SELECT button CINEMA MATRIX GAME PROLOGIC MUSIC will be selected in turn Each time you press SELECT button MUSIC PROLOGIC GAME MATRIX CINEMA will be selected in turn Dolby Pro Logic ll Mode To Exit Setup Mode Wait for about 5 seconds MAIN UNIT 1 2 OPERATION Dolby Pro Logic ll Mode This mode provides 5 1 channel sound from 2 channel sources Press MODE button Each time you press this b...

Page 17: ...de Press FUNCTION button 10 times DPL ll MODE appears on the display Press SURROUND button Each time you press this button C WIDTH DIMENSION PANORAMA will be selected in turn Press SELECT button to select Dolby Pro Logic ll effect you want Dolby Pro Logic ll Effect MAIN UNIT 1 2 4 3 OPERATION Dolby Pro Logic ll Effect This function works only in Dolby PRO LOGIC II MUSIC Mode Press MODE button to s...

Page 18: ...CH STADIUM DOME CLUB ARENA THEATER HALL will be selected in turn To Exit Setup Mode Wait for about 5 seconds MAIN UNIT 1 2 OPERATION SFE Mode The SFE Sound Field Effect function uses 7 different DSP sound field effects to digitally simulate actual music environments such as concert halls or movie theaters Press SFE MODE button Each time you press this button HALL THEATER ARENA CLUB DOME STADIUM CH...

Page 19: ... 1 O O O O DIGITAL L C R SL SR SW Dolby D 5 1ch Dolby Digital 5 1 O O O O DIGITAL L C R SL SR SW Dolby D 2ch Pro Logic II O O O O DIGITAL L C R SL SR SW Dolby D 2ch Surr Pro Logic II O O O O DIGITAL L C R SL SR SW L PCM Audio Pro Logic II O O O O L PCM L C R SL SR SW Analog Pro Logic II O O O O ANALOG L C R SL SR SW DTS ES DTS 5 1 O O O O DTS L C R SL SR SW DTS 96 24 DTS 5 1 O O O O DTS L C R SL S...

Page 20: ...selected Select frequency Automatic Tuning 1 1 Press TUNING MODE button to select PRESET 2 Press TUNING CH button to select the preset frequency Automatic Tuning 2 1 Press TUNING MODE button to select MANUAL 2 Press and hold TUNING CH button to automatically tune in frequency Manual Tuning 1 Press TUNING MODE button to select MANUAL 2 Press TUNING CH button briefly to increase or decrease the freq...

Page 21: ... and RT will not appear on the display PTY Program Type indication and PTY SEARCH function To search for a program using the PTY codes Before you start remember The PTY Search is only applicable to preset stations To stop searching any time during the process press PTY SEARCH while searching There is a time limit in doing the following steps If the setting is cancelled before you finish start from...

Page 22: ...ll stored settings Do not use this unless necessary 1 2 3 Convenient Functions Press the SLEEP button SLEEP OFF 15 30 45 60 90 120MINwillbeselectedinturn You can set the time that this unit will shut itself off To Check Sleep Timer Press SLEEP button The remaining time before this unit will shut itself off is shown on the display Pressing the button again changes the sleep time from what you set p...

Page 23: ...AMPO 040 SAMSUNG 000 015 016 017 040 043 046 047 048 049 054 059 060 098 SANYO 019 061 065 101 102 103 104 SCOTT 003 040 060 061 SEARS 015 018 019 SHARP 015 057 064 101 105 106 115 SIGNATURE2000 M WARDS 057 058 SONY 050 051 052 053 055 101 SOUNDESIGN 003 040 SPECTRICON 001 SSS 018 SYLVANIA 018 040 048 054 059 060 062 SYMPHONIC 061 095 096 TATUNG 006 TECHWOOD 018 TEKNIKA 003 015 018 025 TMK 018 040...

Page 24: ...OTT 006 051 054 057 069 070 100 101 SEARS 020 021 025 SHARP 043 105 106 SINGER 096 SIGNATURE2000 M WARDS 043 044 054 100 106 SHINTOM 096 SONY 034 035 036 037 038 039 040 041 042 082 083 084 085 086 STS 020 SYLVANIA 001 033 044 049 066 091 SYMPHONIC 044 TANDY 009 TASHIRO 050 TATUNG 047 052 092 TEAC 044 047 052 092 TECHNICS 001 033 049 091 TEKNIKA 001 025 033 TOSHIBA 006 051 TOTEVISION 025 072 TAEKW...

Page 25: ... 20 21 to select LARGE or SMALL Refer to pages 30 37 to select other Surround Modes Remote controller does not work There is no sound from surround speakers The sound from each device is changed during stereo playback Can t receive radio broadcasts Is AM or FM antenna connected properly Are the batteries drained Is the distance between remote control and main unit proper Is the surround speaker co...

Page 26: ...t Digital Input TV Format Input Level Impedance Output Level Impedance Video Frequency Response Component Video Frequency Response S N Ratio GENERAL FM TUNER AM TUNER AMPLIFIER FREQUENCY RESPONSE 230V 50 Hz 0 9W 95W 4 2 kg 430 x 66 x 348 mm 5 C 35 C 10 75 87 5 108 0MHz 12dBf MONO STEREO 55 55dB MONO STEREO 0 3 0 8 30dB 1KHz 75KHz Dev 522 1611KHz 40dB 60dBµV m Loop Antenna 2 MOD 80 20Hz 20KHz THD 1...

Page 27: ...52 Contact SAMSUNG WORLD WIDE If you have any questions or comments relating to Samsung products please contact the SAMSUNG customer care center ...

Reviews: