background image

CHANGING

SETUP

MENU

AUDIO SETUP

DTS

    :  Off

Dynamic Compression     :  On

PCM Down Sampling        :  On

Digital Output

             :  PCM

Speaker Setup

Speaker Setup

Multi Channel Output

    :  Analog 

AUDIO SETUP

DTS

   :  Off

Dynamic Compression    :  On

PCM Down Sampling        :  On

Digital Output

            :  PCM

Speaker Setup

Multi Channel Output

Multi Channel Output


    :  

:  Analog 

Analog 

Surround Sound Speaker Setup 

(DVD-P538K only)

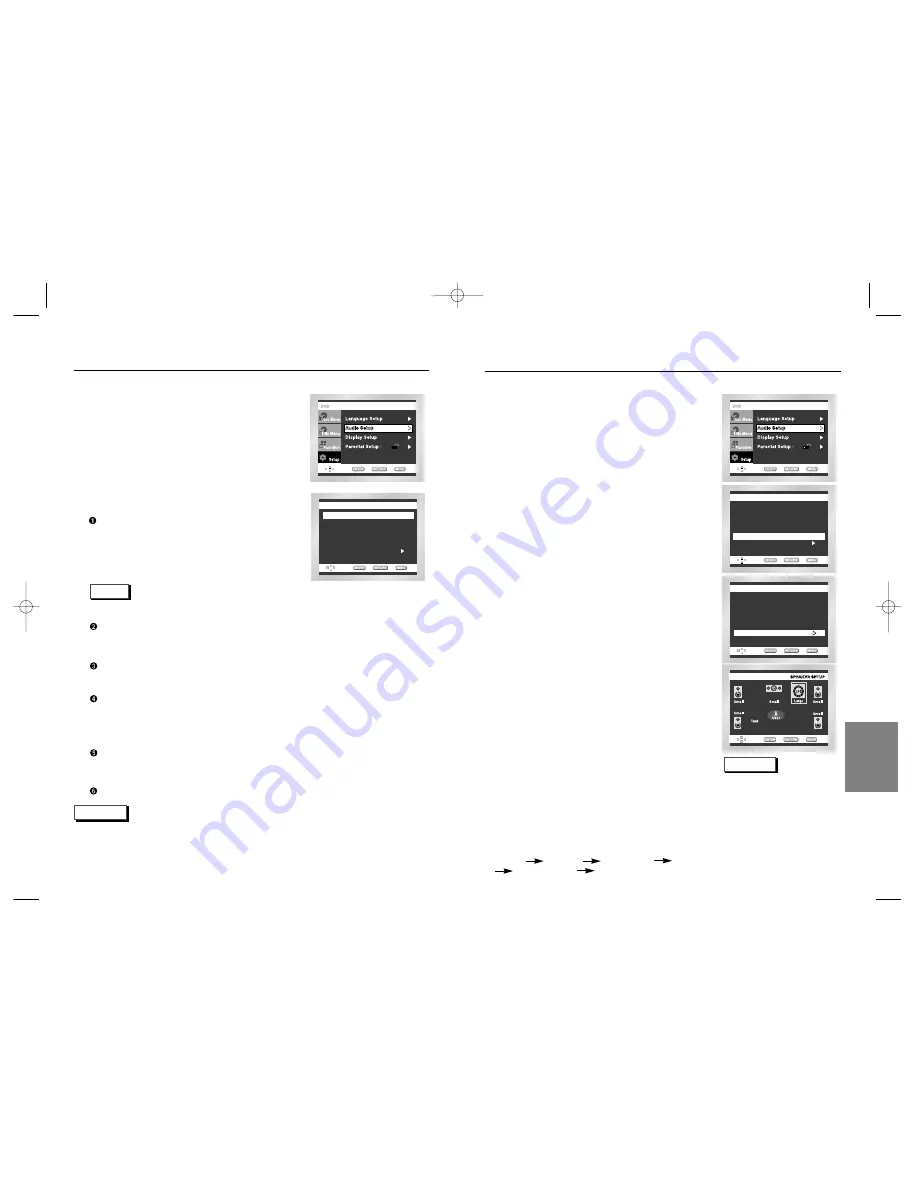
With the unit in Stop mode, press the MENU button.

Select Setup using UP/DOWN buttons, 
then RIGHT or ENTER button.

Select Audio Setup using UP/DOWN buttons, 
then press the RIGHT or ENTER button.

Select Multi Channel Output using UP/DOWN
buttons. Then select Analog pressing the RIGHT
or ENTER button.

Use the UP/DOWN buttons to select Speaker Setup
Then press the RIGHT or ENTER button.

Use the UP/DOWN or LEFT/RIGHT buttons to select
the desired item. Then press the ENTER button.

1

2

3
4

5
6

The default settings : FRONT L , R (Large), CENTER(None), 
SURROUND (None)
Select the size of the speakers to be connected.
• Front (FL , FR)

- Large: Normally select this.
- Small: When the sound cracks or the surround sound effects are

difficult to hear, select this. This activates the Dolby Digital bass
redirection circuitry and outputs the bass frequencies of the speaker
from the subwoofer.

• Center

- None: If you do not connect a center speaker, select this.
- Large: Normally select this.
- Small: When the sound cracks, select this. This activates the Dolby

Digital bass redirection circuitry and outputs the bass frequencies of
the center speaker from other speakers.

• Surround (SL, SR)

- None: If you do not connect a center speaker, select this.
- Large (Rear/Side): Normally select either of these according to the

rear speaker’s position.

- Small (Rear/Side): When the sound cracks or the surround sound

effects are difficult to hear, select either of these according to the
rear speaker’s position. This activates the Dolby Digital bass
redirection circuitry and outputs the bass frequencies of the rear
speaker from other speakers.

Setting up TEST
The test output signals come clockwise starting from the Front
Speaker(L). Adjust Channel Balance to match to the volume of test
signals memorized in the system.

50

51

Setting Up the Audio Options

With the unit in Stop mode, press the MENU button.

Select Setup using UP/DOWN buttons, then RIGHT
or ENTER button.

Select Audio Setup using UP/DOWN buttons, then
press the RIGHT or ENTER button.

Use the UP/DOWN buttons to select the desired
item. Then press the RIGHT or ENTER button.

AUDIO SETUP

DTS

   :  Off

Dynamic Compression    :  On

PCM Down Sampling        :  On

Multi Channel Output

    :  Digital 

Digital Output

Digital Output


            :  PCM

:  PCM

Speaker Setup

NOTE

• How to make the SETUP menu disappear or return to menu screen during set up; 

Press RETURN or LEFT button.

• Manufactured under license from Dolby Laboratories.

“Dolby” and the double-D symbol are trademarks of Dolby Laboratories.

• “DTS” and “DTS Digital Out” are trademarks of Digital Theater Systems, Inc.

1
2

3

4

FRONT(L)            CENTER             SUBWOOFER            FRONT(R)  

SURROUND(R)           SURROUND(L)

NOTE

• How to make the SETUP

menu disappear or return to
menu screen during set up.
Press RETURN or LEFT button.

• The subwoofer test output 

signal is lower than the other
speakers.

• The MPEG Multichannel logo 

is a trademark registered by 
PHILIPS Corporation.

Digital Output

1. PCM :

Converts to PCM(2CH) audio. 
Select PCM when using the Analog Audio Outputs.

2. Bitstream :

Converts to Dolby Digital Bitstream (5.1CH).
Select Bitstream when using the Digital Audio Output.

• Be sure to select the correct Digital Output 

or no audio will be heard.

• When Multi Channel Output select Digital.

Dolby & MPEG-2 Digital Out works.

DTS

1. Off : Doesn’t output digital signal.
2. On : Outputs DTS Bitstream via digital output only. 

Select DTS when connecting to a DTS Decoder.

Dynamic Compression

1. On : To select dynamic compression.
2. Off : To select the standard range.

PCM Down Sampling

1. On : Select this when the amplifier connected to the player is not 96KHz compatible. 

In this case, the 96KHz signals will be down converted to 48KHZ.

2. Off : Select this when the amplifier connected to the player is 96KHz compatible. 

In this case, all signals will be output without any changes.

Multi Channel Output (DVD-P538K only)

1. 

Digital 

: Select this when using the multichannel digital audio output.

2. Analog  : Select this when using the multichannel analog audio output.

NOTE

Speaker Setup (DVD-P538K only)

E138A 00141K-2(GB)XTC  4/9/03 10:21 AM  Page 50

Summary of Contents for AK68-00141K

Page 1: ...ENG DVD PLAYER DVD E138A DVD 1010 DVD E138B DVD E238 DVD E338K DVD P538K AK68 00141K E138A 00141K Cover XTC 4 9 03 10 20 AM Page 2 ...

Page 2: ... can be dangerous for you or certain fragile components You could receive an electric shock or touch the laser beam Do not place your eyes close to the opening of the disc tray or any other opening to look inside the player Be careful handle your discs with care Hold a disc with finger on the border or hole Always place disc with the label facing upward in case of a single side disc Always use a s...

Page 3: ...Skip Functions 25 Using the Display Function 26 Using the Disc and Title Menu 27 Using the Function Menu 28 Repeat Play 29 Advanced Functions Adjusting the Aspect Ratio EZ View 30 Slow Repeat play 32 Selecting the Audio Language 33 Selecting the Subtitle Language 34 Changing the Camera Angle 35 Using the Instant Replay Skip Function 36 Using the Bookmark Function 37 Using the Zoom 3D Sound Functio...

Page 4: ...ods claims of certain U S patents and other intellectual property rights owned by Macrovision Corporation and other rights owners Use of this copyright protection technology must be authorized by Macrovision Corporation and is intended for home and other limited viewing uses only unless otherwise authorized by Macrovision Corporation Reverse engineering or disassembly is prohibited Discs which can...

Page 5: ...evel 5 DIGITAL ECHO Use to adjust echo delay 6 DISC TRAY Load the disc here 7 DISPLAY Operation indicators are displayed here 8 OPEN CLOSE Press to open and close the disc tray 9 PLAY PAUSE Begin or pause disc play 10 STOP Stops disc play 11 SKIP Use to skip a scene or music 12 EZ VIEW Easy View can convert Letter Box images to full screen viewing on your conventional TV 13 SHUTTLE Use during DVD ...

Page 6: ...EO OUT JACK Use the S Video cable to connect this jack to the S Video jack on your television for a higher quality picture The VIDEO OUT SELECT switch must be set to the S VIDEO position 6 COMPONENT VIDEO OUT JACKS Use these jacks if you have a TV with Component Video in jacks These jacks provide Pr Pb and Y video Along with S Video Component Video provides the best picture quality If 525P 480P VI...

Page 7: ...ty picture The S Video must be selected in the VIDEO OUT SELECT 5 COMPONENT VIDEO OUT JACKS Use these jacks if you have a TV with Component Video in jacks These jacks provide Pr Pb and Y video Along with S Video Component Video provides the best picture quality The COMPONENT must be selected in the VIDEO OUT SELECT 6 VIDEO OUT SELECT SWITCH Use the switch to set video out If COMPONENT is selected ...

Page 8: ...I SKIP Button This function skips playback ahead 10 seconds 16 PLAY PAUSE Button Begin Pause disc play 17 SKIP Buttons Use to skip the title chapter or track 18 RETURN Button Returns to a previous menu 19 INFO Button Displays the current disc mode 20 ENTER DIRECTION Button UP DOWN or LEFT RIGHT Buttons This button functions as a toggle switch 21 ANGLE Button Use to access various camera angles on ...

Page 9: ...E Button To open and close the disc tray 14 3D Button 15 I SKIP Button This function skips playback ahead 10 seconds 16 PLAY PAUSE Button Begin Pause disc play 17 SKIP Buttons Use to skip the title chapter or track 18 RETURN Button Returns to a previous menu 19 INFO Button Displays the current disc mode 20 ENTER DIRECTION Button UP DOWN or LEFT RIGHT Buttons This button functions as a toggle switc...

Page 10: ...u to repeat play a title chapter track or disc 16 JOG DIAL Operates frame by frame play In CD mode performs track search 17 SHUTTLE DIAL Performs fast motion play 18 TV POWER Button 19 SLOW Button 20 3D Button 21 OPEN CLOSE Button 22 CHANNEL Buttons 23 I SKIP Button This function skips playback ahead 10 seconds 24 PLAY PAUSE Button Begin Pause disc play 25 SKIP Buttons Use to skip the title chapte...

Page 11: ...od 4 Audio Output Jacks OR OR AV Cable S Video Cable Video Cables Video Output Jack S Video Jack Component Video Jacks Component Video Jacks DVD Player TV with Video Input Jack The VIDEO OUT SELECT switch must be set to the S VIDEO position DVD Player TV with S Video Input Jack The VIDEO OUT SELECT switch must be set to the S VIDEO position DVD Player TV with Component Video Jacks The VIDEO OUT SE...

Page 12: ...ay Press the PLAY PAUSE or STEP button on the remote during play Screen stops no sound To resume again press PLAY PAUSE button once again 1 2 3 4 5 6 Choosing a Connection DVD E138A DVD 1010 DVD E138B DVD E238 DVD E338K only TV Normal Widescreen Projection etc Method 1 Method 2 Method 3 Connection to a TV For Video TV Method 1 Method 2 Method 3 e g DVD E338K DVD PLAYER Good picture Better picture ...

Page 13: ...eft off unless the disc is removed the STOP button is pressed twice or the player is unplugged If the player is left for 5 minutes in pause mode it will stop If the player is left in the stop mode for more than 30 minutes the power will automatically shut off Automatic Power Off Function DVD E138A DVD 1010 DVD E138B DVD E238 only If the player is left in the stop mode for more than one minute with...

Page 14: ...mber buttons of the remote control to directly access a title chapter or to start the playback from the desired time To make the screen disappear press the INFO button again To access the desired title when there is more than one in the disc For example if there is more than one movie on a DVD each movie will be identified Most of DVD discs are recorded in chapters so that you can quickly find a s...

Page 15: ...e LEFT RIGHT buttons to select Off Press ENTER then press the PLAY PAUSE button Of Off Chapter Title A B ENTER Off Off Track Disc A B ENTER NOTE DVD repeats play by chapter or title CD and VCD repeat play by disc or track Depending on the disc the Repeat function may not work When in VCD 2 0 mode MENU ON mode this function does not work DVD VCD CD 1 2 3 4 28 29 Repeat Play Using the Function Menu ...

Page 16: ... the button is pressed repeatedly The screen zoom mode operates differently depending on the screen setting in the initial setup menu To ensure correct operation of the EZ VIEW button you should set the correct aspect ratio in the initial setup See page 53 For 16 9 aspect ratio discs Wide Screen Displays the content of the DVD title in 16 9 aspect ratio Screen Fit The top and bottom of the screen ...

Page 17: ...peed between 1 8X 1 4X and 1 2X of normal DVD P538K only Press the button to choose the play speed between 1 8X 1 4X and 1 2X of normal DVD E138A DVD 1010 DVD E138B DVD E238 DVD E338K only Press the REPEAT or REPEAT A B DVD E138A DVD 1010 DVD E138B DVD E238 only button to select the point where the function starts A See Page 29 Press the REPEAT or REPEAT A B DVD E138A DVD 1010 DVD E138B DVD E238 o...

Page 18: ...ve the same subtitle language come up whenever you play a DVD Refer to Setting Up the Language Features on page 49 1 2 3 34 35 Changing the Camera Angle Press the ANGLE button to see if an ANGLE mark is present at the upper left hand corner of the screen When an ANGLE mark is shown press the ANGLE button then an ANGLE select icon will appear at the upper left hand corner of the screen Use the LEFT...

Page 19: ... the BOOKMARK button on the remote Use the LEFT RIGHT buttons to select the bookmark number you want to delete Press the CLEAR button to delete a bookmark number Press the BOOKMARK button to turn off the display ENTER 1 CLEAR NOTE Up to three scenes may be marked at a time When in VCD 2 0 mode MENU ON mode this function does not work Depending on the disc the Bookmark function may not work Using t...

Page 20: ... the MODE button to switch between the PROGRAM and RANDOM modes See page 41 for more information on these modes Program Random playback MP3 WMA Play Function 1 2 Using the Zoom 3D Sound Functions Using the Zoom Function DVD During play or pause mode press the ZOOM button on the remote A zoom mark will be displayed on screen Use the UP DOWN or LEFT RIGHT buttons to select the part of the screen you...

Page 21: ...Sound quality with MP3 files basically depends on the rate of compression decompression you choose Getting audio CD quality sound requires an analog digital sampling rate that is conversion to MP3 format of at least 128 Kbps and up to 160 Kbps However choosing higher rates like 192 Kbps or more only rarely give better sound quality Conversely files with decompression rates below 128 Kbps will not ...

Page 22: ...Use the UP DOWN or LEFT RIGHT buttons on the remote controller to select the picture you want to view and then press the ENTER button Press the PLAY PAUSE button if you want to play it in the Slide Show mode To see the next 6 pictures press the button To see the previous 6 pictures press the button Return to the Album Screen Press the UP DOWN or LEFT RIGHT buttons on the remote controller to displ...

Page 23: ... Out does not work Beginning Karaoke Functions DVD E338K DVD P538K only Reserving a Song DVD E338K DVD P538K only It is the function to reserve the desired song in advance by use of Karaoke function Playback the Karaoke Disc containing the wanted songs Press the KARAOKE button Select the Request using the LEFT RIGHT buttons Input the number Track No of the desired song into the flickering part You...

Page 24: ...ing the KARAOKE button twice displays the following The function to make the music only sound by cancelling vocal when playing a Karaoke disc In VCD CVD or CD you can select only the On or Off VOCAL FADER Remark V1 CH1 Vocal Cancel V2 CH2 Vocal Cancel 1 2 CH1 CH2 Vocal Cancel OFF Vocal Fader Off To guide melody through xylophone and piano help you sing easily This function works only on the DVD Ka...

Page 25: ...corded language is selected Howto make the SETUP menu disappear or return to menu screen during set up Press RETURN or LEFT button Using the Audio Language Using the Subtitle Language 1 2 3 5 4 6 1 2 3 4 5 6 Setting Up the Language Features Using the Player Menu Language Using the Disc Menu Language If you set the player menu disc menu audio and subtitle language in advance they will come up autom...

Page 26: ...e volume of test signals memorized in the system 50 51 Setting Up the Audio Options With the unit in Stop mode press the MENU button Select Setup using UP DOWN buttons then RIGHT or ENTER button Select Audio Setup using UP DOWN buttons then press the RIGHT or ENTER button Use the UP DOWN buttons to select the desired item Then press the RIGHT or ENTER button AUDIO SETUP DTS Off Dynamic Compression...

Page 27: ...ode Screen Messages Use to turn on screen messages On or Off Front Display Adjust the brightness of the unit s front panel display 1 Auto Dim Makes the Front Panel Display dim automatically when playing a DVD 2 Bright Makes the Front Panel Display bright 3 Dim Makes the Front Panel Display dim Black Level Adjusts the brightness of the screen On Off Setting Up the Display Options 52 53 Setting Up t...

Page 28: ...he password Enter your password again The Parental Control screen appears About the Rating Level The Rating Level will work only when Use Password is set to Yes To unlock the player use UP DOWN to select No Use RIGHT or ENTER to select Rating Level Press ENTER Use UP DOWN to select the level e g Level 6 and press ENTER Discs that contain Level 7 will now not play To cancel the rating level use RIG...

Page 29: ...eries and hold down one or more buttons for several minutes to drain the microprocessor inside the remote to reset it Reinstall batteries and try remote again Ensure that the disc is installed with the label side facing up Check the region number of the DVD 5 1 channel sound is reproduced only when the following conditions are met 1 The DVD player is connected with the proper amplifier 2 The disc ...

Reviews: