background image

ENG

12

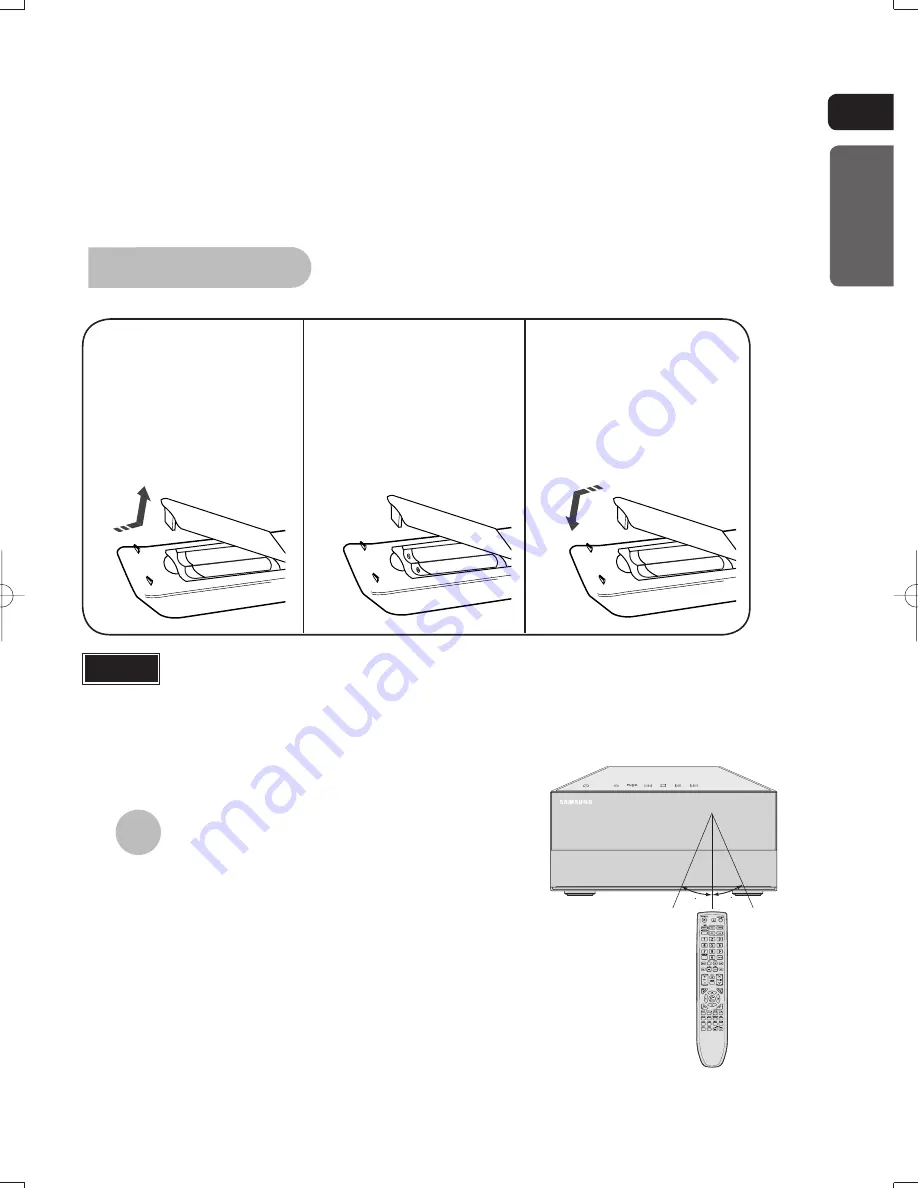
The remote control can be used up to approximately 23 
feet/7 meters in a straight line. It can also be operated at 
a horizontal angle of up to 30° from the remote control 
sensor.

Range of Operation of the Remote Control 

PREPARATION

Caution

Remove the battery
cover in the direction 
of the arrow.

1

Insert two 1.5V AAA 
batteries, paying 
attention to the correct 
polarities (+ and –).

2

Replace the battery 
cover.

3

Follow these precautions to avoid leaking or cracking cells:

• 


Place batteries in the remote control so they match the polarity:(+) to (+)and (–)to (–).

• 


Use the correct type of batteries.Batteries that look similar may differ in voltage.

• 


Always replace both batteries at the same time.

• 


Do not expose batteries to heat or flame.

Insert Remote Batteries

30

30

MM-C430D-530D-XAC-i-MIC-ENG-1.indd   15

MM-C430D-530D-XAC-i-MIC-ENG-1.indd   15

2010-6-10   8:35:32

2010-6-10   8:35:32

Summary of Contents for AH68-02272Y

Page 1: ...AH68 02272Y Rev 1 0 ...

Page 2: ...COMPONENT SYSTEM user manual MM C430D MM C530D MM C550D imagine the possibilities Thank you for purchasing a Samsung product To receive a more complete service please register your product at www samsung com register ...

Page 3: ... apparatus DANGER VISIBLE AND INVISIBLE LASER RADIATION WHEN OPEN AVOID DIRECT EXPOSURE TO BEAM FDA 21 CFR CAUTION CLASS 3B VISIBLE AND INVISIBLE LASER RADIATION WHEN OPEN AVOID EXPOSURE TO THE BEAM IEC 60825 1 THIS PRODUCT UTILIZES A LASER USE OF CONTROLS OR ADJUSTMENTS OR PERFORMANCE OF PROCEDURES OTHER THAN THOSE SPECIFIED HEREIN MAY RESULT IN HAZARDOUS RADIATION EXPOSURE DO NOT OPEN COVER AND ...

Page 4: ... are provided for your safety If the provided plug does not fi t into your outlet consult an electrician for replacement of the obsolete outlet Protect the power cord from being walked on or pinched particularly at plugs 10 convenience receptacles and the point where they exit from the apparatus Only use attachment accessories specifi ed by the manufacturer 11 Use only with the cart stand tripod b...

Page 5: ...from the wall outlet especially when left unused for a long period of time During thunderstorms disconnect the AC plug from the wall outlet Voltage peaks due to lightning could damage the product Do not expose the product to direct sunlight or other heat sources This could lead to overheating and malfunction of the product Protect the product from moisture and excess heat or equipment creating str...

Page 6: ... a long period of time Protect the player from moisture i e vases and excess heat e g fireplace or equipment creating strong magnetic or electric fields i e speakers Disconnect the power cable from the AC supply if the player malfunctions Your player is not intended for industrial use Use of this product is for personal use only Condensation may occur if your player or disc have been stored in col...

Page 7: ...ivX JPEG and DVD R RW with a sophisticated FM tuner USB HOST all in a single player USB Host support You can enjoy media files such as pictures movies and music saved on an MP3 player digital camera or USB memory stick by connecting the storage device to the USB port of the Micro Component HDMI HDMI transmits DVD video and audio signals simultaneously and provides a clearer picture Anynet HDMI CEC...

Page 8: ...ayback 37 A B Repeat Playback 38 Zoom Function 39 Selecting Audio Subtitle Language 40 Moving Directly to a Scene Song 41 Using Disc Menu 42 Using the Title Menu 43 SETUP Setting the Language 44 Setting TV Screen type 45 Setting Parental Controls Rating Level 47 Setting the Password 48 Setting the DRC Dynamic Range Compression 49 AV SYNC Setup 50 RADIO OPERATION Listening to Radio 51 Presetting St...

Page 9: ... this player If such discs are played a This disc cannot be played Please check the regional code message appears on the TV screen Many DVD discs are encoded with copy protection Because of this you should only connect your DVD player directly to your TV not to a VCR Connecting to a VCR results in a distorted picture from copy protected DVD discs This item incorporates copy protection technology t...

Page 10: ... Kodak Fuji Picture CDs may take longer to start playing or may not play at all CD R MP3 Discs Only CD R discs with MP3 files in ISO 9660 or Joliet format can be played MP3 file names should be 8 characters or less in length and contain no blank spaces or special characters Use discs recorded with a compression decompression data rate greater than 128Kbps Only files with the mp3 and MP3 extensions...

Page 11: ...2 USB JACK 3 HEADPHONE JACK 4 MIC JACK 5 WINDOW DISPLAY 1 2 3 5 4 1 OPEN CLOSE BUTTON 2 FUNCTION BUTTON 3 SEARCH FUNCTION BUTTON DOWN 4 TUNING MODE OR STOP BUTTON 5 PLAY PAUSE BUTTON 6 SEARCH FUNCTION BUTTON UP 7 VOLUME CONTROL BUTTON 8 POWER BUTTON 1 2 3 5 4 6 7 8 ...

Page 12: ...X IN 2 FM Antenna Connector 3 IPOD Connector 4 HDMI OUT Connector 5 Video Output Connector Connect the TV s video input jacks VIDEO IN to the VIDEO OUT connector 6 Component Output Connectors Connect a TV with component video input jacks to these jacks 7 Speaker Connector Terminals 8 Cool Fan 9 Clamp Wire Fasten the speaker wires All those pictures of Rear panel are based on MODEL MM C550D MM C430...

Page 13: ... CLOSE button REMAIN button ANGLE button POWER BASS button MIC VOL button TUNER MEMORY button MIC VOL button ECHO button SUBTITLE button INFO button Cursor ENTER button RETURN button REPEAT button TUNING button Tuning Preset button MUTE button AUDIO button SLEEP button SLOW button ZOOM button POWER SOUND button REPEAT A B button CD RIPPING button STEP button CD Skip buttons EXIT button Play button...

Page 14: ... the direction of the arrow 1 Insert two 1 5V AAA batteries paying attention to the correct polarities and 2 Replace the battery cover 3 Follow these precautions to avoid leaking or cracking cells Place batteries in the remote control so they match the polarity to and to Use the correct type of batteries Batteries that look similar may differ in voltage Always replace both batteries at the same ti...

Page 15: ...the speakers so that their tweeters will be at the same height as your ear R L Subwoofer The position of the subwoofer is not so critical Place it anywhere you like SW L SW R If you place a speaker near your TV set screen color may be distorted because of the magnetic field generated by the speaker If this occurs place the speaker away from your TV set Do not let children play with or near the spe...

Page 16: ...solutions available for the HDMI output are 480p 576p 720p 1080i 1080p See page 17 for resolution setting This product operates in Interlace scan mode 480i 576i for Component Output After making the video connection set the Video input source on your TV to match the corresponding Video output HDMI Component or Composite on your Micro Component See your TV owner s manual for more information on how...

Page 17: ...ity is degraded due to noise and signal loss HDMI technology is superior because it requires no D A conversion and is a pure digital signal from the player to your TV What is the HDCP HDCP High band width Digital Content Protection is a system for protecting DVD content outputted via HDMI from being copied It provides a secure digital link between a video source PC DVD etc and a display device TV ...

Page 18: ...CD during CEC ON if you turn off the TV Power the Micro Component doesn t automatically turn off the Power You can select to use the BD Wise menu only if the Micro Component is connected to a Samsung TV that supports BD Wise using an HDMI cable What is BD Wise BD Wise automatically adjusts BD Wise compliant Samsung products to the optimal settings between them This feature is enabled only if BD Wi...

Page 19: ...en press the ENTER button Press the Cursor 4 button to move to HDMI Resolution and then press the ENTER button Press the Cursor 5 button to select the desired item and then press the ENTER button Resolutions available for the HDMI output are 480p 576p 720p 1080i 1080p SD Standard Definition resolution is 480p 576p and HD High Definition resolution is 720p 1080i 1080p Press the RETURN button to ret...

Page 20: ...frame displayed every 1 25th of a second contains two interfaced fields thus a total of 50 fields are displayed every 1 50th of a second The interlaced scanning method is intended for capturing a still object Interlaced Scan 1 FRAME 2 FIELDS The progressive scanning method scans one full frame of video consecutively down the screen line by line An entire image is drawn at one time as opposed to th...

Page 21: ...music or to view videos You can also use the FUNC button on the main unit The mode switches as follows DVD CD TUNER USB IPOD IPOD MUSIC AUX DVD Depending on the type of iPod you may need to insert one of the dock slots which are provided by Apple when you purchase the iPod see next page Adjust the volume to a moderate level before you connect your iPod and Micro Component When the unit is powered ...

Page 22: ...on 8GB 16GB 32GB iPod classic 80GB 120GB 160GB iPod nano 4th generation 8GB 16GB Made for iPod means that an electronic accessory has been designed to connect specifically to iPod and has been certified by the developer to meet Apple performance standards Apple is not responsible for the operation of this device or its compliance with safety and regulatory standards iPod is a trademark of Apple In...

Page 23: ...colors 1 Example Analog signal components such as a VCR Camcorder and TV Connecting an External Analog Component Connecting External Components Press AUX to select AUX AUX appears in the display 2 Audio Cable If the external analog component has only one Audio Out connect either left or right not supplied ...

Page 24: ...Note iPod FM Antenna supplied The cooling fan supplies cool air to the unit to prevent overheating Please observe the following cautions for your safety Make sure the unit is well ventilated If the unit has poor ventilation the temperature inside the unit could rise and may damage it Do not obstruct the cooling fan or ventilation holes If the cooling fan or ventilation holes are covered with a new...

Page 25: ...s flash Increase the hours Decrease the hours 3 Press ENTER The hour flashes You can display the time even when you are using another function by pressing TIMER CLOCK once You can also use on the main set instead of buttons in step 3 4 Note Checking the Remaining Time Each time the REMAIN button is pressed the time is displayed as below Press the REMAIN button For checking the remaining time of a ...

Page 26: ... a disc gently into the tray with the disc s label facing up For mixed discs the play order is as below MP3 WMA DIVX JPEG Depending on the content of the disc the initial screen may appear different Depending on the recording mode some MP3 CDs cannot be played For CD discs you can press the numeric buttons to select the track when you press the numeric buttons after 3 seconds the playback starts a...

Page 27: ...hen press the ENTER button The MP3 WMA menu screen will appear and playback will start The appearance of the menu depends on the MP3 WMA disc WMA DRM files cannot be played Use to select the track 1 Load the MP3 WMA disc 4 Press the STOP button to stop playback To select another album and track repeat Steps 2 and 3 above 3 To change the album use to select another album in Stop mode and then press...

Page 28: ...ttons during playback Press INFO button during playback and then press INFO button or Cursor buttons to select the Slide Show Speed the playback speed changes as follows SLIDE SHOW SPEED Normal SLIDE SHOW SPEED Slow SLIDE SHOW SPEED Fast Press button the picture will rotate as clockwise Press button the picture will rotate as counter clockwise Press button it will display the previous picture Pres...

Page 29: ...ton Go to the next file whenever you press button if there are over 2 files in the disk Go to the previous file whenever you press button if there are over 2 files in the disk Press button Each time the button is pressed during playback To resume normal playback press PLAY button ...

Page 30: ...re Table DivX Supported Avi files are used to contain the audio and video data these must be stored on CD in the ISO 9660 format MPEGs containing DivX can be divided into Video and Audio Video compatibility All versions of DivX later than 3 11 including the latest 5 1 are supported In addition XviD is supported Audio compatibility MP3s encoded at bit rates from 8kbps to 320kbps AC3s from 32kbps to...

Page 31: ...ress bar You can use the remote control or main unit to control simple playback 8 functions such as PLAY PAUSE STOP and REPEAT Press the STOP button to return to the previous menu To move to the Music List and select a file Press the 1 STOP button It stops playing and returns to the music list Press the 2 S T buttons to select the file you want to play and press the ENTER PLAY button Press the STO...

Page 32: ...u M See page 20 for compatible iPods Compatibility depends on the software version of your iPod You must have the VIDEO output connected to your TV to view iPod video See page 14 iPod video is available when video output is composite If you want to watch iPod video via VIDEO output change composite CVBS on the TV video input source When the current fi le is played to the end the next fi le will be...

Page 33: ...play files from external USB storage devices such as MP3 players USB flash memory etc using the player s USB function To stop playback press the STOP button 31 Playing Media Files using the USB feature Fast playback Skip Forward Back During playback press the button When there is more than a file when you press the button the next file is selected When there is more than a file when you press the ...

Page 34: ...pported Removable HDDs equipped with 160Gbytes or more may not be recognized depending on the device If the connected device does not work due to insufficient power supply you can use a separate power cable to supply power so that it can work properly The connector of the USB cable may differ depending on the manufacturer of the USB device USB card Reader One slot USB card reader and Multi slot US...

Page 35: ...disappears Display disappears What is a Title A movie contained in a DVD disc What is a Chapter Each title on a DVD disc is divided into several smaller sections called chapters appears on the TV screen If this symbol appears on the TV screen while buttons are being operated that operation is not possible with the disc currently being played Depending on the disc the disc information display may a...

Page 36: ...ton Press SLOW button Each time the button is pressed during playback the playback speed changes as follows Slow Playback DVD DivX Note To resume normal playback press PLAY button In Pause mode or Slow mode you can use the button to select as below During fast playback of a CD or MP3 CD sound is not heard No sound is heard during slow playback and step motion playback During slow playback of a DIV...

Page 37: ...CD Briefly press Each time the button is pressed briefly during playback the previous or next chapter track or directory file will be played The picture moves forward one frame each time the button is pressed during playback Playing Frame by Frame Press STEP button DIVX ...

Page 38: ...cene in different angles 36 OPERATION DVD 1Press ANGLE button Each time the button is pressed the angle changes as follows The Angle function works only with discs on which multiple angles have been recorded Note 2 Press Cursor buttons to select the desired angle ...

Page 39: ...e Repeatedly plays the selected title Chapter Repeatedly plays the selected chapter Off Cancels Repeat Playback Normal Audio CD CD DA MP3 Tracks on a disc are played in the order in which they were recorded on the disc Repeat track Audio CD CD DA MP3 Repeat Folder MP3 Repeat All Audio CD CD DA All tracks are repeated Shuffle Audio CD CD DA MP3 Each track can be played one time When playing an Audi...

Page 40: ...with JPEG disc The time space of point A and B should be more than 5 seconds 2 Press the REPEAT A B button at the point where you want repeat play to stop B 1 Press the REPEAT A B button at the point where you want repeat play to start A 3 To return to nomal play press the REPEAT A B button again Repeat A B A Repeat A B A B Repeat A B Off A B A A B A B ...

Page 41: ...ws you to enlarge a particular area of the displayed image Each time the button is pressed the zoom level changes as follow 2 x 4 x OFF Zoom Screen Enlarge Function DVD 2 Press Cursor buttons to move the area 1Press ZOOM button DIVX JPEG ...

Page 42: ...r buttons to 2 select the Subtitle Press Cursor buttons to 3 select the desired Subtitle language 40 OPERATION Selecting Audio Subtitle Language Audio Language Selection Function DVD DIVX DIVX Subtitle Language Selection Function DVD You can use the AUDIO or SUBTITLE button on the remote control to select an audio or subtitle language Depending on the disc the Subtitle and Audio Language functions...

Page 43: ... numeric 3 buttons to select the desired Title and then press ENTER button Press 1 INFO button Press Cursor buttons to select 2 the Chapter Press Cursor or numeric 3 buttons to select the desired Chapter and then press ENTER button Press 1 INFO button Press Cursor buttons to select 2 the Playing Time Press numeric buttons to select the 3 desired playing time and then press ENTER button Moving to a...

Page 44: ...s MENU button Press Cursor buttons to move to DISC MENU and then press ENTER button 4 3 Press Cursor buttons to select the desired item and then press ENTER button Press Cursor buttons to select the desired item and then press ENTER button Press MENU button to exit the setup screen Press RETURN button to return to the previous level Press EXIT button to exit the setup screen ...

Page 45: ...rk differently 2 Press Cursor button to move to Title Menu and then press ENTER button DVD 1 In stop mode press MENU button Press MENU button to exit the setup screen 43 Press EXIT button to exit the setup screen 4 3 Press Cursor buttons to select the desired item and then press ENTER button Press Cursor buttons to select the desired item and then press ENTER button ...

Page 46: ...e to Setup and then press ENTER button 3 Once the setup is complete if the language was set to English OSD will be displayed in English Selecting the Audio Language recorded on the disc Selecting the Subtitle Language recorded on the disc Selecting the DivX Subtitle Language recorded on the disc 4 Press Cursor button to select the Language Setup and then press ENTER button Press Cursor button to s...

Page 47: ...een messages Off you can t see the screen messages 4 6 3 5 In stop mode press MENU button Press Cursor button to move to Setup and then press ENTER button Press Cursor button to move to Display Setup and then press ENTER button Press Cursor button to move to Screen Messages and then press ENTER button Press Cursor button to Tv Aspect and then press ENTER button Press Cursor button to Video Output ...

Page 48: ... this to view a 16 9 picture in the full screen mode on your wide screen TV You can enjoy the wide screen aspect Select this to play a 16 9 picture in the letter box mode on a conventional TV Black bars will appear at the top and bottom of the screen Select this to play a 16 9 picture in the pan scan mode on a conventional TV You can see the central portion of the screen only with the sides of the...

Page 49: ...ton to move to Setup and then press ENTER button 4 The password is set to 7890 by default Once the setup is complete you will be taken to the previous screen If you have selected Level 6 you cannot view DVDs with Level 7 or higher The higher the level the closer the content is to violent or adult material 3 5 Press Cursor button to move to Parental Setup and then press ENTER button Press Cursor bu...

Page 50: ... Press Cursor button to move to Setup and then press ENTER button Enter the old password a new password The setting is complete 3 5 Press Cursor button to move to Parental Setup and then press ENTER button Enter the password and then press ENTER button Setting the Password You can set the password for the Parental rating level setting SETUP Press CANCEL button to cancel the error numeric when you ...

Page 51: ...utton Press Cursor button to move to Audio and then press ENTER button 3 4 Press Cursor to adjust the DRC Press RETURN button to return to the previous level Press MENU button to exit the setup screen Press EXIT button to exit the setup screen Press Cursor button to select the DRC and then press ENTER button You can set the DRC between 0 and 8 Set it to the optimal status ...

Page 52: ...e of AV SYNC and then press the ENTER button Video may look slower than the audio if it is connected with digital TV In this case adjust the delay time of audio to optimal status to fit the video Press Cursor buttons to move to AV SYNC and then press ENTER button In stop mode press MENU button Press RETURN button to return to the previous level Press MENU button to exit the setup screen Press EXIT...

Page 53: ...ANUAL and then briefly press to tune into a lower or higher frequency Manual Tuning Each time the button is pressed the sound switches between STEREO and MONO In a poor reception area select MONO for a clear interference free broadcast Press MO ST button to listen in Mono Stereo This applies only when listening to an FM station Remote Control Unit Main Unit Press the STOP button to select PRESET a...

Page 54: ...ess the TUNER button and select the FM band If you can t press TUNER MEMORY in 5 seconds the preset disappears and FM displays 5 4 You can select between 1 and 15 Press the TUNER MEMORY button Press the TUNER MEMORY button 6 To preset another station repeat steps 2 to 5 Press TUNING to select preset number You can store up to 15 FM stations RADIO OPERATION kHz kHz kHz MO kHz MO kHz ...

Page 55: ...n or in the Pause or Stop mode the CD Ripping can t work During CD Ripping do not deal impact If is shocked while CD Ripping CD Ripping maybe disengage Sometimes some of USB devices CD Ripping time is long When CD Ripping completes or Stops the CD will reload When HDMI audio on the CD RIPPING can t work 2 1 3 Connect the USB Switch the system on by pressing POWER Load a compact disc Digital Audio ...

Page 56: ...n the system switches on Press ENTER to confirm the timer 5 4 a Set the hour by pressing or button b Press ENTER The minutes flash c Set the minutes by pressing or button d Press ENTER TIME OFF is displayed for a few seconds followed by any switch off time already set you can now set the timer switch off time a Set the hour by pressing or button b Press ENTER The minutes flash c Set the minutes by...

Page 57: ...tart automatically as shown by the TIMER indication on the display If you no longer wish to use the timer you must cancel it is no longer displayed To cancel the timer press TIMER ON OFF once is displayed again To resume the timer press TIMER ON OFF again 55 ...

Page 58: ...th the function of POWER SOUND mode The function of POWER SOUND mode amplifies bass and improves high key or bass twice as much for you to appreciate powerful real sound Press the P BASS button Result P BASS is displayed for a few seconds To cancel this function press P BASS again OFF is displayed for a few seconds When CD Ripping the P BASS function can t work and the P BASS automatically covert ...

Page 59: ...des a clear vocal as if listening HIP HOP music DNSE Provides various sound settings to enhance the type of music you re listening to WIDE 3D Provides various sound settings to enhance the type of music you re listening to PASS Select this for normal listening When you insert the microphone you can t select DNSE and WIDE 3D modes When CD Ripping the DSP EQ function can t work and the DSP EQ automa...

Page 60: ...LEEP button Each time the button is pressed the selection changes as follows 90 MIN 60 MIN 45 MIN 30 MIN 15 MIN OFF Press SLEEP button Sleep Timer Function You can set the time that the DVD player will shut itself off To cancel the sleep timer press SLEEP button until OFF appears on the display MUTE appears in the display To turn off mute press this button again Mute Function This is useful when a...

Page 61: ...You can view the various functions available on your system DEMO Function DIMMER Function Each time the button is press the brightness changes as follows DEMO ON DIMMER ON Dim DIMMER OFF Bright DIMMER Function You can adjust the brightness of the display on the main unit so it won t interfere with your movie viewing Press DEMO DIMMER button Press DEMO DIMMER button Press any buttons to cancel DEMO...

Page 62: ... MIC level Press the ECHO button to select ECHO1 ECHO2 and ECHO OFF You can connect a set of headphones to your micro component system so that you can listen to music or radio programmers without disturbing other people in the room The headphones must have a 3 5ø jack or an appropriate adapter You can also insert microphone to sing along with your favorite CDs Prolonged use of headphones at a high...

Page 63: ... to the outside of the disc Handling discs Handling and Storing Discs Cautions on Handling and Storing Discs Small scratches on the disc may reduce sound and picture quality or cause breaks in playback Be especially careful not to scratch discs when handling them Condensation may form if warm air comes into contact with cold parts inside the player When condensation forms inside the player the pla...

Page 64: ...immediately when the Play Pause button is pressed No sound is heard during fast playback slow playback and step motion playback Are the speakers connected properly Is the speaker setup correctly customized Is the disc severely damaged Sound is not produced Was the DVD player suddenly moved from a cold place to a warm one When condensation forms inside the player remove the disc and let the player ...

Page 65: ...his unless necessary Turn off the power and hold the STOP button on the main unit or on the remote control for longer than 5 seconds Using the RESET function will erase all stored settings Do not use this unless necessary The password for rating level has been forgotten The main unit is not working Example The power goes out or strange noise is heard The DVD player is not working normally Is the a...

Page 66: ...dio This is recorded on a video CD version 2 0 Selected scenes or information can be chosen from the menu displayed on the TV monitor Both the DVD player and DVD discs are encoded with a region number If the region number on the DVD disc does not correspond to the region number of the DVD player the player cannot play the disc Translated appearing at the bottom of the screen A DVD disc can contain...

Page 67: ...ENG 66 MISCELLANEOUS ...

Page 68: ...TUGAL 80820 SAMSUNG 726 7864 www samsung com pt SLOVAKIA 0800 SAMSUNG 726 7864 www samsung com sk SPAIN 902 1 SAMSUNG 902 172 678 www samsung com es SWEDEN 0771 726 7864 SAMSUNG www samsung com se k u m o c g n u s m a s w w w 4 6 8 7 6 2 7 G N U S M A S 5 4 8 0 K U e i m o c g n u s m a s w w w 0 0 1 7 1 7 8 1 8 0 E R I E AUSTRIA 0810 SAMSUNG 7267864 0 07 min www samsung com at SWITZERLAND 0848 S...

Reviews: