background image

39

 GB

  SYSTEM SETUP

SETTING UP THE VIDEO DISPLAY/OUTPUT OPTIONS

This function allows you to set up the TV screen settings. This function depends on the disc or TV type. It may not 
work with some discs or TVs.

With the unit in Stop mode, press the 

MENU

 button.

Press the 

▲▼

 buttons to select 

Setup

, then press the 

ENTER

 or 

 button.

Press the 

▲▼

 buttons to select 

Display Setup

, then 

press the 

ENTER

 or

 ►

 button.

Display setup menu will be displayed.

Press the 

▲▼

 buttons to select the desired display option 

then press the 

ENTER

 or 

 button.

Press the 

▲▼

 buttons to select the desired sub-menu 

item from a display option, then press the 

ENTER

 button.

Press the 

RETURN

 or 

 button to return to the previous menu. Press the 

MENU

 button to 

exit the menu.

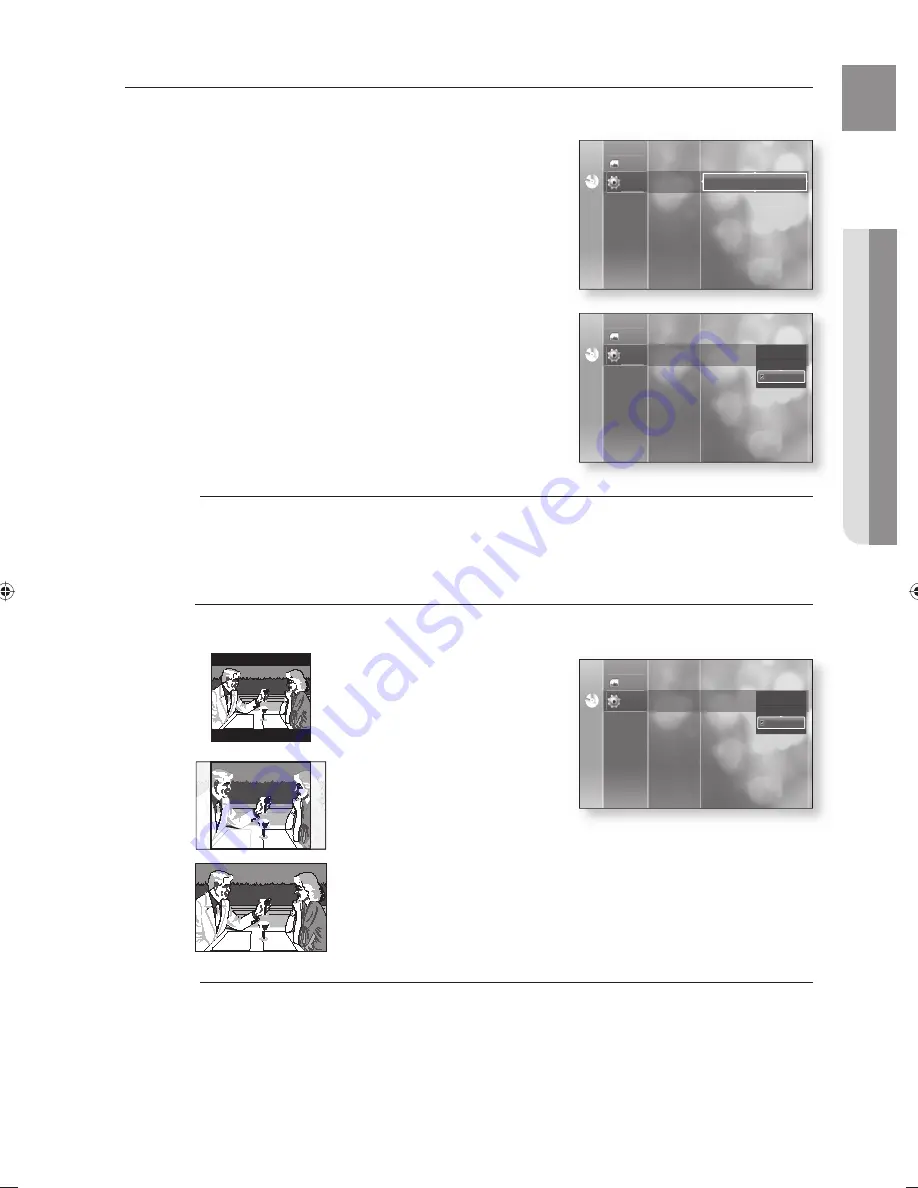
TV Aspect

Depending on the type of television you have, you may want to adjust the screen setting. (aspect ratio)

•   4:3 Letter Box : 

Select when you want to see the total 
16:9 ratio screen BD/DVD supplies, even 
though you have a TV with a 4:3 ratio 
screen. Black bars will appear at the top 
and bottom of the screen.

•  4:3 Pan-Scan : 

Select this for conventional size TV when 
you want to see the central portion of the 
16:9 screen. (Extreme left and right side 
of movie picture will be cut off.)

•  16:9 Wide : 

You can view the full 16:9 picture on your widescreen TV. 

Depending on the disc type, some aspect ratios may not be available.

Certain movies will be displayed in 4:3 Pillarbox (black bars on sides of picture) even if 16:9 
wide is selected.

1.

2.

3.

4.

5.

M

M


No Disc

No Disc

Photo

Setup

HDMI Setup

Parental Setup

System Upgrade

Display Setup

Movie Frame (24 Fs) 

:  Off

Resolution : 


576p/480p

Screen Message 

:  On

 TV Aspect 

:  16:9 Wide

Language Setup

Audio Setup

 4:3  Letter Box

 4:3  Pan-Scan

16:9 Wide

No Disc

No Disc

Photo

Setup

HDMI Setup

Parental Setup

System Upgrade

Display Setup

Movie Frame (24 Fs) 

:  Off

Resolution : 


576p/480p

Screen Message 

:  On

 TV Aspect 

:  16:9 Wide

Language Setup

Audio Setup

 4:3  Letter Box

 4:3  Pan-Scan

16:9 Wide

No Disc

No Disc

Photo

Setup

HDMI Setup

Parental Setup

System Upgrade

Display Setup

Movie Frame (24 Fs) 

:  Off

Resolution : 


480p

Screen Message 

:  On

 TV Aspect 

:  16:9 Wide

Language Setup

Audio Setup

HT-BD2_NOGB.indd   39

HT-BD2_NOGB.indd   39

2007-12-6   11:48:18

2007-12-6   11:48:18

Summary of Contents for AH68-02019K

Page 1: ...AH68 02019K ...

Page 2: ...y Home Cinema System user manual imagine the possibilities Thank you for purchasing a Samsung product To receive a more complete service please register your product at www samsung com global register HT BD2 HT BD2 ...

Page 3: ... transmits DVD video and audio signals simultaneously and provides a clearer picture The 1080p Full HD resolution provides even clearer pictures Anynet HDMI CEC Function Anynet is a function that can be used to operate the main unit of this system using a Samsung TV remote control by connecting the Blu ray Home Theater to a SAMSUNG TV using an HDMI Cable This is only available with SAMSUNG TVs tha...

Page 4: ...een is accessed Due to Blu ray Disc s ability to preload data from the disc without interrupting playback a menu may consist of several pages You can browse through the menu pages or select different menu paths while the audio and video remain playing in the background Interactivity Certain Blu ray Discs may contain Animated menus and Trivia games User Browsable Slideshows With Blu ray Discs you c...

Page 5: ...rformance of procedures other than those specified herein may result in hazardous radiation exposure CAUTION INVISIBLE LASER RADIATION WHEN OPEN AND INTERLOCKS DEFEATED AVOID EXPOSURE TO BEAM WARNING To reduce the risk of fire or electric shock do not expose this appliance to rain or moisture CAUTION TO PREVENT ELECTRIC SHOCK MATCH WIDE BLADE OF PLUG TO WIDE SLOT FULLY INSERT This apparatus shall ...

Page 6: ...ft unused for a long period of time During thunderstorms disconnect the AC main plug from the wall outlet Voltage peaks due to lightning could damage the unit Protect the player from moisture i e vases and excess heat e g fireplace or equipment creating strong magnetic or electric fields i e speakers Disconnect the power cable from the AC supply if the player malfunctions Your player is not intend...

Page 7: ...ideo Out to your TV 24 Connecting Audio from External Components 26 Connecting to Samsung s FTP Internet site for Software Upgrades 27 Connecting the FM Antenna BASIC FUNCTIONS OF YOUR BLU RAY HOME CINEMA 28 28 Before Playing 29 Using the remote control to operate the blu ray home cinema or your samsung tv 30 Playing a Disc 31 Using the Search and Skip Functions 31 Slow Motion Play Step Motion Pla...

Page 8: ... DA MP3 Screen Elements 57 Buttons on the Remote Control used for Audio CD CD DA MP3 disc playback 57 Repeat Audio CD CD DA MP3 VIEWING A PICTURE 59 59 Viewing a Picture 59 Slide Show 59 Rotate 60 Zoom 60 Go To Photo List SOUND MODE 61 61 SFE Sound Field Effect Mode 61 NEO 6 mode 62 Dolby Pro Logic IIx Mode 62 Dolby Pro Logic IIx Effect RADIO 63 63 Listening to Radio 63 Presetting Stations CONVENI...

Page 9: ...s a function available on a data CD CD R or CD RW G JPEG This involves a function available on CD R RW DVD R RW discs A MP3 This involves a function available on CD R RW DVD R RW discs Caution This involves a case where a function does not operate or settings may be cancelled M Note This involves tips or instructions on the page that help each function operate About the use of this user s manual B...

Page 10: ...io PAL broadcast system in U K France Germany etc Dolby TrueHD DTS HD Master Audio Digital Audio MP3 Stereo Java Manufactured under license from Dolby Laboratories Dolby and the double D symbol are trademarks of Dolby Laboratories Manufactured under license under U S Patent s 5 451 942 5 956 674 5 974 380 5 978 762 6 226 616 6 487 535 other U S and worldwide patents issued pending DTS is a registe...

Page 11: ...ing Mexico 9 region free 5 Eastern Europe Russia India Africa Blu ray Disc Compatibility Blu ray Disc is a new and evolving format Accordingly disc compatibility issues are possible Not all discs are compatible and not every disc will play back For additional information refer to the Compliance and Compatibility Notice section of this Manual If you encounter compatibility problems please contact t...

Page 12: ...corded files may not play Some CD R RW discs may not be playable with this unit depending on the device which was used to burn them For contents recorded on CD R RW media from CDs for your personal use playability may vary depending on contents and discs DVD R Disc Playback Once a DVD R recorded in Video Mode is finalized it becomes DVD Video This unit can play back DVD R discs recorded and finali...

Page 13: ...ON Stops disc playback PLAY PAUSE BUTTON Plays a disc or pauses playback TUNING UP SKIP BUTTON Goes to the next title chapter track Tunes up the FM frequency band Volume Control BUTTONS Volume adjustment EJECT BUTTON Eject the disc DISC INSERT HOLE Insert a disc STANDBY INDICATOR When the unit is first plugged in this indicator lights 10 POWER BUTTON Turns the Blu ray Home Cinema on and off 10 8 7...

Page 14: ...tal output HDMI OUT JACK Use the HDMI cable connect this HDMI output terminal to the HDMI input terminal on your TV for the best quality picture LAN TERMINAL Connect this LAN terminal to the LAN terminal on your modem for software upgrades FM 75Ω COAXIAL JACK Connect the FM antenna SUBWOOFER OUT JACK Connect the subwoofer speaker COOLING FAN The fan always revolves when the power is on Ensure a mi...

Page 15: ...14 remote control TOUR OF THE REMOTE CONTROL 2 1 35 34 33 32 31 30 29 28 27 26 25 24 23 22 21 20 19 18 17 16 15 14 13 12 11 10 9 8 7 6 5 4 3 ...

Page 16: ...attery cover Follow these precautions to avoid leaking or cracking cells Place batteries in the remote control so they match the polarity to and to Use the correct type of batteries Batteries that look similar may differ in voltage Always replace both batteries at the same time Do not expose the batteries to heat or a flame M 18 17 16 15 14 13 12 11 10 9 8 7 6 5 4 3 2 1 EJECT button TV VIDEO butto...

Page 17: ...ung TV While holding down the POWER button use the number buttons to enter 00 15 16 17 and 40 4 If the TV turns off the setting is complete You can use the TV POWER VOLUME CHANNEL and Numeric buttons 0 9 The remote control may not work on some brands of TVs Also some operations may not be possible depending on your brand of TV If you do not set the remote control with the code for your brand of TV...

Page 18: ... 03 15 40 15 01 15 16 17 37 38 39 40 41 42 43 44 18 19 54 56 59 60 62 63 65 71 15 17 18 48 54 59 60 62 72 89 40 54 54 18 40 18 40 59 60 75 44 45 46 47 48 49 50 51 52 53 54 55 56 57 58 59 60 61 62 63 64 65 66 67 68 69 70 71 72 73 74 75 76 77 78 79 80 81 82 83 84 85 86 MTC NEC Nikei Onking Onwa Panasonic Penney Philco Philips Pioneer Portland Proton Quasar Radio Shack RCA Proscan Realistic Sampo Sam...

Page 19: ...and base Insert and tighten Black screws on the bottom side of the stand base Place the stand on thefl oor Insert and tighten 2 Silver screws on the back of the stand 1 2 3 Speaker Packages Please confirm that all the following contents are included in the package Front speakers and Surround speakers are packaged separately as shown in the diagram STAND BASE STAND connection STAND BASE 4EA STAND 4...

Page 20: ...bled speaker Make sure that the speaker is installed on a flat and stable area Otherwise it may easily be knocked over To mount the speakers on the wall Drive a screw into the wall for each speaker and then hook the front speaker over them 4 5 6 M SPEAKER STAND Hook the speakers so that the screws are in the position of the figure ...

Page 21: ...ightly in front of the center speakers Center Speaker f It is best to install it at the same height as the front speakers You can also install it directly over or under the TV Surround Speakers hj Place these speakers to the side of your listening position If there isn t enough room place these speakers so they face each other Place them about 60 to 90cm 2 to 3feet above your ear facing slightly d...

Page 22: ...een color may be distorted because of the magnetic field generated by the speaker If this occurs place the speaker away from your TV set M FM Front Speaker R Center Speaker Subwoofer Speaker Front Speaker L Surround Back Speaker L Surround Back Speaker R Surround Speaker R Surround Speaker L Do not let children play with or near the speakers They could get hurt if a speaker falls When connecting t...

Page 23: ...the player to the TV using the HDMI cable for the first time or to a new TV the HDMI output resolution will be automatically set to the highest provided by the TV If you connect a Samsung TV to the Blu ray Home Cinema using an HDMI cable the player can be easily operated using the TV remote control This is only available with Samsung TVs that support the Anynet feature See page 42 If the HDMI cabl...

Page 24: ...nked operation of this unit through Samsung TVs with the Anynet feature If your Samsung TV has an logo then it supports the Anynet function If you turn on the player and insert a disc the player will start playing the disc and the TV will turn on automatically and switch to HDMI mode If you turn on the player and press the Play button with a disc already inserted the TV will immediately turn on an...

Page 25: ...o match connector colors Press the AUX button on the remote control to select AUX input You can also use the FUNCTION button on the main unit The mode switches as follows BD DVD D IN 1 D IN 2 AUX FM You can connect the Video Output jack of your VCR to the TV and connect the Audio Output jacks of the VCR to this product 1 2 M FM Audio Cable not supplied If the external analog component has only one...

Page 26: ...e remote control to select D IN 1 or D IN 2 input You can also use the FUNCTION button on the main unit The mode switches as follows BD DVD D IN 1 D IN 2 AUX FM To see video from your Cable Box Satellite receiver you must connect it s video output to a TV This system supports Digital sampling frequencies of 32 kHz of higher from external digital This system supports Digital sampling frequencies of...

Page 27: ...R SOFTWARE UPGRADES Using the Direct LAN Cable UTP cable connect the LAN terminal on the rear of the Blu ray Home Cinema to the LAN terminal of your modem Connect to the Internet for future software upgrades See pages 46 49 for the Software Upgrade procedure M ...

Page 28: ...s Cooling Fan The cooling fan supplies cool air to the unit to prevent overheating Please observe the following cautions for your safety Make sure the unit is well ventilated If the unit has poor ventilation the temperature inside the unit may rise and may damage it Do not obstruct the cooling fan or ventilation holes If the cooling fan or ventilation holes are covered with a newspaper or cloth he...

Page 29: ...his player BD R BD RE HD DVD DVD RW DVD R DVD ROM DVD RAM CDV CD ROM CVD CD I 8 cm MD mini disc Super Audio CD except CD layer CDGs play audio only not graphics Ability to play back may depend on recording conditions DVD R CD RW R DVD RW V mode The unit may not play certain CD R CD RW and DVD R due to the disc type or recording conditions Blu ray Disc is a new and evolving format Accordingly disc ...

Page 30: ... into the AC power supply Press the BD RECEIVER button to switch to BD RECEIVER mode to operate the Blu ray Home cinema Press the FUNCTION button on the main unit or BD button on the remote to enable BD DVD playback Press the TV button to set the remote to TV mode Press the POWER button to turn on your Samsung TV with this remote Press the TV VIDEO button to select VIDEO mode on your TV 1 2 3 4 5 ...

Page 31: ...tion To pause playback press the PLAY PAUSE button during playback To resume press the PLAY PAUSE button once again If the player is left in the stop mode for more than 10 minutes without any pressing any buttons a screen saver will appear on your TV If the player is left in the screen saver mode for more than 30 minutes the power will automatically turn off except during playback of an MP3 CDDA a...

Page 32: ...KIP button it moves to the beginning of the chapter One more press makes it move to the beginning of the previous chapter SLOW MOTION PLAY STEP MOTION PLAY Slow Motion Play hZCV In pause or step mode press the SLOW button on the remote control for Slow Motion play If you press the SLOW button 1 8 1 4 1 2 To return to normal speed playback press the PLAY PAUSE button This icon indicates an invalid ...

Page 33: ...32 system setup For your convenience you can set this Blu ray Home Cinema s features for the best use in your home environment ON SCREEN MENU NAVIGATION ...

Page 34: ... Menu For the disc menu contained on the disc Menu For the on screen menu of your Blu ray Home Cinema Press the buttons to select the desired language then press the ENTER button Press the RETURN or button to return to the previous menu Press the MENU button to exit the menu The selected language will only appear if it is supported on the disc 1 2 3 4 5 M No Disc No Disc Photo Setup Audio Setup Di...

Page 35: ...e movie with the standard Dynamic Range AV Sync Video may look slower than the audio when the player is connected to a digital TV If this occurs adjust the audio delay time to match the video You can set the audio delay time between 0 ms and 300 ms Set it to the optimal status 1 2 3 4 5 M No Disc No Disc Photo Setup Display Setup HDMI Setup Parental Setup System Upgrade Audio Setup AV Sync 50msec ...

Page 36: ...tely as follows Small None For Front Subwoofer Center and Surround the mode is set to Present When done use the buttons to select Save then press the ENTER button If you don t want to save your settings use the buttons to select Cancel then press the ENTER button Press the RETURN button to return to the previous menu 1 2 3 4 5 6 M No Disc No Disc Photo Setup Display Setup HDMI Setup Parental Setup...

Page 37: ...n A test tone will be sent to L C R SR SBR SBL SL LFE in order so you can make sure the speakers are set up correctly To end the test tone press the RED A button again When playing a BD DVD or CD this will work only in Stop mode Use this function to check that each speaker is correctly connected and that there is no problem When HDMI AUDIO is on audio is produced through TV speakers the TEST TONE ...

Page 38: ... Distance You can set the Speaker Distance between 0 3m 1ft and 9m 30ft When done use the buttons to select Save then press the ENTER button If you don t want to save your settings use the buttons to select Cancel then press the ENTER button Press the RETURN button to return to the previous menu 1 2 3 4 5 6 M No Disc No Disc Photo Setup Display Setup HDMI Setup Parental Setup System Upgrade Audio ...

Page 39: ...URN button to return to the previous menu Adjusting Front Surround Surround Back Speaker Balance You can select between 0 6 and OFF The volume decreases as you move closer to 6 Adjusting Center Surround Surround Back Subwoofer Speaker Level The volume level can be adjusted in steps from 6dB to 6dB The sound gets louder as you move closer to 6dB and quieter as you get closer to 6dB 1 2 3 4 5 6 M No...

Page 40: ... 3 ratio screen Black bars will appear at the top and bottom of the screen 4 3 Pan Scan Select this for conventional size TV when you want to see the central portion of the 16 9 screen Extreme left and right side of movie picture will be cut off 16 9 Wide You can view the full 16 9 picture on your widescreen TV Depending on the disc type some aspect ratios may not be available Certain movies will ...

Page 41: ...1080p If the connected TV does not support the movie frame or the selected resolution you will see the following message If you select Yes and the resolution is not supported the TV s screen will be blank If the screen is blank press and hold the STOP button on the front of the player for more than 5 seconds no disc inserted All settings are restored to the factory default Follow the steps on the ...

Page 42: ...ou can t select the 1080p resolution or Movie Frame 24 Fs The BD disc must have the 24 frame feature in order to use the Movie Frame 24 Fs mode If you have both HDMI and Component cables connected to your TV the Component resolution may differ from the chart above In DVD playback if both HDMI and Component jacks are connected and you select the Component mode the Display Setup menu will show the o...

Page 43: ... cable See page 22 Set the Anynet function on your TV See the TV instruction manual for more information You can operate the Home Cinema by using the TV remote control Available TV buttons and buttons button If you select TV Set the Anynet HDMI CEC function to On on your TV Receiver On You can listen to audio through the Home Cinema Receiver Off You can listen to audio through the TV If you select...

Page 44: ...tted over the HDMI connection cable and audio is output through your TV speakers only Off Video is transmitted over the HDMI connection cable only and audio is output through the Home Cinema speakers only The default setting of this function is HDMI Audio Off HDMI AUDIO is automatically down mixed to 2ch for TV speakers M No Disc No Disc Photo Setup Parental Setup System Upgrade HDMI Setup HDMI Au...

Page 45: ...ord message will be displayed Enter your password again Press the ENTER or button to select Parental Lock Press the buttons to select On or Off then press the ENTER button Press the RETURN or button to return to the previous menu Press the MENU button to exit the menu If you forgot your password Remove the disc Press and hold the STOP button on the front panel for 5 seconds or more All settings wi...

Page 46: ...n using the number buttons on the remote control 1 2 1 2 3 No Disc No Disc Photo Setup System Upgrade Parental Setup New Password Display Setup HDMI Setup Parental Lock Off Rating Level 1 Kids No Disc No Disc Photo Setup System Upgrade Parental Setup New Password Display Setup HDMI Setup Parental Lock Off Rating Level 1 Kids Parental Setup NUMBER RETURN Confirm the password No Disc No Disc Photo S...

Page 47: ... the network setup If the network connection has failed This system can not connect to internet for update Please check the network setup If no later version has been released the latest version has been already installed The latest version of the firmware is already installed There is no need to update If there is a disc in the player Please maintain No Disc state for network update This indicate...

Page 48: ...n the system upgrade is done check the firmware details in the System Upgrade menu Do not turn off the player during the System Upgrade Otherwise the player may not work properly When software is upgraded settings you have made will return to their default factory settings We recommend you write down your settings so that you can easily reset them after the upgrade 6 7 8 9 M No Disc No Disc Photo ...

Page 49: ...or button You will see a menu that allows you to make network settings Press the buttons to select DHCP then press the ENTER button If DHCP is set to On you can t select IP Address Subnet Mask or Gateway If DNS is set to Automatic you can t select Primary Secondary DNS 1 2 3 4 5 4 5 M No Disc No Disc Photo Setup System Upgrade Network Setup Upgrade Start System Information HDMI Setup Parental Setu...

Page 50: ...DMI Setup Parental Setup System Information Network Setup s SELECT RETURN Save Cancel DHCP On IP Address 000 000 000 000 Subnet Mask 255 255 255 000 Gateway 000 000 000 000 DNS Manual Primary DNS 000 000 000 000 Secondary DNS 000 000 000 000 Setup not available No Disc No Disc Photo Setup System Upgrade Upgrade Start Network Setup HDMI Setup Parental Setup System Information Network Setup s SELECT...

Page 51: ...ovie will be identified as a Title Chapter Most BD DVD discs are recorded in chapters so that you can quickly find a specific passage Playing Time Allows playback of the film from a desired time You must enter the starting time as a reference The time search function does not operate on some discs Audio Refers to the film s soundtrack language A BD disc can contain up to 32 audio languages and a D...

Page 52: ...p then press the ENTER button The Title menu setup options may vary from disc to disc Depending on the disc the Title Menu may not be available Title Menu will only be displayed if there are at least two titles in the disc Using the Popup Menu h During playback press the POPUP MENU button on the remote control Press the buttons or ENTER button to select the desired menu The Popup menu setup option...

Page 53: ...ton again then press the buttons to select Off Depending on the disc the Repeat function may not be available Using the A B Repeat function hZCV Press the REPEAT A B button on the remote control Press the REPEAT A B button at the point where you want repeat play to start A Press the REPEAT A B button at the point where you want repeat play to stop B To return to normal play press the CANCEL button...

Page 54: ...lu ray Discs may allow you to select multi channel LPCM Dolby digital audio English sound tracks and HD audio formats like Dolby digital Dolby TrueHD or DTS HD SELECTING THE SUBTITLE LANGUAGE hZ You can select a desired subtitle quickly and easily with the SUBTITLE button Using the SUBTITLE button Press the SUBTITLE button The subtitle changes when the button is pressed repeatedly The subtitle lan...

Page 55: ...n hZCV During playback press the MARKER button on the remote control The Bookmark screen appears Press the ENTER button when the desired scene appears The selected scene will be stored Press the buttons to move to the next position Press the ENTER button again when the desired scene appears The scene will be stored at the selected position and the bookmark time information will be shown Repeat abo...

Page 56: ...r CANCEL button to delete the selected bookmark 1 2 3 1 2 3 a DELETE MOVE s Play e EXIT T 1 00 12 17 T 1 00 12 27 Add Add Add Add Add Add 00 12 21 01 53 26 Marker BD a DELETE MOVE s Play e EXIT T 1 00 12 17 T 1 00 12 27 T 1 00 12 53 T 1 00 12 55 T 1 00 12 57 Add Add Add 00 13 38 01 53 26 Marker BD a DELETE MOVE s Play e EXIT T 1 00 12 17 T 1 00 12 27 T 1 00 12 53 T 1 00 12 55 T 1 00 12 57 T 1 00 1...

Page 57: ...r of the track currently being played MP3 Displays the name of the track currently being played Displays the current play index total track number Current Total Play Time Displays available COLOR buttons see next page for Color button usage 1 2 3 1 2 3 CD CD Root Song02 mp3 Song03 mp3 Song04 mp3 Song05 mp3 Song06 mp3 Song07 mp3 Song08 mp3 00 03 32 00 03 38 00 03 41 00 03 43 00 04 05 00 03 27 00 03...

Page 58: ...ng 7 ENTER button Plays the selected track song 8 buttons Moves to the applicable folder or plays the applicable track according to the current position Moves to the parent folder 9 COLOR buttons RED A GREEN B YELLOW C RED A button Selects the Play Mode Repeat during playback GREEN B button Go to Playlist from Music List Go to Music list from Playlist YELLOW C button Playlist play REPEAT AUDIO CD ...

Page 59: ...TRACK 002 TRACK 003 TRACK 004 TRACK 005 TRACK 006 TRACK 007 TRACK 008 TRACK 001 Video Music Photo Setup b Music List Playlist Play s Add Play Original Playlist CD CD TRACK 005 TRACK 007 TRACK 008 TRACK 009 TRACK 010 TRACK 011 TRACK 012 TRACK 013 01 TRACK 002 02 TRACK 003 03 TRACK 004 04 TRACK 006 TRACK 006 Video Music Photo Setup b Music List Playlist Play s Add Play Original Playlist CD CD TRACK ...

Page 60: ... Each time you press the button the play speed will increase accordingly To stop the Slide Show Press the STOP or RETURN button JPEG s smaller than 1920 x 1080 will be displayed at normal resolution They will not fully fill the screen ROTATE To setup follow steps 1 and 3 above Press the ENTER button Use the RED A and GREEN B buttons to rotate the image in a desired direction Photo files larger tha...

Page 61: ...w steps 1 to 3 in Viewing a Picture on page 59 Press the ENTER button To go Photo List press the RETURN or STOP button 4 5 6 4 5 ar90 b u90 Zoom d Speed Slide Show 03 07 BEACH JPG CD CD ar90 b u90 Zoom d Speed Slide Show 04 07 KE JPG CD CD a Zoom In b Zoom Out Zoom Off m MOVE x2 60 CD CD KE JPG KE2 JPG MBHONG JPG NEW_BEE JPT _____1_ JPG 194 KB 191 KB 30 KB 76 KB 17 KB BEACH JPG 27 KB Music Photo S...

Page 62: ...d signals or HD audio sound NEO 6 MODE Enables you to play back 2 channel or DTS 5 1 channel audio signals over 7 1speakers Press NEO 6 MODE button NEO 6 MODE appears on the display panel Each time the button is pressed the selection changes as follows CINEMA MUSIC NEO 6 OFF This mode decodes 2 channel signals to a high precision digital matrix decoder CINEMA CINEMA mode is optimized for movie pla...

Page 63: ...g in a baseball park or concert hall GAME Enhances the excitement of the game s sound DPL IIx OFF Select this to listen to sound from the front left and right speakers and the subwoofer only When selecting Pro Logic IIx mode connect your external device to the AUDIO INPUT jacks L and R on the player If you connect to only one of the inputs L or R you cannot listen to surround sound This mode is av...

Page 64: ... the STOP button to select MANUAL and then briefly press the SKIP button to tune in to a lower or higher frequency Mono Stereo Press the MO ST button to listen in Mono Stereo Each time the button is pressed the sound switches between STEREO and MONO In a poor reception area select MONO for a clear interference free broadcast PRESETTING STATIONS Example Presetting FM 89 10 in the memory Press the T...

Page 65: ...again changes the sleep time from what you have set earlier To cancel the sleep timer press the SLEEP button until OFF appears on the display ADJUSTING DISPLAY BRIGHTNESS You can adjust the brightness of the display on the main unit so it won t interfere with your movie viewing Press the DIMMER button Each time the button is pressed the brightness of front display will be adjusted MUTE FUNCTION Th...

Page 66: ...or 8 speakers select the D PL IIX Neo 6 or SFE MODE modes If you set SBL and SBR to NONE in the speaker mode in the audio setup of the setup screen no sound is heard from the SBL and SBR speakers Set SBL and SBR to Small Dolby Digital 5 1 CH Surround Sound is not produced Is there Dolby Digital 5 1 CH mark on the disc Dolby Digital 5 1 CH Surround Sound is produced only if the disc is recorded wit...

Page 67: ...lu ray Home Cinema system no sound is heard If the EJECT button is pressed while listening to TV audio using the D IN or AUX functions the BD DVD functions are turned on and this mutes the TV audio The icon appears on screen The features or action cannot be completed at this time because 1 The BD DVD s software restricts it 2 The BD DVD s software doesn t support the feature e g angles 3 The featu...

Page 68: ... ventilated area Keep in a clean Protection jacket Store vertically Do not allow the discs to become contaminated with dirt Do not load cracked or scratched discs Handling and Storing Discs When you get fingerprints or dirt on the disc clean it with a mild detergent diluted in water and wipe with a soft cloth When cleaning wipe gently from the inside to the outside of the disc Condensation may for...

Page 69: ...20p 576p 480p PCM multichannel audio Bitstream audio PCM audio Amplifier Front speaker output 135W x 2 3Ω Center speaker output 135W 3Ω Surround speaker output 135W x 2 3Ω Subwoofer speaker output 155W 8Ω Surround Back speaker output 135W x 2 3Ω Frequency range 20Hz 20KHz S N Ratio 70dB Channel separation 60dB Input sensitivity AUX 400mV Speaker Speaker system 7 1ch speaker system Impedance Freque...

Page 70: ...le Subject to the restrictions described below and those noted throughout this Manual including the Disc Type and Characteristics section of this Manual disc types that can be played are pre recorded commercial BDROM DVD Video and Audio CD discs DVD RW DVDR discs and CD RW CD R discs Discs other than the above cannot and or is not intended to be played by this player And some of the above discs ma...

Page 71: ...ct SAMSUNG WORLD WIDE If you have any questions or comments relating to Samsung products please contact the SAMSUNG customer care center North America Latin America Europe CIS Asia Pacific Middle East Africa ...

Reviews: