background image

English - 18

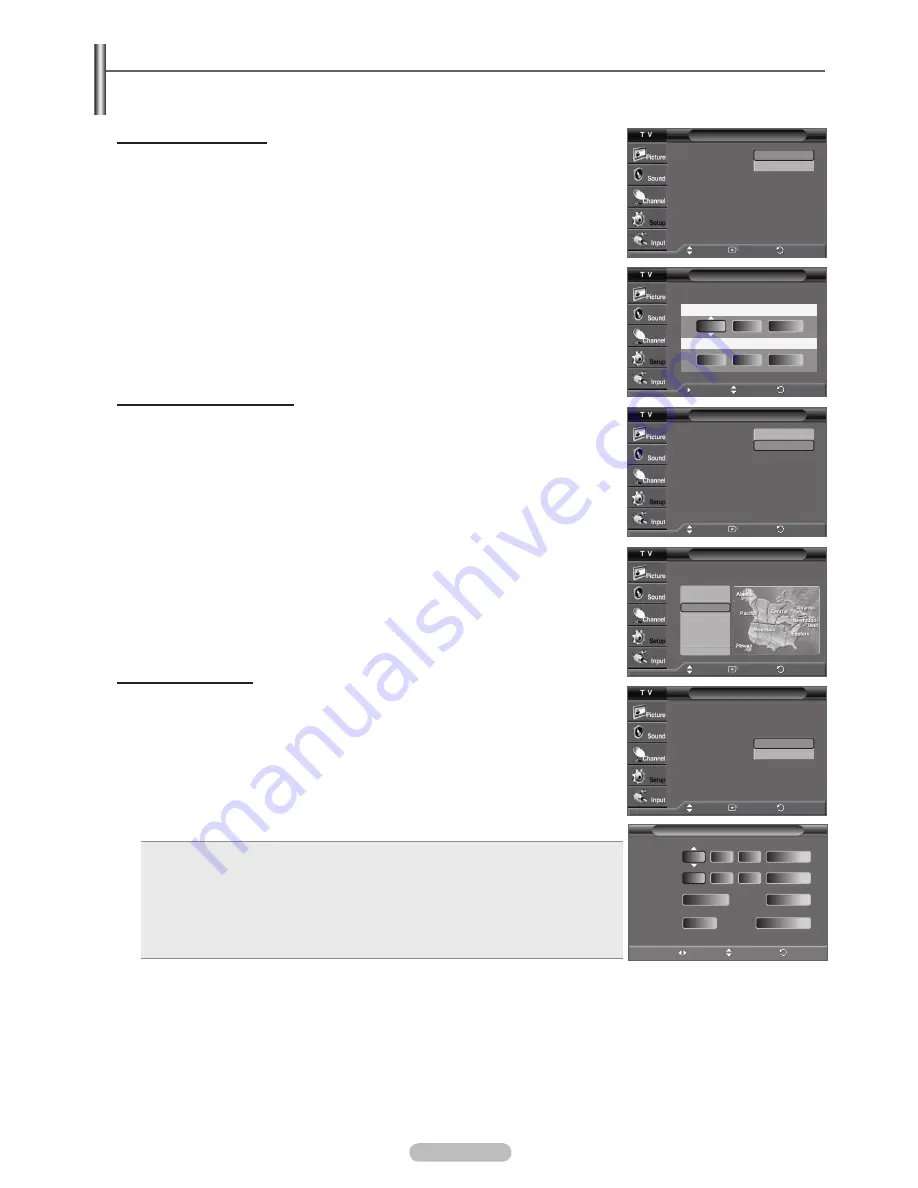
Setting the Time

Setting the clock is necessary in order to use the various timer features of the TV. Also, you can check the time while watching 

the TV. (Just press the INFO button.)

Setting the Clock Manually
1

  Press the 

MENU

 button to display the menu. 

Press the ▲ or ▼ button to select 

Setup

, then press the 

ENTER

 button. 

Press the ▲ or ▼ button to select 

Time

, then press the 

ENTER

 button.

2

  Press the 

ENTER

 button to select 

Clock

.

3

  Press the 

ENTER

 button to select 

Clock Mode

Press the ▲ or ▼ button to select 

Manual

, then press the 

ENTER

 button.

4

  Press the ▲ or ▼ button to select 

Clock Set

, then press the 

ENTER

 button.

5

  Press the ◄ or ► button to  move to 

Month

Day

Year

Hour

Minute

, or 

am/pm

.  

Set the date and time you want by pressing the ▲ or ▼ button, then press the 

ENTER


button.


Press the 

EXIT

 button to exit.

  The current time will appear every time you press the 

INFO

 button.

  You can set the month, day, year, hour, and minute directly by pressing the number buttons 

on the remote control.

Setting the Clock Automatically
1

  Press the 

MENU

 button to display the menu. 

Press the ▲ or ▼ button to select 

Setup

, then press the 

ENTER

 button. 

Press the ▲ or ▼ button to select 

Time

, then press the 

ENTER

 button.

2

  Press the 

ENTER

 button to select 

Clock

.

3

  Press the 

ENTER

 button to select 

Clock Mode

Press the ▲ or ▼ button to select 

Auto

, then press the 

ENTER

 button.

4

  Press the ▲ or ▼ button to select 

Time Zone

, then press the 

ENTER

 button.

5

  Press the ▲ or ▼ button to highlight the time zone for your local area, then press the 

ENTER

 button.

6

  Press the ▲ or ▼ button to select 

DST

 (Daylight Saving Time), then press the 

ENTER


button. Press the ▲ or ▼ button to select 

On

 or 

Off

, then press the 

ENTER

 button.


Press the 

EXIT

 button to exit.

  Depending on the broadcast station and signal, the auto time may not be set correctly.  

If this occurs, set the time manually.

  Air or cable must be connected in order to set the time automatically.

Setting the On/Off Timer
Use this feature to set the TV to turn on or off at a desired time. You must set the clock 

first.
1

  Press the 

MENU

 button to display the menu. 

Press the ▲ or ▼ button to select 

Setup

, then press the 

ENTER

 button. 

Press the ▲ or ▼ button to select 

Time

, then press the 

ENTER

 button.

2

  Press the ▲ or ▼ button to select 

Timer1

Timer2

, or 

Timer3

, then press the 

ENTER


button. The timer menu is displayed.

Press the ◄ or ► button to select the required item below. 

Press the ▲ or ▼ button to adjust to the setting satisfied. 

Press the 

EXIT

 button to exit.


On Timer 

: Select hour, minute, 

am/pm

, and 

Inactivated/Activated

.  

(To activate timer with the setting satisfied, set to 

Activated

.)


Off Timer 

: Select hour, minute, 

am/pm

, and 

Inactivated/Activated

.  

(To activate timer with the setting satisfied, set to 

Activated

.)


Repeat

 : Select 

Once

Everyday

MON~FRI

MON~SAT

, or 

SAT~SUN

.


Volume

 : Select the required volume level.


Antenna

 : Select 

Air

 or 

Cable

.


Channel

 : Select the required channel.

  You can set the hour, minute, and channel directly by pressing the number buttons on the remote control.


Auto Power Off


When you set the timer “On”, the TV will eventually turn off if no controls are operated for 3 hours after the TV was turned on by 

timer. This function is only available in timer “On” mode and prevents overheating, which may occur if a TV is on for too long time.

Continued...

Clock

Clock Mode 

: Manual 

Clock Set

Time Zone

DST 

: Off

Manual

Auto

Move

Enter

Return

NewFoundlan

Atlantic

Eastern

Central

Mountain

Pacific

Alaska

Hawaii 

Time Zone

Select the time zone where you are located.

Move

Enter

Return

Clock

Clock Mode 

: Auto 

Clock Set

Time Zone

DST 

: Off

Off

On

Move

Enter

Return

Timer 1

On Timer 

:

Inactivated

12

Adjust

Return

Move

00

am

Off Timer 

:

Inactivated

12

00

am

   Repeat 

Volume

10

Once

  Antenna 

Channel

3

Air

Clock

Clock Mode 

: Manual 

Clock Set

Time Zone

DST 

: Off

Manual

Auto

Move

Enter

Return

Clock Set

Enter the current date and time.

--

----


Month 

Day 

Year


Hour  Minute  am/pm

--

--

--

--

Return

Adjust

Move

AA68-03782G_Eng.indd   18

2007-02-21   ソタネト 5:16:35

Summary of Contents for AA59-00411A - Original Remote Control

Page 1: ...Model Name TX T3091WH TX T3092WH TX T3093WH TX T2793H TX T2791H Screen Size Diagonal 30 inch 27 inch Sound Output 10W 10W Dimensions WxHxD Body 36 7 x 22 3 x 15 9 inches 934 x 568 x 406 mm 31 3 x 23 0 x 16 3 inches 796 x 586 x 415 mm 35 8 x 22 4 x 16 3 inches 910 x 570 x 415 mm 30 3 x 23 3 x 16 5 inches 771 x 593 x 420 mm 31 3 x 23 0 x 16 3 inches 796 x 586 x 415 mm Weight 120 1 lbs 54 5 Kg 119 0 ...

Page 2: ...X T2793H TX T3091WH TX T3092WH TX T3093WH Owner s Instructions Register your product at www samsung com global register Record your Model and Serial number here for future reference Model _______________ Serial No _______________ ...

Page 3: ...ls to view the different formats as a full screen picture Be careful in the selection and duration of television formats used for viewing Uneven CRT aging as a result of format selection and use as well as other burned in images is not covered by your Samsung limited warranty Contents General Information Accessories 3 Viewing the Control Panel 3 Viewing the Connection Panel 4 Remote Control 5 Conn...

Page 4: ...s 3 VOL Press to increase or decrease the volume In the on screen menu use the VOL buttons as you would use the and buttons on the remote control 4 CH Press to change channels In the on screen menu use the CH buttons as you would use the and buttons on the remote control 5 Power Indicator Lights up when you turn the power off Power Off Red Power On Off 6 Remote Control Sensor Aim the remote contro...

Page 5: ...be used as a DVI connection with separate analog audio inputs An optional HDMI DVI cable will be necessary to make this connection When using the optional HDMI DVI adapter the DVI analog audio inputs on your TV allow you to receive left and right audio from your DVI device HDMI DVI connection to a computer is not possible This TV cannot be used as a Monitor with your PC When connecting this produc...

Page 6: ...R Press to operate your TV DVD STB CABLE box or VCR SOURCE Press to display all of the available video sources Press to activate the backlight of the VOL CH and the active source button TV DVD CABLE STB VCR on the remote control PRE CH Tunes to the previous channel a FAV CH Press to switch to your favorite channels b SLEEP Press to select a preset time interval for automatic shut off c CH CH Press...

Page 7: ...led ANT OUT VHF OUT or simply OUT 2 Connect the other end of this cable to the ANT IN terminal on the back of the TV Connecting to a Cable Box that Descrambles Some Channels If your cable box descrambles only some channels such as premium channels follow the instructions below You will need a two way splitter an RF A B switch and four lengths of Antenna cable These items are available at most elec...

Page 8: ...on above Each VCR has a different back panel configuration When connecting a VCR match the color of the connection terminal to the cable 1 To begin follow steps 1 3 in the previous section to connect the antenna or cable to your VCR and your TV 2 Connect an S Video Cable between the S VIDEO OUT jack on the VCR and the AV IN 2 S VIDEO jack on the TV 3 Connect Audio Cables between the AUDIO OUT jack...

Page 9: ...n terminal to the cable 1 Connect an HDMI Cable between the HDMI DVI IN or HDMI1 DVI IN HDMI IN 2 on the TV and the HDMI OUT on the DVD player Set Top Box or connect a DVI to HDMI Cable or DVI HDMI Adapter between the HDMI DVI IN or HDMI1 DVI IN HDMI IN 2 jack on the TV and the DVI jack on the DVD player Set Top Box If connecting via HDMI DVI you must also connect audio cables Connect Audio Cables...

Page 10: ...gital Audio System has a different back panel configuration 1 Connect an Optical Cable between the DIGITAL AUDIO OUT OPTICAL jack on the TV and the Digital Audio Input jack on the Digital Audio System When a Digital Audio System is connected to the DIGITAL AUDIO OUT OPTICAL terminal Decrease the gain volume of the TV and adjust the volume level with the system s volume control 5 1CH audio is possi...

Page 11: ...nnels After all the available channels are stored the Auto program menu reappears Press the ENTER button when channel memorization is complete The Clock Mode menu is displayed To stop the search before it has finished press the ENTER button with Stop selected 6 Press the ENTER button Press the or button to select Manual for setting the current time manually then press the ENTER button The message ...

Page 12: ...cable company to identify the type of cable system that exists in your particular area At this point the signal source has been selected 7 After all the available channels are stored the Auto Program menu reappears You can also press the AUTO PROG button on the remote control to bring up the Auto Program menu Setting the Clock Automatically 9 Press the ENTER button Press the or button to select On...

Page 13: ... that are preset at the factory You can activate a Picture Setting by making a selection from the menu 1 Press the MENU button to display the menu Press the ENTER button to select Picture 2 Press the ENTER button to select Mode Press the or button to select the Dynamic Standard or Movie picture setting then press the ENTER button Choose Dynamic for viewing the TV during the day or when there is br...

Page 14: ...ure format by expanding it both horizontally and vertically Wide Fit does not support all external devices DVD VCR etc 16 9 Sets the picture to 16 9 wide mode Zoom1 Magnifies the size of the picture on screen It is vertically enlarged Zoom2 Magnifies the size of the picture more than Zoom1 It is vertically enlarged Wide Fit Enlarges the aspect ratio of the picture to fit the entire screen 4 3 Sets...

Page 15: ...urround XT SRS and Symbol are trademarks of SRS Labs Inc TruSurround XT technology is incorporated under license from SRS Labs Inc TRADEMARK LABEL LICENSE NOTICE Choosing a Multi Channel Sound MTS Track Digital The digital TV transmission system is capable of simultaneous transmission of many audio tracks for example simultaneous translations of the program into foreign languages The availability ...

Page 16: ...isplay the menu Press the or button to select Channel then press the ENTER button 2 Press the or button to select Channel List then press the ENTER button 3 Press the ENTER button to select All 4 Press the button to select a channel to delete then press the ENTER button Press the or button to select Delete then press the ENTER button to delete the channel The symbol disappears Press the RETURN but...

Page 17: ...n Press repeatedly to select All Added or Favorite Yellow button Press to delete all channels memorized Setting the Default Channel List Mode You can set All Added or Favorite to be the Default List that appears when you press the CH LIST button 1 Press the MENU button to display the menu Press the or button to select Channel then press the ENTER button 2 Press the or button to select Channel List...

Page 18: ...the ENTER button Press the EXIT button to exit Only analog TV channels can be fine tuned will appear next to the number of fine tuned channels Checking the Digital Signal Strength Unlike analog channels which can vary in reception quality from snowy to clear digital HDTV channels have either perfect reception quality or you will not receive them at all So unlike analog channels you cannot fine tun...

Page 19: ...r cable must be connected in order to set the time automatically Setting the On Off Timer Use this feature to set the TV to turn on or off at a desired time You must set the clock first 1 Press the MENU button to display the menu Press the or button to select Setup then press the ENTER button Press the or button to select Time then press the ENTER button 2 Press the or button to select Timer1 Time...

Page 20: ...entered the Confirm new PIN screen appears Re enter the same 4 digits When the Confirm screen disappears your PIN has been memorized If you forget the PIN press the remote control buttons in the following sequence which resets the pin to 0 0 0 0 Power Off MUTE 8 2 4 Power On How to Set up Restrictions Using the TV Parental Guidelines First set up a personal identification number PIN and enable the...

Page 21: ...ons Using the MPAA Ratings G PG PG 13 R NC 17 X NR The MPAA rating system uses the Motion Picture Association of America MPAA system and its main application is for movies When the V Chip lock is on the TV will automatically block any programs that are coded with objectionable ratings either MPAA or TV Ratings 10 Press the or button to select MPAA Rating then press the ENTER button 11 Press the or...

Page 22: ...automatically block certain categories that are more restrictive The rating titles for example Humor Level etc and TV ratings for example NV MV V etc may differ depending on the broadcasting station Viewing Closed Captions On Screen Text Messages Analog The Analog Caption function operates in either analog TV channel mode or external signal mode Depending on the broadcasting signal the Analog Capt...

Page 23: ... Small Standard and Large Font Style This option consists of Default Style0 Style7 You can change the font you want Foreground Color This option consists of Default White Black Red Green Blue Yellow Magenta and Cyan You can change the color of the letter Background Color This option consists of Default White Black Red Green Blue Yellow Magenta and Cyan You can change the background color of the ca...

Page 24: ...just the picture for optimum quality Film mode is supported in 480i only 1 Press the MENU button to display the menu Press the or button to select Setup then press the ENTER button 2 Press the or button to select Film Mode then press the ENTER button 3 Press the or button to select Off or On then press the ENTER button Press the EXIT button to exit Setting the HDMI Black Level Use this function wh...

Page 25: ...hould turn on if your remote control is set up correctly If your VCR Cable box DVD or Set Top Box does not turn on repeat steps 2 3 and 4 but try one of the other codes listed for the brand of your particular VCR Cable box DVD or Set Top Box Note on Using Remote Control Modes VCR CABLE DVD STB When your remote control is in VCR Cable box DVD or Set Top Box mode the volume buttons still control you...

Page 26: ...30 032 034 040 047 050 052 060 063 065 066 067 069 073 018 024 028 029 048 051 061 025 002 005 017 021 056 002 006 007 008 009 010 007 019 025 041 042 074 021 002 007 018 019 021 026 037 041 054 056 007 008 018 021 026 037 007 008 018 026 037 070 025 038 025 081 082 083 021 056 059 007 008 018 021 026 037 062 006 036 073 074 075 076 021 006 021 024 025 034 005 019 041 075 Brand MITSUBISHI MONTGOME...

Page 27: ...9 044 045 046 047 023 024 034 124 134 136 137 138 036 076 117 118 120 023 035 074 075 131 132 073 038 104 026 029 126 127 128 129 130 141 039 041 042 043 093 140 062 062 094 090 145 028 062 076 139 072 073 096 097 098 099 101 076 075 102 032 063 040 073 103 076 121 DVD Brand ALPHASTAR ANAM CHANNEL MASTER CROSSDIGITAL CHAPARRAL DIRECT TV DAEWOO DISH NETWORK SYSTEM DISHPRO DRAKE DX ANTENNA ECHOSTAR ...

Page 28: ...put antenna The image is too light or too dark Adjust the Brightness and Contrast Adjust the Fine tuning The visual qualities of digital channels vary The visual qualities of digital channels may vary depending on the original production method analog or digital If the original production method is digital High visual quality program If the original production method is analog The digital program ...

Page 29: ...may be distributed under the terms of this General Public License The Program below refers to any such program or work and a work based on the Program means either the Program or any derivative work under copyright law that is to say a work containing the Program or a portion of it either verbatim or with modifications and or translated into another language Hereinafter translation is included wit...

Page 30: ...se since you have not signed it However nothing else grants you permission to modify or distribute the Program or its derivative works These actions are prohibited by law if you do not accept this License Therefore by modifying or distributing the Program or any work based on the Program you indicate your acceptance of this License to do so and all its terms and conditions for copying distributing...

Page 31: ...ost effectively convey the exclusion of warranty and each file should have at least the copyright line and a pointer to where the full notice is found One line to give the program s name and a brief idea of what it does Copyright C year name of author This program is free software you can redistribute it and or modify it under the terms of the GNU General Public License as published by the Free So...

Page 32: ...GNU General Public License This license the GNU Lesser General Public License applies to certain designated libraries and is quite different from the ordinary General Public License We use this license for certain libraries in order to permit linking those libraries into non free programs When a program is linked with a library whether statically or using a shared library the combination of the tw...

Page 33: ...very part regardless of who wrote it Thus it is not the intent of this section to claim rights or contest your rights to work written entirely by you rather the intent is to exercise the right to control the distribution of derivative or collective works based on the Library In addition mere aggregation of another work not based on the Library with the Library or with a work based on the Library o...

Page 34: ... in a single library together with other library facilities not covered by this License and distribute such a combined library provided that the separate distribution of the work based on the Library and of the other library facilities is otherwise permitted and provided that you do these two things a Accompany the combined library with a copy of the same work based on the Library uncombined with ...

Page 35: ...ERVICING REPAIR OR CORRECTION 16 IN NO EVENT UNLESS REQUIRED BY APPLICABLE LAW OR AGREED TO IN WRITING WILL ANY COPYRIGHT HOLDER OR ANY OTHER PARTY WHO MAY MODIFY AND OR REDISTRIBUTE THE LIBRARY AS PERMITTED ABOVE BE LIABLE TO YOU FOR DAMAGES INCLUDING ANY GENERAL SPECIAL INCIDENTAL OR CONSEQUENTIAL DAMAGES ARISING OUT OF THE USE OR INABILITY TO USE THE LIBRARY INCLUDING BUT NOT LIMITED TO LOSS OF...

Page 36: ...This page is intentionally left blank ...

Reviews: