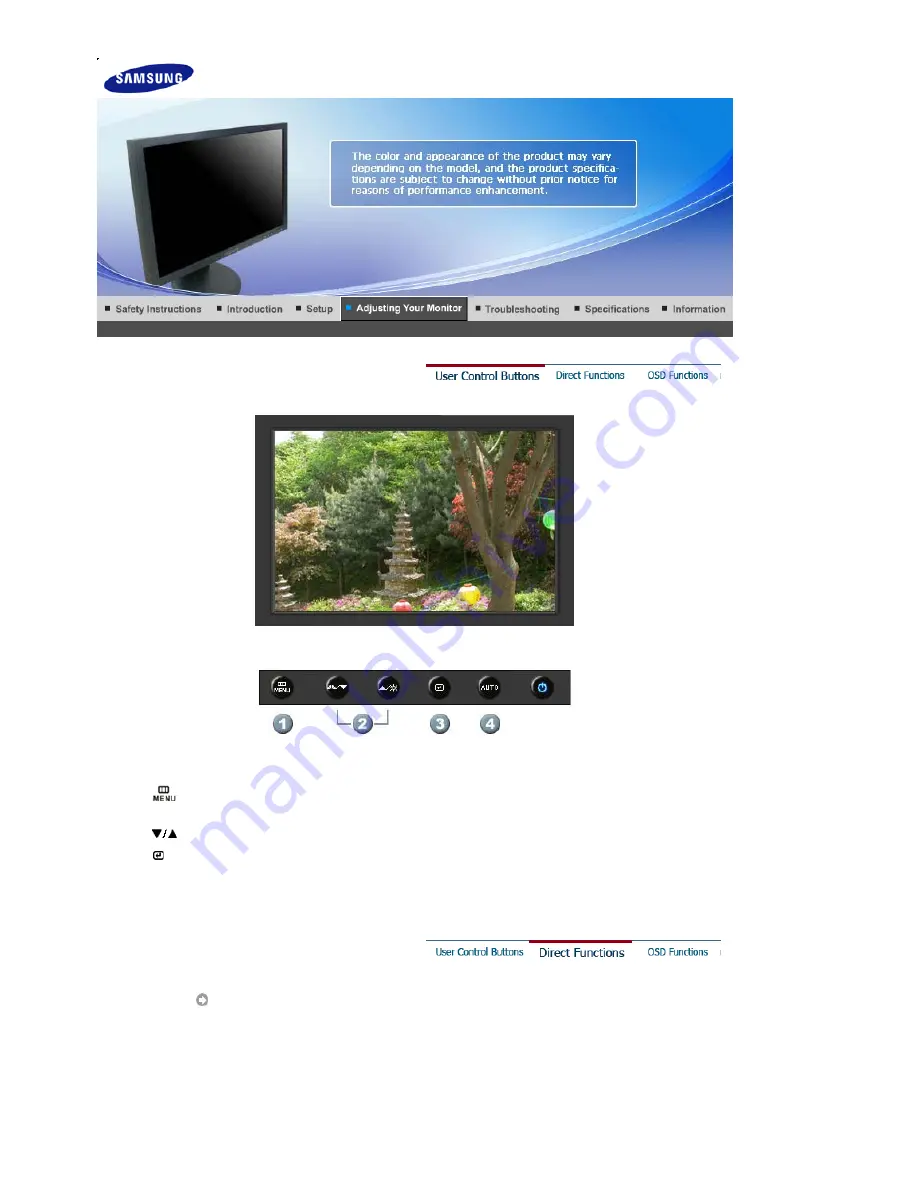
background image


1. 

[

]Use this button to open the on-screen menu and exit from the menu screen or close screen 

adjustment menu. 

2. 

[

]These buttons allow you to adjust items in the menu.

3. 

[ ]Press this button to activate a highlighted menu item.

4. 

[

AUTO

]Press to self-adjust to the incoming PC signal. The values of fine,coarse and position are 

adjusted automatically.


 AUTO


Summary of Contents for 920NW - SyncMaster - 19" LCD Monitor

Page 1: ...Install driver SyncMaster 920NW...

Page 2: ...d understand at all times Do not disassemble Disconnect the plug from the outlet Do not touch Ground to prevent an electric shock Power When not used for an extended period of time set your computer t...

Page 3: ...e fire Do not excessively bend the plug and wire nor place heavy objects upon them which could cause damage z This may cause electric shock or fire Do not connect too many extension cords or plugs to...

Page 4: ...oes not protrude from the showcase or shelf z Dropping the product may cause damage to the product or the person carrying it Do not place the product on an unstable or small surface area z Place the p...

Page 5: ...l When installing the product make sure to keep it away from the wall more than 10 cm 4 inches for ventilation purposes z Poor ventilation may cause an increase in the internal temperature of the prod...

Page 6: ...MSUNG customer care center or Customer Center for interior cleaning once a year z Keep the product s interior clean Dust which has accumulated in the interior over an extended period of time may cause...

Page 7: ...down electric shock or fire due to damage to the cable Do not move the monitor right or left by pulling only the wire or the signal cable z This may cause a breakdown electric shock or fire due to dam...

Page 8: ...itor continuously at a too close angle may result in damage to your eyesight To ease eye strain take at least a five minute break after every hour of using the monitor Do not install the product on an...

Page 9: ...Try to maintain a good posture when using the monitor z Keep your back straight z Keep a distance of about 45 50 cm between your eyes and the monitor screen Look at the screen from slightly above it...

Page 10: ...he following items are included with your monitor If any items are missing contact your dealer Contact a local dealer to buy optional items Unpacking Without stand Monitor With stand Monitor Simple St...

Page 11: ...mage you are watching Currently four different modes are available Custom Text Internet and Entertain Each mode has its own pre configured brightness value You can easily select one of four settings b...

Page 12: ...adjustments See PowerSaver described in the manual for further information regarding power saving functions For energy conservation turn your monitor OFF when it is not needed or when leaving it unatt...

Page 13: ...ppropriate for your computer 2 1 Using the D sub Analog connector on the video card Connect the signal cable to the 15 pin D sub port on the back of your monitor RGB IN 2 2 Connected to a Macintosh Co...

Page 14: ...he LCD monitor face down on a flat surface with a cushion beneath it to protect the screen 3 Remove screws and then remove the stand from the LCD monitor 4 Align the mounting interface pad with the ho...

Page 15: ...OK button 4 If you can see following message window then click the Continue Anyway button Then click OK button Microsoft Windows XP 2000 Operating System 5 Monitor driver installation is completed Th...

Page 16: ...Operating System 1 Insert your Manual CD into your CD ROM drive 2 Click Start and Control Panel Then double click on Appearance and Personalization 3 Click Personalization and then Display Settings 4...

Page 17: ...Click Update Driver in the Driver tab 7 Check the Browse my computer for driver software checkbox and click Let me pick from a list of device drivers on my computer 8 Click Have Disk and select the f...

Page 18: ...screens displayed in sequence Microsoft Windows XP Operating System 1 Insert CD into the CD ROM driver 2 Click Start Control Panel then click the Appearance and Themes Icon 3 Click Display icon and c...

Page 19: ...5 Click Update Driver and select Install from a list or then click Next button 6 Select Don t search I will then click Next and then click Have disk 7 Click the Browse button then choose A D Driver an...

Page 20: ...Monitor homepage http www samsung com 9 Click the Close button then click OK button continually 10 Monitor driver installation is completed Microsoft Windows 2000 Operating System When you can see Dig...

Page 21: ...monitor that corresponds to the one you connected to your computer and click OK 11 Continue choosing Close button and OK button until you close the Display Properties dialogue box Microsoft Windows NT...

Page 22: ...een or close screen adjustment menu 2 These buttons allow you to adjust items in the menu 3 Press this button to activate a highlighted menu item 4 AUTO Press to self adjust to the incoming PC signal...

Page 23: ...e and position are adjusted automatically Available in analog mode only To make the automatic adjustment function sharper execute the AUTO function while the AUTO PATTERN is on If auto adjustment does...

Page 24: ...djusting the current settings Lock Hold down the menu button for more than five seconds to activate the OSD adjustment lock function Unlock Hold down the menu button for more than five seconds to deac...

Page 25: ...en push the MagicBright button again to circle through available preconfigured modes Four different modes Custom Text Internet Entertain Brightness Menu Description Brightness When OSD is not on the s...

Page 26: ...mage Reset Color Reset Information Picture Menu Description Play Stop Brightness You can use the on screen menus to change the brightness according to personal preference Direct Access Feature When OS...

Page 27: ...l Makes whites bluish Normal Keeps whites white Warm Makes whites reddish Custom Select this mode when you want to adjust the image according to your preferences Color Control Adjusts individual R G B...

Page 28: ...such as horizontal stripes If the noise persists even after fine tuning repeat it after adjusting the frequency clock speed Available in analog mode only MENU MENU Sharpness Changes the clearance of...

Page 29: ...l position where the OSD menu appears on your monitor MENU MENU V Position You can change the vertical position where the OSD menu appears on your monitor MENU MENU Transparency Change the transparenc...

Page 30: ...u Description Play Stop Image Reset Image parameters are replaced with the factory default values MENU MENU Color Reset Color parameters are replaced with the factory default values MENU MENU Informat...

Page 31: ...Menu Description Information Shows a video source display mode on the OSD screen MENU MENU...

Page 32: ...computer in the applicable mode the safe mode for Windows ME XP 2000 and then change the frequency of the video card Refer to the Preset Timing Modes Note If the initial screen the login screen does...

Page 33: ...ing to the video card manual and the Preset Timing Modes The maximum frequency per resolution may differ from product to product There are only 16 colors shown on the screen The screen colors have cha...

Page 34: ...eature Check Self Test Feature Check Warning Messages Environment Useful Tips Your monitor provides a self test feature that allows you to check whether your monitor is functioning properly Self Test...

Page 35: ...is trouble with the computer or the video card this can cause the monitor to become blank have poor coloring noise Video mode not supported etc In this case first check the source of the problem and t...

Page 36: ...esolution Optimum resolution 1440 x 900 60 Hz Maximum resolution 1440 x 900 75 Hz Input Signal Terminated RGB Analog 0 7Vp p Positive at 75 10 Separate H V sync Composite sync SOG TTL level positive o...

Page 37: ...ice Class B Equipment Information Communication equipment for residential use This product complies with the Electromagnetic Compatibility Directives for residential use and can be used in all areas i...

Page 38: ...5 156 56 250 36 000 VESA 800 x 600 37 879 60 317 40 000 VESA 800 x 600 46 875 75 000 49 500 VESA 800 x 600 48 077 72 188 50 000 VESA 1024 x 768 48 363 60 004 65 000 VESA 1024 x 768 56 476 70 069 75 00...

Page 39: ...ILE 800 726 7864 SAMSUNG http www samsung com cl COLOMBIA 01 8000112112 http www samsung com co COSTA RICA 0 800 507 7267 http www samsung com latin ECUADOR 1 800 10 7267 http www samsung com latin EL...

Page 40: ...om uk SLOVAKIA 0800 SAMSUNG 7267864 http www samsung com sk SPAIN 902 10 11 30 http www samsung com es SWEDEN 0771 400 200 http www samsung com se SWITZERLAND 0800 7267864 http www samsung com ch U K...

Page 41: ...dge of the screen horizontally is called Horizontal Cycle The inverse number of the Horizontal Cycle is called Horizontal Frequency Unit kHz Interlace and Non Interlace Methods Showing the horizontal...

Page 42: ...f you view a fixed screen for an extended period of time residual image or blurriness may appear Change the mode to energy save or set a screensaver to move the picture when you need to be away from t...

Page 43: ...416 Mae tan 3dong Yeongtong gu Suwon City Gyeonggi do Korea...

Page 44: ...Mode Ex z Turn the power off when using a stationary pattern z Use a Screen saver if possible z Set the Monitor to power off with the PC Display Properties Power Scheme Turn the power off for 4 hours...

Page 45: ...atterns When the LCD panel is operated for a long time with a fixed pattern over 12 hours there may be slight difference in voltage between electrodes that work the liquid crystal LC in a pixel The vo...

Page 46: ...ment or human health from uncontrolled waste disposal please separate this from other types of wastes and recycle it responsibly to promote the sustainable reuse of material resources Household users...

Reviews: