background image

43

English

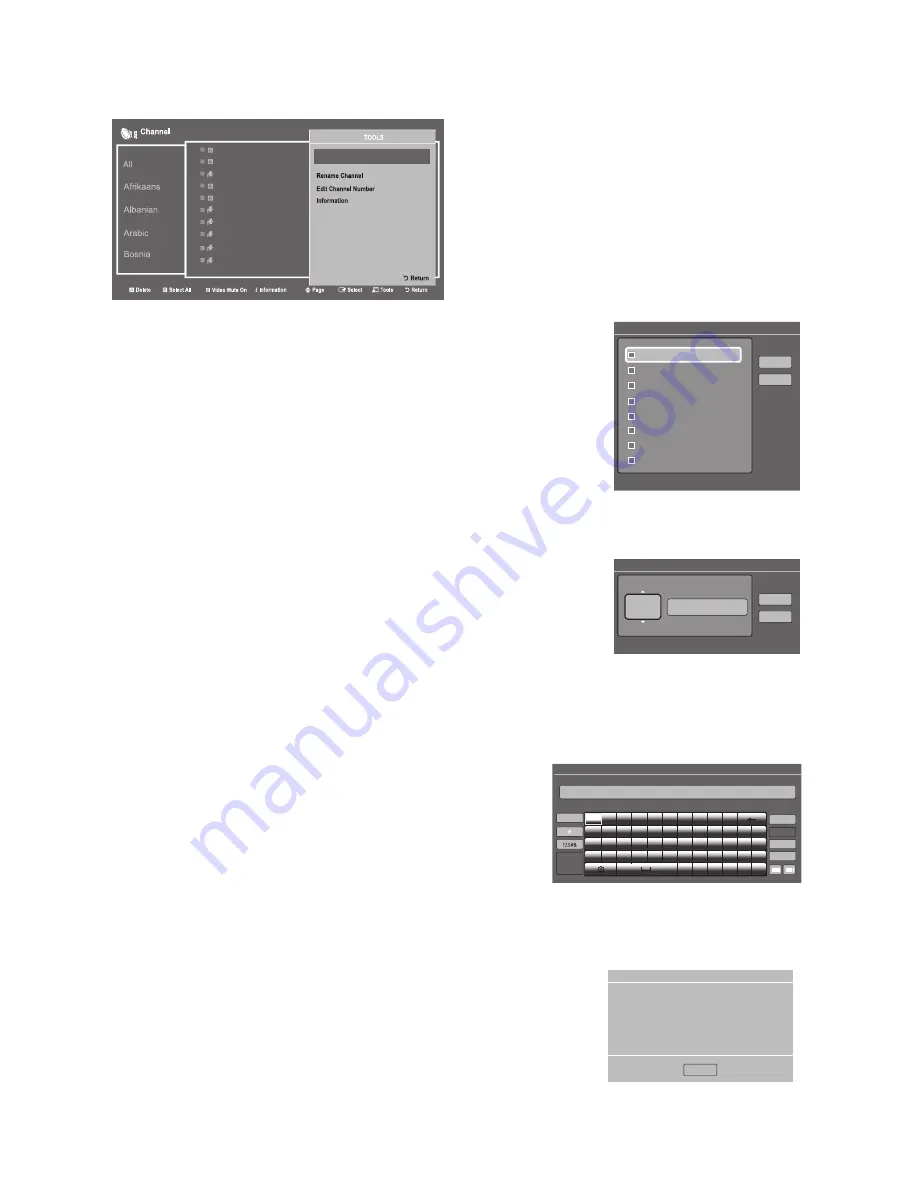
When you press the 

TOOLS

 button, the following menu is available.

1

Z6

Z6

4

5

7

CCTV-10

2

1

3           C8

3           C8

11

9

CCTV-11

CCTV-12

高清

Language Edit


Language Edit

 Use Language Edit to change language of a channel you select.
 To change language,follow these steps:

1. 

 Select a channel on the 

Channel Edit

 screen.

2. 

 Press the 

TOOLS

 button on your remote.

3. 

 Select Language Edit in Tools menu.

4. 

 Use up,down and Enter button to select the language you want to select.

5. 

 Select 

OK

 when done, and then press the 

ENTER

E

 button.

Language Edit

Afrikaans

b


Select All

R


Return

OK

Cancel

Albanian

Bosnia

Cambodia

Arabic

Bulgarian

Chinese (Simple)

Chinese (Traditional)


Edit Channel Number

Use 

Edit Channel Number

 to change the channel number of a channel you select.

To change a channel number, follow these steps:

1. 

Select a channel on the 

Channel Edit

 screen.

2. 

Press the 

TOOLS

 button on your remote.

3. 

Select 

Edit Channel Number

 in the Tools menu.

4. 

Use the up or down arrow keys to change the channel number.

5. 

Select 

OK

 when done, and then press the 

ENTER

E

 button.


When you change the channel number, the channel information is not 

updated automatically.

Edit Channel Number

CCTV-1

U


Adjust

E


Input Number

R


Return

OK

Cancel

6


Rename Channel

Use 

Rename Channel

 to change the name of a channel you select.

To change the name of a channel, follow these steps:

1. 

Select a channel on the 

Channel Edit

 screen.

2. 

Press the 

TOOLS

 button on your remote.

3. 

Select 

Rename Channel

 in the Tools menu.

4. 

Use the on-screen keyboard that appears to enter the new name for 

the channel. Use the arrow buttons on your remote to select a letter 

or number, and then press Enter. Repeat for each letter or number 

you want to select.

5. 

When finished, select 

Done

 on the bottom of the screen, and then 

press the 

ENTER

E

 button.

Rename Channel

Enter new name for CH 6 (Max Length = 24)

As you enter characters, recommended text will be shown.

6/24

CCTV-1

Done

Clear

Caps

ENG

Cancel

1

2

3

4

5

6

7

8

9

0

q

w

e

r

t

y

u

i

o

p

^

*

a

s

d

f

g

h

j

k

l

~

@

!

z

x

c

v

b

n

m

,

.

?

-

www. .com

/

◄ ►

ABC

ABC


Information

Use Information to view information about a channel you select.
To view information about a channel, follow these steps:

1. 

Select a channel on the 

Channel Edit

 screen.

2. 

Press the 

TOOLS

 button on your remote.

3. 

Select 

Information

 in the Tools menu.

4. 

Select 

OK

, and then press the 

ENTER

E

 button to close the Information 

screen.

Information

OK

Summary of Contents for 680 SERIES

Page 1: ...ED TV Installation manual imagine the possibilities Thank you for purchasing this Samsung product To receive more complete service please registeryour product at www samsung com register Model Serial No ...

Page 2: ...tions may be restricted to prevents guests from cheating the TV system No main menu Interactive mode or Channel Menu Plug Play in Main Menu Stand Alone mode Limited Volume and Panel key lock or unlock Still image warning Avoid displaying still images like jpeg picture files or still image element like TV Programme logo panorama or 4 3 image format stock or news bar at screen bottom etc on the scre...

Page 3: ...rol 11 Using the Samsung Smart Control 13 Connecting to the Network 18 Connecting the TV with SBB 20 Connecting the Bathroom Speakers 22 Connecting the MediaHub HD 25 Connecting the RJP Remote Jack Pack 26 Setting the Hotel Option Data 28 SIRCH 46 Installing the Wall Mount 47 Securing the TV to the Wall 48 Anti theft Kensington Lock 48 Specifications 49 ...

Page 4: ... x 2 Quick Set up Guide Regulatory Guide Hotel Mount Kit Holder Ring Power Cord Safety Guide Only HONG KONG Service Card Warranty Card Installation Instructions of Antenna Shield Only CHINA Holder Wire Stand Module RF Shield Box Only CHINA The stand and stand screw may not be included depending on the model ...

Page 5: ... Components When installing the stand use the provided components and parts 1 2 O O O O X X X O O O O O X X X X Place a soft cloth over a table to protect the TV and then place the TV on the cloth screen side down Insert the Stand Guide into the slot on the bottom of the TV 3 C A 8 M4 L12 B Front Top View Side ATTENTION DO NOT USE CHEMICALS DO NOT USE GREASE DO NOT USE OIL A B x4 M4 X L12 C ...

Page 6: ... Bolt 2EA Nut 2EA Washer 2EA Top Bottom Affix the stand to a flat surface such as a dressertop desk top or entertainment centre as shown WARNING To prevent injury this apparatus must be securely attached to the floor table in accordance with the installation instructions ...

Page 7: ...T䕨ܺ HDMI 䕨ܺ2 LAN RJP PC䕨ܺ HP ID HDMI 䕨ܺ 3 ARC PC DVI 书䕨ܺ ࠋ ৄভ 书䕨ߏ ᘧ䞤 书䕨ߏ 5 0 HDMI 䕨ܺ1 DVI 㾛书䕨ߏ 㾛书 ৈ 书 Ꮋ 4 5 HONG KONG Model HG43AE690 HG49AE690 HG55AE690 3 PCIN HP ID HDMI IN 3 ARC PC DVI AUDIOIN USB 5V0 5A HDD1 0A CLONING DIGITAL AUDIO OUT OPTICAL VARIABLE AUDIOOUT HDMI IN 1 DVI HDMIIN2 VOL CTRL LAN RJP VIDEOOUT 1 2 4 5 9 6 7 8 5 DOOR EYE 0 VIDEO AUDIO LAN OUT B ...

Page 8: ...et from one of the following sources An outdoor antenna A cable television network 0 LAN OUT DATA Used to support data communication between the TV and the SBB The TV jack type is RJ 12 HEADPHONE JACK Headphones may be connected to the headphone jack on your TV While the headphones are connected the soundfrom the built in speakers will be disabled HP ID Connect the cable to HP ID and Headphone Jac...

Page 9: ...680 x1050 31 469 37 861 37 500 37 879 48 077 46 875 48 363 56 476 60 023 67 500 63 981 79 976 45 000 49 702 62 795 60 000 47 712 55 935 70 635 65 290 59 940 72 809 75 000 60 317 72 188 75 000 60 004 70 069 75 029 75 000 60 020 75 025 60 000 59 810 74 934 60 000 60 015 59 887 74 984 59 954 25 175 31 500 31 500 40 000 50 000 49 500 65 000 75 000 78 750 108 000 108 000 135 000 74 250 83 500 106 500 1...

Page 10: ...ing and holding the TV s controller The product colour and shape may vary depending on the model With the TV s Controller you cannot perform other operations except for turning the TV on or off changing the channel adjusting the volume and switching the input source Standby mode Your TV enters Standby mode when you turn it off and continues to consume a small amount of electric power To be safe an...

Page 11: ... Swich to the HOME Screen Cut off the sound temporarily Electronic Programme Guide EPG display Have direct access to channels Alternately selects Teletext Double or Mix Adjust the volume Display channel list on the screen Quickly select frequently used functions Return to the previous menu Buttons in the Channel list Contents Home menu etc Select on screen menu items and change menu values Display...

Page 12: ...Displays channel lists on the screen Quickly selects frequently used functions Returns to the previous menu Buttons in the Channel list Contents Home menu etc Select on screen menu items and change menu values Display the main on screen menu Use these buttons in the Contents Home When you press INFO key for 7 seconds in standby mode TV screen displays the time Installing batteries Battery size AAA...

Page 13: ...mart Hub Pressing SMART HUB while an application is running terminates the application GUIDE Displays the digital channel broadcasting schedule CH LIST Press and hold to launch the CH LIST Microphone Use the microphone with the Voice Control and Voice functions The Voice Control function can be affected by unclear pronunciation voice level or surrounding noise Turns the sound off and on Press and ...

Page 14: ...e an application is running terminates the application GUIDE Displays the digital channel broadcasting schedule CH LIST Press and hold to launch the CH LIST Microphone Use the microphone with the Voice Control and Voice functions The Voice Control function can be affected by unclear pronunciation voice level or surrounding noise M Turns the sound off and on Press and Hold this button to access Acc...

Page 15: ...ll then attempt to connect to the Samsung Smart Control unit automatically Connection attempt and completion icons Reconnecting Samsung Smart Control If the Samsung Smart Control stops operating orworks abnormally replace the batteries as this may be due to insufficient battery power If the problem persists the Samsung Smart Control restore pairing with the TV 1 Press RETURN button and GUIDE butto...

Page 16: ...ies making sure to align the positive and negative polarities correctly 3 Place the battery cover on the remote control and insert the top part of the cover into the remote control 4 Press the catches on both sides of the battery cover in the order shown so that the cover is completely attached to the remote control Using the TV by Moving the Samsung Smart Control The Samsung Smart Control has a m...

Page 17: ...nel List on the screen Displaying the Context sensitive Menu on Smart Hub Tap and hold on the touch pad from the Smart Hub screen The Options menu available to the selected item appears The Options menu depends on the context Moving to the Smart Hub panel On the Smart Hub screen drag left or right on the touchpad This transits the screen by panel Scrolling on the Web Browser Drag up down on the to...

Page 18: ...eless IP Router or Modem router having DHCP Server This TV supports the IEEE 802 11a b g and n communication protocols Samsung recommends using IEEE 802 11n When you playvideo over a network connection the video may not play smoothly Most wireless network systems incorporate a security system that requires devices that access the network through an access point orAP typically a wireless IP Sharer ...

Page 19: ...0 690 Model The Modem Port on the Wall TV Rear Panel LAN Cable Not Supplied Modem Cable Not Supplied External Modem ADSL VDSL Cable TV The LAN Port on the Wall TV Rear Panel LAN Cable Not Supplied The Modem Port on the Wall TV Rear Panel LAN Cable Not Supplied Modem Cable Not Supplied LAN Cable Not Supplied External Modem ADSL VDSL Cable TV IP Routerthat has a DHCP Server ...

Page 20: ...690 model PCIN HP ID HDMI IN 3 ARC PC DVI AUDIOIN VIDEOOUT DOOR EYE VIDEO AUDIO LAN OUT B AUDIO LAN OUT ETH MODEM TV Rear Panel Data Cable 1 Connect the DATA jack of the TV to the ETH MODEM jack of the STB SBB with the Data cable Some area does not supply data cable Use data communication ...

Page 21: ...h List of Vendors and Compatible Data Cables Supplied with the TV Some area does not supply data cable with TV Confirm you are using the correct data cable foryourvendor Referto the code label on the data cables ...

Page 22: ...xternal amplifier Inlay sample mayvary depending on the model HE680 690 model HP ID HDMI IN 3 ARC USB 5V0 5A HDD1 0A CLONING DIGITAL AUDIO OUT OPTICAL VARIABLE AUDIOOUT HDMI IN 1 DVI HDMIIN2 VOL CTRL LAN RJP LAN OUT HP ID HDMI IN 3 ARC USB 5V0 5A HDD1 0A CLONING DIGITAL AUDIO OUT OPTICAL HDMI IN 1 DVI HDMIIN2 LAN RJP LAN OUT TV Rear Panel Volume Control Box Speaker 2 1 ...

Page 23: ...bathroom speakers The jack that connects the Volume Control Box to the TV is a 3 5mm normal Phone jack Volume Control Box switch is a Tact switch Setting the Sub AMP Mode 0 Turns the Sub AMP function off PWM off 1 Determines the Sub volume according to the main volume control the sub volume is determined according to the Power On Volume the Min Volume and the Max Volume values of Hotel Mode 2 Dete...

Page 24: ...Box Inlay sample mayvary depending on the model HE680 690 model PCIN HP ID HDMI IN 3 ARC PC DVI AUDIOIN VIDEOOUT DOOR EYE VIDEO AUDIO LAN OUT B PCIN HP ID HDMI IN 3 ARC PC DVI AUDIOIN VIDEOOUT DOOR EYE VIDEO AUDIO LAN OUT B HP ID HEADPHON BOX TV Rear Panel Headphone Box TV Headphones jack Whitewire Audio L Shield Wire TV HP ID jack Red wire White wire Red Wire Audio R Shield wire Headphone Box ...

Page 25: ...ear Panel MediaHub HD Rear 2 HDMI cable 1 RS 232 Data Cable MediaHub HD The MediaHub HD is a hardware module that has different Audio Video inputs A V Audio PC HDMI and USB and corresponding outputs The corresponding output sources connect from MediaHub to the TV MediaHub communicates with the TV via RS232 Hot Plug Play is a function that allows hotel guests to connect an external source to the Me...

Page 26: ...O PC RS 232 USB HDMI VIDEO AUDIO AUDIO PC RS 232 TV Rear Panel RJP Rear 5 1 D sub PC Audio cable 2 Audio Cable 3 Video Cable 4 HDMI cable RJP Remote Jack Pack RJP stands for Remote Jack Pack The RJP is a hardware module that has different Audio Video inputs A V Audio PC and HDMI and corresponding outputs The corresponding output sources are connected from RJP to TV The RJP communicates with the TV...

Page 27: ...seconds to establish communications between the TV and the RJP The following table shows the approximate time in seconds to switch from the TV to the input source based on the priority Scenario 1 When no inputs are connected Source To Connect AV 2 Sec PC 0 7 Sec HDMI 3 9 Sec Scenario 2 When two or more inputs are connected and an Input source is disconnected and then reconnected Source Disconnect ...

Page 28: ...Stand Alone Hospitality mode Min Volume 0 Minimum Volume Level setting user can set Max Volume 100 Maximum Volume Level setting user can set Power On Source TV Select the Input source when TV is turned on initially Power On Option Last Option Power On AC Power On Option Standby Stand By Mode Power On Power On Last Option Last Power On State 4 Channel Channel Setup User can set channel option Such ...

Page 29: ...n and Off mode Set TV to turn itself on or off automatically at a specified time 7 Music Mode Music Mode AV OFF To get music output from an mp3 audio playerthrough an AV Input Source When on you can hear sound from the playerthrough the TV even there is no video signal The TV s backlight however remains on And add a video signal it works normally Music Mode PC OFF To get music output from an mp3 a...

Page 30: ...mined according to the Power On Volume the Min Volume and the Max 2 Determines the volume according to the bathroom control panel setting HG890V model only can select 0 and1 Sub Amp Volume 6 Sub AMP Volume level at power on initial condition 11 HP Management HP Mode OFF Forthe specific situation pls see the table below Default HP Volume Main Speaker ON 12 Eco Solution Energy Saving OFF This featur...

Page 31: ...D of the REACH server Referto the REACH server manual for more details Room Number Setting room number REACH Config Version 0000 Displays the current REACH data version 16 Network Network Setup Set IP address to establish Internet connection SmartHub Model Setting Set Hotel ID SmartHub Setting Enterto Smart Hub setting interface Service Discovery ON ON open service discovery OFF close service disc...

Page 32: ...m appears in the test picture select Yes and follow the directions on the screen 3D Picture Test Use to check for 3D picture problems If the problem appears in the test picture select Yes and follow the directions on the screen Sound Test Use the built in melody sound to check for sound problems If the problem occurs during the test select Yes and follow the directions on the screen Channel inform...

Page 33: ...one is connected forcefully even if Headphone is not connected physically HP Sound YES HP vol level from Factory applied Greyed OFF OFF Volume up down Main Speaker Mute HP volume level up down as per current HP volume Greyed OFF ON Mute Main Speaker Mute No Action HP Change to Mute Greyed OFF ON volume up down keeping Mute state Main Speaker Sound No Mute HP volume level up down as per current HP ...

Page 34: ...message should be ON in order to display the message on power on Network SI Vendor OFF Hospitality Mode Standalone Widget Solution Power On Channel Menu OSD Clock Music Mode Remote Jack Pack External Source Bathroom Speaker HP Management Eco Solution Logo Message Cloning REACH Solution Door Eye Virtual Standby Security Mode DRM System r Welcome Message ON Edit Welcome Message Hospitality Logo OFF ...

Page 35: ...pitality Logo DL Logo Display Time 5 Second Hospitality Logo This option lets you choose whether the Hospitality Logo image is displayed or not The Initial value is OFF This Can be set to OFF or ON When set to ON the Logo Download and Logo Time Display menu items become accessible Hospitality LOGO DL This option lets you download the logo image to the TV s memory from a USB device A wait message a...

Page 36: ...o TV This downloads the stored data in the USB device to TV set 1 Insert a USB drive into the USB port on the rear of the TV 2 Enter Hotel Option by pressing buttons in order MUTE 1 1 9 ENTER 3 Press the or button to select Clone USB to TV and then press the ENTER button 4 When the message Clone USB to TV is displayed then press the ENTER button 5 You can Make sure USB cloning behaviour In Progres...

Page 37: ...ss Sharpness Colour Tint G R Apply Picture Mode Picture Size Picture Size Zoom Position Auto Adjustment PC Screen Adjustment PIP Advanced Settings Dynamic Constrast Black Tone Flesh Tone RGB Only Mode Colour Space White Balance Gamma Motion Lighting Picture Options Colour Tone Digital Clean View MPEG Noise Filter HDMI Black Level Film Mode Analogue Clean View LED Clear Motion Picture Off Reset Pic...

Page 38: ...p c English য檥И ކ এѽИ ކ Select Picture mode If you don t change the country of the Current Location The TV is automatically turned off and on Press Power OFF to exit Hotel Option Menu appears Set Clock If you change the country of the Current Location Select your language If you select TV Basic Setup If you select Cloning Mode If you select Factory Menu Copy the system settings from the USB or ser...

Page 39: ... operation are the same as Samsung s consumer TV models If you press the Enter key the Picture Mode OSD appears Picture Mode OSD Initially highlighted Standard The TV displays the Picture Mode OSD where you can choose the Dynamic or a Standard Picture mode Auto Search Mode OSD If you press the Enter key the TV automatically searches for channels The OSD Display time which starts when the Auto Stor...

Page 40: ... Set ID OSD will be displayed in central position The following words appear Remote control code is set to x If you want to change Remote control code Enter the digit you want to change X is the digit number This OSD displays until Exit is pressed Remote control code is set to 0 If you want to change Remote control code enter the digit you want to change For example TV and Remote will be set to ID...

Page 41: ...on Logo Message Cloning REACH Solution Door Eye Virtual Standby Security Mode DRM System r Channel Editor Depending on model and region some menu items may not exist Simple Steps forchannel EditorunderStand alone Mode Step Broad Outline 1 Operate Channel in Hotel Option Menu 2 Enter Channel Editor in Hotel Option Menu 3 Compile a table related to the final channel lists you want to have 4 Rearrang...

Page 42: ...d from the channel list press the red button on the remote To delete two or more channels simultaneously select multiple channels in Step 1 and then press the red button on the remote If you want to delete the scambled channels you should run the process below Hotel option Channel Channel Setup Channel Settings Clear Scrambled Channel 3 Press the green button on the remote to select all channels 4...

Page 43: ...ber the channel information is not updated automatically Edit Channel Number CCTV 1 U Adjust E Input Number R Return OK Cancel 6 Rename Channel Use Rename Channel to change the name of a channel you select To change the name of a channel follow these steps 1 Select a channel on the Channel Edit screen 2 Press the TOOLS button on your remote 3 Select Rename Channel in the Tools menu 4 Use the on sc...

Page 44: ...r down arrow button on the remote to select the channel number of the analogue channel If you tune to a channel after assigning the channel to an external source you can enter the external source without opening the TV source menu 180 蔺孟䅓瞮 羹灚虹縻 178 188 貹趁婇䅓瞮 186 裀䧼䜓洹懫 HDMI1 DVI HDMI3 Component 182 藛㺷㯾挴 184 蚶㱹箛懫 179 落睧䅓瞮 羵䱮䅓瞮裀寭 187 裀䧼䜓虹縻 189 貹趁婇䅓瞮裀寭 HDMI AV PC 2 181 蔻䝮虹縻 177 183 蚶㱹䁏䔢 185 蚶㱹藛㰸 180 蔺...

Page 45: ...Sound Bar Out On Connect an HDMI cable from the HDMI OUT port of Sound BAR to the HDMI IN3 ARC port of hospitality TV After being connected to the 2016 hospitality TV via HDMI Cable when the TV turns on the Sound Bar automatically detects the TV and then converts to hotel mode by itself The change with power on volume max volume on TV is applied to the connected sound bar since TV boots twice Feat...

Page 46: ...in Hotel SIRCH Headend System forHotel HD ENCODULATOR HD ENCODULATOR HD ENCODULATOR HD ENCODULATOR Satellite Receiver Independence AV Stream Cable STB Terrestrial Receiver RF Combiner Features SIRCH Windows Application SW 19 inch Rack Unit type PC embedded Modulator OpenCable Remote Upgrade TV Software Cloning Data Channel Map Operation can be controlled by key button extra key board monitor and m...

Page 47: ... not use screws that do not complywith VESA standard screw specifications Do not use screws longerthan the standard dimensions as they may cause damage to the inside of the TV set Forwall mounts that do not complywith the VESA standard screw specifications the length of the screws may differ depending on their specifications Do not fasten the screws too tightly This may damage the product or cause...

Page 48: ... not fall backwards It is safe to connect the string so that the clamps fixed on the wall are equal to or lowerthan the clamps fixed on the TV Untie the string before moving the TV 4 Verify that all connections are properly secured Periodically check connections for any sign of fatigue forfailure If you have any doubt about the security of your connections contact a professional installer Anti the...

Page 49: ...by 45 W 0 3 W 50 W 0 3 W Sound Output 10 W 2 Dimensions WxDxH Body With stand 972 9 x 570 1 x 54 0 mm 972 9 x 622 0 x 226 5 mm 1105 8 x 645 0 x 54 6 mm 1105 8 x 697 0 x 226 5 mm Weight Without Stand With Stand 9 4 Kg 12 3 Kg 13 1 Kg 16 0 Kg Model Name HG55AE680 HG55AE690 Screen Size 54 6 inches Power Consumption Normal operation Standby 50 W 0 3 W Sound Output 10 W 2 Dimensions WxDxH Body With sta...

Page 50: ...ons or comments relating to Samsung products please contact the SAMSUNG customer care centre País Centro de Assistência ao Cliente Website CHINA 400 810 5858 www samsung com cn support HONG KONG 852 3698 4698 www samsung com hk support Chinese www samsung com hk_en support English HE680_690 ASIA ENG X1 ...

Reviews: