background image

11

For further information, visit videotron.com/terminal-support.

HD TERMINAL AND HD pVR wITH HoME THEATRE SySTEM

RECoMMENDED CoNNECTIoN pRoCEDURE

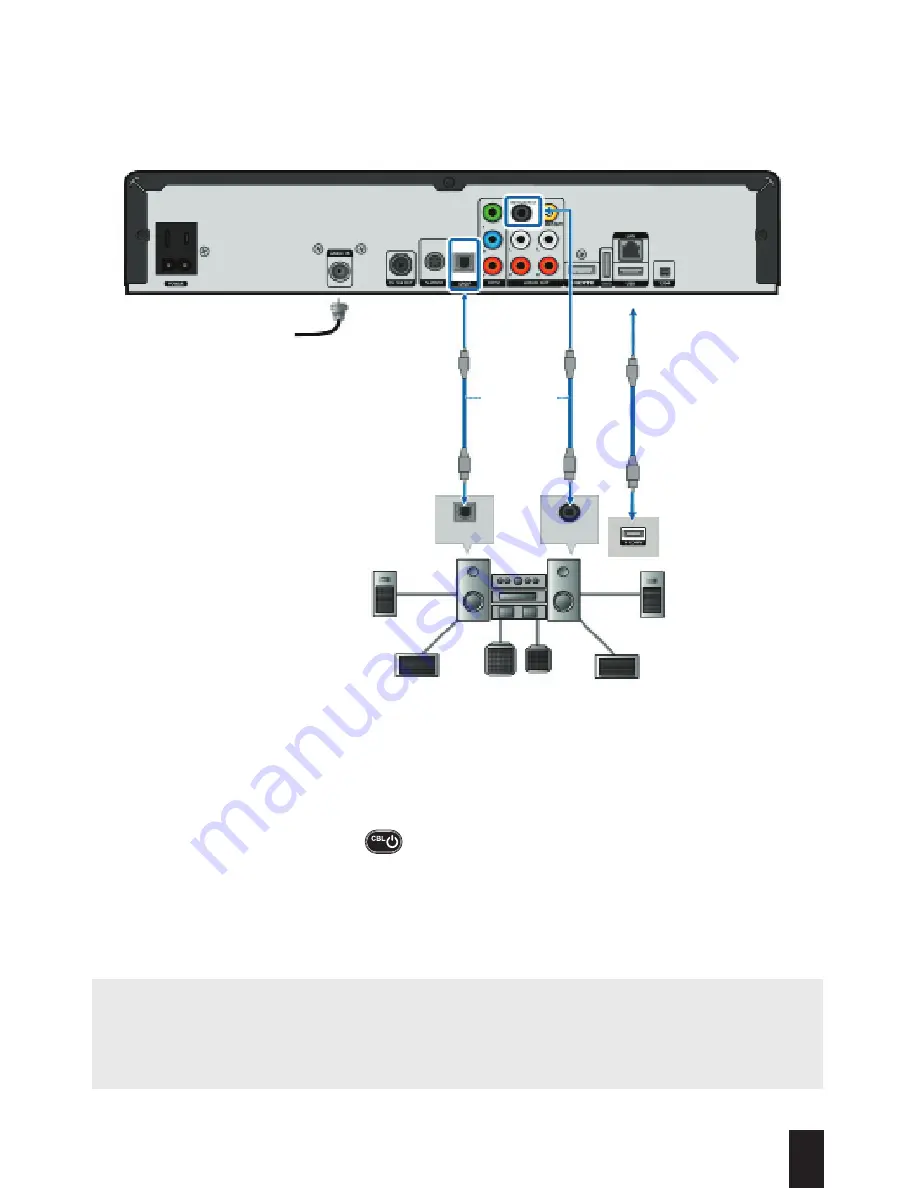
Use this configuration if you are connecting your terminal to a 5.1 home theatre system.

NOTE:

 For further information on connecting your audio system, please refer to your home 

theatre user guide.

WARNiNg

: If you see “WIZ 502” (error message) on your screen, please contact Technical 

Support (see page 45) immediately as certain applications will not work. 

1. Refer to the diagram above and choose a connection type.

i.  If you’re connecting your terminal to the audio system with an HDMI cable, your audio 

system must also be linked to your TV through the HDMI input.

ii.  If you’re connecting your terminal to the audio system with an optical audio cable or 

coaxial digital cable, please refer to the previous pages for the video connection.

2. Turn on the terminal by pressing 


on your remote control. 

3. Program your remote control to your TV by following the instructions on page 13.
4. Turn on your sound system and select the corresponding audio input.

Cable

Choose one 

or the other

HDmi

Digital Audio 

input

SPDF

Summary of Contents for 6340

Page 1: ...USER GUIDE _ HD TERMINAL HD PVR ...

Page 2: ... Customize Displayed Channels 20 How to Create and View Your List of Favourite Channels 20 Search 21 Widgets 22 3D 22 illico On Demand 23 Movie or TV Show Rental 24 Resume Viewing 25 Pay Per View PPV Services 27 HD PVR 29 Main menu 29 Control Live TV 31 Record a Program 32 Manage Your Recordings 34 Manage Your Hard Drive 36 Settings 37 General Settings 37 Controls and Limits 38 Parental Control 39...

Page 3: ...sonalized interactive 15 day Program Guide Use handy apps like the Miniguide and a variety of widgets i e weather forecasts lottery results illico news etc Fully immerse yourself in the HD experience thanks to exceptional image quality and menus adapted to HD TVs Benefit from a Dolby Digital 5 1 output for unbeatable sound adapted to home theatre systems Gain exclusive access to illico On Demand w...

Page 4: ...Connect Your Terminal section 2 When your terminal is connected call 514 380 7834 or 1 866 380 2134 to activate it 3 We strongly recommend that you follow the Quick Start Wizard that will automatically pop up when you turn on your terminal for the first time The Quick Start Wizard shows you how to i Set the display language of your terminal ii Activate the Administrator PIN to manage certain funct...

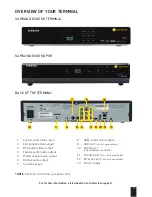
Page 5: ...ly unavailable 10 eSATA port only available on the HD PVR 11 FireWire port currently unavailable 12 Ethernet port currently unavailable 13 Power supply 1 13 4 12 2 3 6 7 5 8 10 9 11 NOTE Photo for illustration purposes only 1 Coaxial audio video input 2 Component video output 3 RCA audio video output 4 Coaxial audio video output 5 Digital coaxial audio output 6 Optical audio output 7 S video outpu...

Page 6: ...le on the HD PVR 12 FireWire port currently unavailable 13 Ethernet port currently unavailable 14 Power supply 1 5 7 4 2 3 11 12 13 14 10 9 8 6 CISCO 4642 HD Terminal back of the TERMINAL NOTE Photo for illustration purposes only 1 Coaxial audio video input 2 Component video output 3 RCA audio video output 4 RCA audio output 5 Digital coaxial audio output 6 Optical audio output 7 S video output ...

Page 7: ... TV as well as Dolby 5 1 audio with just one cable Component cable The component video cable red blue green transmits 1080i high definition video to your TV RCA component and stereo cables The yellow component or RCA cable transmits standard definition video where as the red and white cable transmits stereo sound S video cable The S video cable transmits standard definition video standard definiti...

Page 8: ...l for the first time WARNING If you see WIZ 502 error message on your screen please contact Technical Support see page 45 immediately as certain applications will not work Connect your HD terminal or HD PVR to an HD TV If you would like to connect your terminal to an HD TV you can choose between two types of video connection HDMI or Component Component The component cable red blue green transmits ...

Page 9: ...that will automatically pop up when you turn on your terminal for the first time WARNING If you see WIZ 502 error message on your screen please contact Technical Support see page 45 immediately as certain applications will not work 1 Connect your equipment by following the diagram above 2 Turn on the terminal by pressing on your remote control 3 Turn on your TV and select the corresponding AUDIO V...

Page 10: ...or audio and yellow cables for video 1 Connect your equipment by following the diagram above 2 Turn on the terminal by pressing on your remote control 3 Turn on your TV and select the corresponding AUDIO VIDEO input Input 1 2 3 or HDMI 1 2 3 to display content on screen 4 Program your remote to your TV by following the instructions on page 13 5 Use the remote control that came with your terminal t...

Page 11: ...ications will not work 1 Refer to the diagram above and choose a connection type i If you re connecting your terminal to the audio system with an HDMI cable your audio system must also be linked to your TV through the HDMI input ii If you re connecting your terminal to the audio system with an optical audio cable or coaxial digital cable please refer to the previous pages for the video connection ...

Page 12: ...PVR IOD Search Activate disable function Go to Picture in Picture PiP mode PVR Select your TV s video input Turn on turn off your terminal Get information on the channel or IOD Browse menus on screen Close interactive screens or return to live TV Access illico On Demand Change channel up down Switch to your favourite channels List of recorded shows PVR Skip forward PVR IOD Fast forward PVR IOD Pau...

Page 13: ... Hold down and at the same time until the red light under blinks twice then release both buttons 3 Press once The red light will stay lit 4 Point the remote control at the TV Refer to the table below and enter the number corresponding to the brand of your TV e g 2 for LG The red light will blink twice and the TV will turn off 5 Press to lock the code 6 Turn your TV back on If this programming proc...

Page 14: ...first 2 Hold down and until the red light under blinks twice then release both buttons 3 Press 9 9 1 on the remote control The red light will blink twice 4 Then press 1 if you are looking for a TV code or 3 if you are looking for an audio system code 5 Point the remote control at your TV or audio system then press and release the CH button until the device that you are programming turns off You ma...

Page 15: ... time this means the code you have entered is invalid Repeat steps 3 and 4 using the same code or another code if possible 5 Point the remote control at your device and press The device should turn off If nothing happens repeat steps 2 to 5 6 To program your audio device repeat steps 2 to 5 7 When your remote control has been programmed we strongly recommend that you select its model and volume co...

Page 16: ...ntil the red light beneath blinks twice then release both buttons 2 Press 9 9 3 The red light will blink twice 3 Press 3 RESETTING YOUR REMOTE CONTROL If you would like to reprogram your remote control to other devices or if you are having problems getting it to work you can reset it by following these steps 1 Hold down and until the red light beneath blinks twice then release both buttons 2 Press...

Page 17: ... do not have an HD TV you can choose a 480i or 480p resolution HD channels are available after channel 600 Volume control Determine whether you would like your remote to control the volume on your TV or terminal If your remote control has been programmed to your TV please ensure that the volume control button is set to work with your TV or audio system Display Display the time on the terminal when...

Page 18: ...e previous screen 3 Press to confirm your choice ACTIVATE AND PERSONALIZE THE SHORTCUT MENU illico TV new generation also offers a Shortcut Menu that lets you choose the shortcuts you want 1 Press 2 Using select Settings then Application Preferences 3 Using select Shortcut Menu 4 In the drop down menu select Activate or Disable the Shortcut Menu then customize it by choosing the shortcuts you want...

Page 19: ...selected schedule 4 Press to go to the selected channel HOW TO USE THE miniguide 1 While you are watching content press 2 Use to go from one channel to the next and from one schedule to another Press to go to the selected channel 3 If you hover the cursor over a show in the Miniguide a description will automatically pop up If this does not happen press 4 Press to exit note You can modify the autom...

Page 20: ...y name or by number 1 Press 2 Press and select Sort using 3 Select By Name or By Number and press How to Create and View a List of Your Favourite Channels Adding or removing your favourite channels in the Program Guide or while watching TV 1 In the Program Guide use to select a channel and press A star on the left of the Program Guide will indicate your favourite channels 2 You can browse through ...

Page 21: ...1 Press on your remote 2 When the on screen keyboard is displayed use to enter the content title or name of the actor you are looking for Relevant content will begin to be displayed from the second letter that you enter The more letters you enter the more accurate your search results will be 3 For search results that are even more accurate select Display Filters at the bottom of the keyboard 4 Sel...

Page 22: ...n also select Games and Applications from the main menu Select the widget you want using and press HOW WIDGETS ARE DISPLAYED WHILE YOU WATCH TV Note To modify the widgets settings like the weather or lottery widget please access the preferences for the desired widget 3D Videotron lets you view content in 3D Experience 3D on a 3D TV It is possible to view all 3D content offered by Videotron on a 3D...

Page 23: ...e released on DVD Blu ray On demand channels like The Movie Network Disney Junior Family HBO etc Thousands of free titles Resume viewing a movie or a show that you paused either on your TV channel 900 or via illicoweb tv or illico mobile Plus you only need to pay once for content you ordered Handy buttons for when you use illico On Demand To access illico On Demand To resume viewing content you pa...

Page 24: ...to view the content FR EN and the viewing mode HD or SD If an option is unavailable it will be shaded You will need your PIN to confirm your order If you did not create a PIN when you set up your terminal a window will pop up prompting you to create an Administrator PIN 5 The ordered title will be available for the period indicated on screen and can be accessed from the Resume Viewing Content menu...

Page 25: ... You will need your Administrator PIN to order content that is blocked by Parental Control 3 An Order PIN or Administrator PIN may be used to order content permitted by Parental Control RESUME VIEWING CONTENT THAT YOU VE PAUSED You can resume viewing an on demand movie that you ve paused on the screen of your choice TV computer via the Web mobile or tablet Search for content identified by this sym...

Page 26: ...n For further information please refer to the Application Preferences section on page 40 From this menu you can modify your preferences like your language preference FR EN or your viewing mode HD or SD Customizing Display Options When you consult available content in different sub menus you can choose the display that you want normal grid list or carousel using the button View Normal default View ...

Page 27: ... 751 onwards for high definition programming 3 Select a time slot and scroll through the movies airing during this period 4 Choose a title and press 5 Press Order to access the content and enter your PIN If you don t have a PIN a pop up window will prompt you to create an Administrator PIN 6 If the content you selected is unavailable select See Other Broadcasts to view a list of later broadcasts F...

Page 28: ...ancel up to 15 minutes after the program has begun i Press ii Select the channel and time slot where you placed your order iii Press iv Select Cancel My Order and enter your PIN in the confirmation window Parental Control Parental Control operate in conjunction with the Pay Per View function Please refer to the Controls and Limits section on page 38 If the Parental Control are active 1 You can dis...

Page 29: ... click and manage your recordings with ease You can even control live TV and record two programs at once while you watch a third previously recorded show main Menu The HD PVR s main menu lets you manage content that you ve already recorded and content set to be recorded You can view your recordings and programmed recordings manually record a show manage your recordings and change your preferences ...

Page 30: ...ture recordings Manual recording Allows you to manually record within a specified time slot PVR Management Allows you to see the available disk space and to run the Free Up Disc Space function Preferences Allows you to modify your HD PVR s buffer settings and recording storage time i A buffer is an area of memory that temporarily stores data The HD PVR s buffer allows a recording to begin a few mi...

Page 31: ...orward press up to four times to increase the fast forward speed To pause stop a show you re watching To skip back a few seconds To skip forward a few seconds To view a list of your recordings To resume viewing in real time To instantly record a show HOW TO CONTROL LIVE TV When you press on one of the buttons mentioned above the status bar will automatically appear at the bottom of the screen and ...

Page 32: ...series i Select Record this Episode to record only the episode you are watching ii Select Record Series to record the TV show you are watching every time it airs no matter what day or time slot 3 If you are watching a TV program i Select Record Once to record only the TV show you are watching ii Select Repeat Recording to record the TV show you are watching every time it airs 4 To modify the recor...

Page 33: ...ing every time it airs if this option is available to you 5 To modify the recording criteria press 6 The title of the programmed recording will be displayed in a red box in the Program Guide Manual recording within a specified time slot To record all TV shows within a specified time slot 1 Press to go to the main menu 2 Use to select HD Video Recorder PVR 3 Use to select Manual Recording 4 Fill ou...

Page 34: ...roblem will be stored and the HD PVR will prioritize the recording of series and movies MANAGING YOUR RECORDINGS This section will show you how to view the content you recorded and how to manage the recording space on your hard drive Play recorded content 1 Press select a title and press 2 While it is playing press to pause or press to go back to the beginning or delete the title 3 If you have not...

Page 35: ...nect the terminal to a TV please refer to the Connect Your Terminal section on page 8 Please note that a cable connection is not required Deleting recordings 1 Press and select the title you wish to delete 2 Use to select Delete and press To delete multiple recordings use the Free Up Disc Space function explained on the following page Deleting and modifying upcoming recordings 1 Press to go to the...

Page 36: ...drive when you need to 1 Press to go to the main menu 2 Use to select PVR and press 3 Use to select PVR Management and press 4 Use to select Free Up Disc Space and follow the instructions on screen Picture in Picture PiP Picture in Picture PiP is an exclusive feature of the HD PVR that allows you to watch two shows at once To activate the PiP feature 1 Press 2 Press to modify the PiP screen displa...

Page 37: ... code and the widgets display as well as launch the Quick Start Wizard 1 Press to go to the main menu 2 Use to select General Settings and press In this menu you can modify the following settings a Language Choose the language in which you d like the illico TV new generation interface to be displayed b Postal code Enter your postal code to receive geo located information c Display the widget bar w...

Page 38: ...ttings on your terminal Protect the recordings on your HD PVR Manage your PINs Manage Parental Control via the main menu 1 Press to go to the main menu 2 Use to select Settings Next select Controls and Limits and enter your PIN in the window that pops up on screen 3 Select Modify Controls and Limits by pressing 4 Next select Enable Disable Controls and Limits You can also choose to suspend Control...

Page 39: ... Manage Parental Control settings and Block a Channel From the Modify Controls and Limits menu you can also 1 Hide adult content 2 Select the channels you want to block by using the Restricted Channels feature 3 Establish for how long the PIN will be able to unblock the channel 4 Add viewing restrictions based on the time of day 5 Protect the recordings on your HD PVR 6 Protect your settings ...

Page 40: ... your TV screen You must be subscribed to Videotron s Call Display service Program Guide and TV To modify which channel comes on automatically when you turn on your TV manage your favourite channels set your display preferences for the Program Guide or set the viewing mode Viewing Mode The terminal allows users to change the viewing mode according to their preferences An HD TV features a wide scre...

Page 41: ...uch as the order in which your selections are displayed the display language FR EN and the content format HD SD HD PVR To modify your HD PVR s buffer settings and how long your recordings are stored for For display preferences refer to the illico On Demand Preferences section on page 26 Shortcut Menu To enable or disable the shortcut menu or delete available options the Program Guide and illico On...

Page 42: ... who have trouble hearing Activating Closed captioning 1 Press to go to the main menu 2 Use to select Settings 3 Use to select Accessibility and Closed captioning 4 Use to select On Off and press Modifying audio accessibility and closed captioning settings 1 Press to go to the main menu 2 Use to select Settings and press 3 Use to select Accessibility and press i Audio Accessibility Allows you to c...

Page 43: ...inal by unplugging the power supply cord and plugging it back in If the problem persists restart the terminal as indicated above or contact Technical Support at 1 877 380 2611 I plugged in my terminal with an HDMI cable but the TV screen is blank What do I do Once you ve made sure that the HDMI cable is properly plugged into the terminal reboot the terminal by unplugging the power supply cord and ...

Page 44: ...n your terminal This will disable the Mute function and bring the sound back Is it normal that broadcasts on certain channels don t fill the screen Yes The only channels that broadcast full screen are HD channels channels after channel 600 Channels where the picture does not fill the screen are standard definition channels However some shows airing on HD channels are broadcast in standard definiti...

Page 45: ...Saturdays from 8 a m to 8 p m and on Sundays from 9 a m to 8 p m Montreal 514 281 1711 Quebec City 418 847 4410 Saguenay 418 545 1114 Outaouais Region 819 771 7715 Elsewhere in Quebec 1 888 433 6876 TECHNICAL SUPPORT For problems of a technical nature we invite you to contact Technical Support You can reach a representative 24 hours a day 7 days a week Montreal 514 841 2611 Quebec City 418 842 261...

Page 46: ...9 Denon 10145 10511 Diamond Vision 11996 Digistar 11565 Digital Lifestyles 11765 11822 Disney 11665 12152 Dumont 10017 10019 Durabrand 10463 10180 10178 10171 11034 10003 11665 Dwin 10747 Dynex 12049 11463 Eiki 10735 Electroband 10000 10185 Electrograph 11755 11623 Electrohome 10463 10381 10409 11570 11670 11672 Element 11687 12183 Emerson 11864 11394 10154 10451 10236 10462 10180 10178 10171 1166...

Page 47: ...341 11328 11327 11326 11316 11314 11286 11276 11262 10865 11314 11286 11276 11262 10865 11385 Portland 10451 10092 11661 10019 10039 Prism 10051 Proscan 10047 10030 10466 10747 11922 12147 12183 12256 Proton 10178 10003 10031 10052 10466 Protron 11320 11323 Proview 11687 Pulsar 10017 10019 Pvision 11222 Pyle 11200 Quasar 10250 10051 10165 10219 11291 11919 11924 11969 RCA 12434 10047 10051 10093 1...

Page 48: ...Bose 30674 Breath Audio 31963 Bryston 32359 Cal Audio Labs 31098 Cambridge Audio 31982 Carver 30269 Cinema Sound 30160 Classe 31461 31462 31915 32854 Curtis Mathes 30300 Denon 30160 32134 32706 Elan 30647 Emotiva 31908 Forte 30606 Gateway 31621 GE 30078 Goldstar 30031 Halcro 31934 32198 Harman Kardon 30892 30106 JVC 30331 Kenwood 30356 Krell 31837 31926 32463 Left Coast 31592 Lenoxx 31561 Lexicon ...

Page 49: ...z 31189 31269 30039 30189 31289 McIntosh 31289 MCS 30039 30346 Micromega 31189 Mitsubishi 31393 31957 Modulaire 30195 Myryad 31189 31901 NAD 30320 31889 31989 32309 Nakamichi 31313 30097 31555 31642 NexxTech 31751 Niro 31634 Norcent 31389 31751 Nova 31389 Nuvo 32509 Onkyo 31805 30135 31298 31531 32451 Optimus 31023 30042 30186 30531 30670 30797 31074 Oritron 31497 Panasonic 32967 31308 31518 30039...

Page 50: ... it with a damp cloth Do not use a liquid or aerosol cleaner or a magnetic static cleaning device OBJECT AND LIQUID ENTRY Do not expose the terminal to humidity or spill liquids on or near the device Do not place the terminal on a wet surface Never push objects into the terminal s openings as they may touch dangerous voltage points or cause short circuits that could result in a fire or electric sh...

Page 51: ...arranty will be void Refer all servicing to a certified Videotron technician Service should be referred to a certified Videotron technician when any of the following occurs There is damage to the power supply cord or plug Liquid enters the unit or there is exposure to rain or water A heavy object falls on the unit or you drop the unit or damage the cabinet It does not operate properly the instruct...

Reviews: