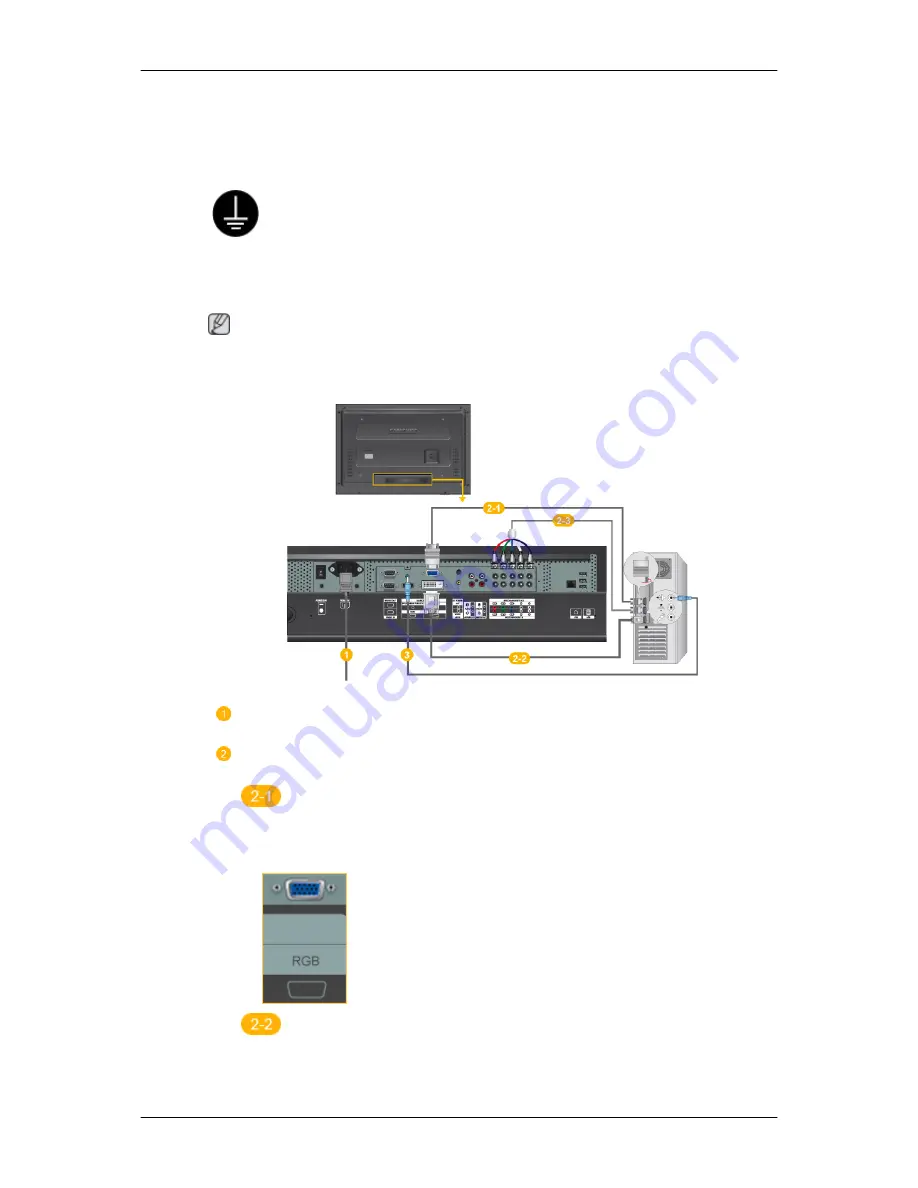
background image

Connections

Connecting a Computer

Using a Power cord with Earth

• In the event of failure, the earth lead may cause electric shock. Make

sure to wire the earth lead in correctly, before connecting the AC power.

When un-wiring the earth lead, make sure to disconnect the AC power

in advance.

 Note

AV input devices such as DVD players, VCRs or camcorders as well as your computer can

be connected to the LCD Display. For detailed information on connecting AV input devices,

refer to the contents under Adjusting Your LCD Display.

Connect the power cord for your LCD Display to the power port on the back

of the LCD Display. Turn on the power switch.
There are 2 ways to connect the D-sub to your LCD Display. Choose one

of the following:


 Using the D-sub (Analog) connector on the video card.

• Connect the D-sub to the 15-pin, RGB port on the back of your LCD

Display and the 15 pin D-sub Port on the computer.


 Using the DVI (Digital) connector on the video card.

• Connect the DVI Cable to the DVI port on the back of your LCD Display

and the DVI port on the computer.

Summary of Contents for 400FP-2 - SyncMaster - 40" LCD Flat Panel...

Page 1: ...ii LCD MONITOR quick start guide 400MX 2 400MXn 2 460MX 2 460MXn 2...

Page 2: ...ve the lock from the package box as shown in the figure above Lift up the package box by holding the grooves on both sides of the package box Check the contents of the package Remove the Styrofoam and...

Page 3: ...anty Card Not available in all locations User s Guide MagicInfo Software CD MagicInfo Manual CD Applicable to the FPn 2 model only Cables Power Cord Others Remote Control Batteries AAA X 2 Not availab...

Page 4: ...Ferrite Core for Lan Cable Applicable to the 46 inch network model only Sold separately D Sub Cable DVI Cable Wall Mount KIT LAN Cable Applicable to the FPn 2 model only TV tuner box NetWork Box Appl...

Page 5: ...y or adjusts selected menu values When OSD is not on the screen push the button to adjust volume ENTER button ENTER Activates a highlighted menu item SOURCE button SOURCE Switches from PC mode to Vide...

Page 6: ...rn your LCD Display OFF when it is not needed or when leaving it unattended for long periods Remote Control Sensor Aim the remote control towards this spot on the LCD Display Rear Note For detailed in...

Page 7: ...on Terminal Using a D Sub Cable 15 pin D Sub PC mode Analog PC DVI PC HDMI IN DVI PC Video Con nection Terminal Using a DVI Cable DVI D to DVI D DVI mode Digital PC DC OUT Make sure to use connecting...

Page 8: ...ing the R G B H V ports Component Connection connecting the PR Y PB ports BNC COMPONENT IN R PR G Y B PB H V BNC Component Connection Terminal In put RGB OUT Applicable to the FPn 2 model only LAN LAN...

Page 9: ...f the Kensington Lock may be different depending on its model Using the Anti Theft Kensington Lock 1 Insert the locking device into the Ken sington slot on the Monitor and turn it in the locking direc...

Page 10: ...TONS TTX MIX STILL AUTO S MODE MDC LOCK SOURCE ENTER PRE CH CH P D MENU GUIDE RETURN Up Down Left Right buttons EXIT SRS MagicInfo P MODE DUAL MTS PIP SWAP 1 POWER Turns the product On 2 Off Turns the...

Page 11: ...TTX MIX 13 STILL Press the button once to freeze the screen Press it again to unfreeze 14 AUTO Adjusts the screen display automatically in PC mode By changing the resolution in the control panel auto...

Page 12: ...providing the optimum viewing en vironment depending on the contents of the image you are watching Then push button again to circle through available preconfigured modes Entertain Internet Text Custom...

Page 13: ...Mechanical Layout 400FP 2 400FPn 2 Mechanical Layout Introduction...

Page 14: ...stallation Information Please contact your nearest SAMSUNG Distributor to place an order After your order is placed installation profes sionals will visit you and install the bracket At least 2 person...

Page 15: ...o the product or harm to customers when the installation is done by the customer This product is for installing on cement walls The product may not stay in place when installed on plaster or wood Comp...

Page 16: ...locking holes at the back of the product is correct If the length is too short or long loosen all or some of the 4screws on the wall bracket to adjust the length A Length between the two locking hole...

Page 17: ...plastic hanger Notice Mount the product on the wall bracket and make sure it is properly fixed to the left and right plastic hangers Be careful when installing the product on the bracket as fingers c...

Page 18: ...safety pin 3 to securely hold the product to the bracket A LCD Display B Wall Bracket C Wall Wall Bracket Angle Adjustment Adjust the bracket angle to 2 before installing it on the wall 1 Fix the pro...

Page 19: ...Make sure to use the top center and not the leftor the right side of the product to adjust the angle Mechanical Layout 460FP 2 460FPn 2 Mechanical Layout Introduction...

Page 20: ...stallation Information Please contact your nearest SAMSUNG Distributor to place an order After your order is placed installation profes sionals will visit you and install the bracket At least 2 person...

Page 21: ...nics is not responsible for any damages to the product or harm to customers when the installation is done by the customer This product is for installing on cement walls The product may not stay in pla...

Page 22: ...There are two hinges left and right Use the correct one A Captive Screw B Wall Bracket C Hinge Left D Hinge Right 2 Before drilling into the wall check if the length between the two locking holes at...

Page 23: ...he product may vary depending on the model The assemblies of the plastic hanger and the screw are the same 1 Remove the 4 screws on the back of the product 2 Insert the screw B into the plastic hanger...

Page 24: ...acket Make sure to re insert and tighten the safety pin 3 to securely hold the product to the bracket A LCD Display B Wall Bracket C Wall Wall Bracket Angle Adjustment Adjust the bracket angle to 2 be...

Page 25: ...Make sure to use the top center and not the leftor the right side of the product to adjust the angle Introduction...

Page 26: ...nformation on connecting AV input devices refer to the contents under Adjusting Your LCD Display Connect the power cord for your LCD Display to the power port on the back of the LCD Display Turn on th...

Page 27: ...rth In the event of failure the earth lead may cause electric shock Make sure to wire the earth lead in correctly before connecting the AC power When un wiring the earth lead make sure to disconnect t...

Page 28: ...UTPUT jacks on the camcorder and the AV AUDIO IN L AUDIO R on the LCD Display 2 Connect a video cable between the VIDEO OUTPUT jack on the camcorder and the AV IN VIDEO on the LCD Display 3 Select AV...

Page 29: ...h a DVD disc inserted Note A component cable is optional For an explanation of Component video consult your DVD manual Connecting a DTV Set Top Box Note The connections for a typical Set Top Box are s...

Page 30: ...the HDMI terminal Connecting Using a DVI to HDMI Cable Note Connect the DVI output terminal of a digital output device to the HDMI terminal of the LCD Display using a DVI to HDMI cable Connect the red...

Page 31: ...LCD Display For detailed information on connecting AV input devices refer to the contents under Adjusting Your LCD Display Note Connect the LAN cable Applicable to the FPn 2 model only Connecting a US...

Page 32: ...Note You can connect USB devices such as a mouse or keyboard Applicable to the FPn 2 model only Connections...

Page 33: ...connect the video cable then turn on both your com puter and the LCD Display If your LCD Display screen remains blank after using the previous procedure check your video controller and computer system...

Page 34: ...e than 3 times when booting If it does request an a service for the main board of the computer 3 If you installed a new video card or if you assembled the PC check if you installed the Adaptor video 4...

Page 35: ...y A Check if the signal cable is securely connected Re connect it if necessary Refer to Connecting a Computer Q The image is not clear picture is blurred A Run Frequency Coarse and Fine tuning A Turn...

Page 36: ...n check the cable connection between the LCD Display and the computer to en sure that the connector is properly connected Problems related to Audio Note Problems related to audio signals and their sol...

Page 37: ...sing the Enter key in the Boot menu A 4 Switch your set on while your USB disk is connected and boot up in DOS mode A 5 Run C ghost exe and choose Local Partition From Image from the menu Choose the g...

Page 38: ...nd then clean the LCD Display with a soft cloth using either a cleaning solution or plain water Do not leave any detergent or scratches on the case Do not let any water enter the LCD Display Q How can...

Reviews: