background image

24

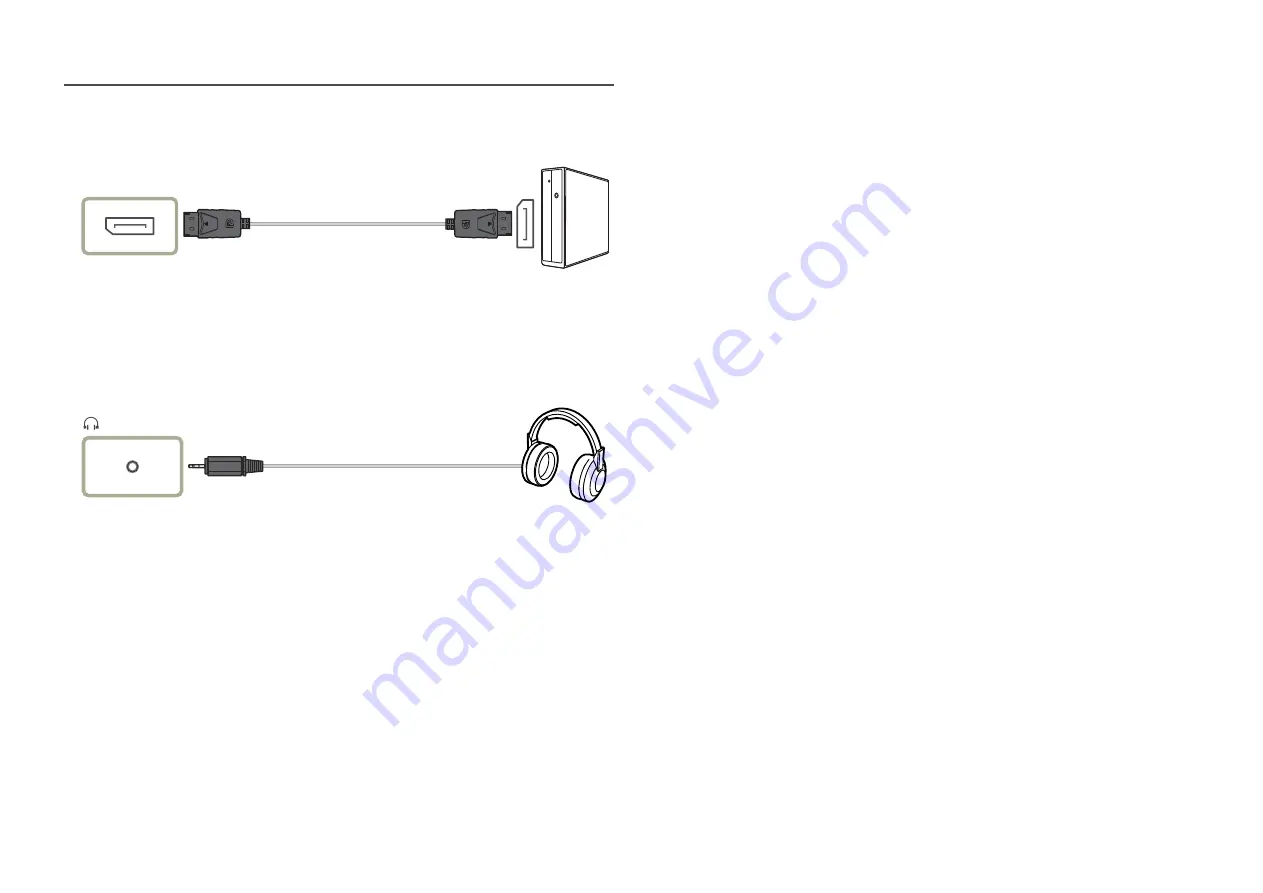
Connection Using an DP Cable

DP IN


A DP cable shorter under 1.5 m in length is recommended. Using a cable longer than 1.5 m can affect the 
picture quality.

Connecting to Headphones


Use headphones when activating sound with an HDMI-HDMI or DP cable.


The earphone jack supports only the 3 conductor tip-ring-sleeve (TRS) type. 

Summary of Contents for 2560x1440

Page 1: ...l in parts or entirety without the authorization of Samsung Electronics is prohibited Trademarks other than that of Samsung Electronics are owned by their respective owners An administration fee may be charged in the following situations a An engineer is called out at your request but it is found that the product has no defect i e where the user manual has not been read b You bring the unit to a r...

Page 2: ... Refresh Rate 29 Black Equalizer 29 Response Time 29 FreeSync C27JG54QQ C27JG56QQ C32JG50FQ C32JG53FD C32JG54QQ C32JG56QQ 30 Low Input Lag 31 Screen Size 31 Removing the Stand C27JG50QQ C27JG52QQ C27JG54QQ C27JG56QQ C32JG50QQ C32JG52QQ C32JG54QQ C32JG56QQ 19 Removing the Stand C32JG50FQ C32JG51FD C32JG53FD 20 Installing a Wall mount Kit or Desktop Stand 21 Connecting and Using a Source Device Pre ...

Page 3: ... Saving Plus C27JG50QQ C27JG52QQ C27JG54QQ C27JG56QQ C32JG50QQ C32JG52QQ C32JG54QQ C32JG56QQ 39 Smart ECO Saving C32JG50FQ C32JG51FD C32JG53FD 39 Off Timer 40 PC AV Mode 40 DisplayPort Ver 40 Source Detection 40 Key Repeat Time 41 PowerLED On 41 Reset All 41 Information 41 Installing the Software Easy Setting Box 42 Restrictions and Problems with the Installation 42 System Requirements 42 Picture ...

Page 4: ...m 3 93 Inches 10 cm 3 93 Inches 10 cm 3 93 Inches Precautions for storage High glossy models can develop white stains on the surface if an ultrasonic wave humidifier is used nearby Contact your nearest Samsung Customer Service Center if you want to clean the inside of the product Service fee will be charged Safety Precautions Warning A serious or fatal injury may result if instructions are not fol...

Page 5: ...a loose power socket Do not use multiple products with a single power socket Do not touch the power plug with wet hands Insert the power plug all the way in so it is not loose Connect the power plug to a grounded power socket type 1 insulated devices only Do not bend or pull the power cord with force Be careful not to leave the power cord under a heavy object Do not place the power cord or product...

Page 6: ... result Do not install the product within the reach of young children The product may fall and injure children Edible oil such as soybean oil can damage or deform the product Do not install the product in a kitchen or near a kitchen counter Caution Do not drop the product while moving Do not set down the product on its front When installing the product on a cabinet or shelf make sure that the bott...

Page 7: ...rm power off the product and remove the power cable Do not drop objects on the product or apply impact Do not move the product by pulling the power cord or any cable If a gas leakage is found do not touch the product or power plug Also ventilate the area immediately Do not lift or move the product by pulling the power cord or any cable Do not use or keep combustible spray or an inflammable substan...

Page 8: ... Keep the AC DC adapter in a well ventilated area If you place the AC DC power adapter so that it is hanging with the cord input facing upwards water or other foreign substances could enter the Adapter and cause the Adapter to malfunction Make sure to rest the AC DC power adapter flat on a table or the floor Insert the power plug into the AC DC adapter until a click sound is heard Do not insert on...

Page 9: ... use Do not touch the screen when the product has been turned on for an extended period of time as it will become hot Store small accessories out of the reach of children Exercise caution when adjusting the product angle Your hand or finger may get stuck and injured Tilting the product at an excessive angle may cause the product to fall and an injury may result Do not place heavy objects on the pr...

Page 10: ...s UP DOWN LEFT RIGHT PRESS ENTER C27JG50QQ C27JG52QQ C27JG54QQ C27JG56QQ C32JG50QQ C32JG52QQ C32JG54QQ C32JG56QQ The JOG button is located on the rear left side of the product The button can be used to move up down left or right or as Enter C32JG50FQ C32JG51FD C32JG53FD Power LED This LED is power status indicator and works as Power On Power button Off Power saving mode Blinking Power Off Power bu...

Page 11: ...ton in the Function Key Guide screen A message will appear on the top left corner of the screen if the input signal has been changed Eye Saver Mode Selects by moving the JOG button in the function key guide screen Press to enable or disable Eye Saver Mode The items below are not available if the Eye Saver Mode function is enable Game Picture Mode Black Equalizer Picture Picture Mode Brightness Col...

Page 12: ...Save the value and close Sublist Changing Brightness Contrast and Sharpness settings You can adjust Brightness Contrast or Sharpness by moving the JOG button up or down if no OSD menu is displayed Brightness Contrast Sharpness 100 The displayed image may differ depending on the model The default brightness can vary depending on the region Brightness This menu is not available when Eco Saving Plus ...

Page 13: ... or speakers Set the input volume for the input device to at least 20 and control the volume using the volume control JOG button LEFT RIGHT on the product What is Auto Mute The function mutes the audio to improve sound effect when there is sound noise orwhen the input signal is weak usually due to a problem with the volume of an input device To activate the Mute function access the Volume control ...

Page 14: ...x 1080 60 Hz 100 Hz 120 Hz 144 Hz C32JG50FQ C32JG51FD C32JG53FD DP IN Connects to a PC using a DP cable Connect to an audio output device such as headphones The sound could only be heard when using the HDMI to HDMI cable or DP cable DC19V Connects to the AC DC adapter HDMI IN1 HDMI IN 2 DP IN DC 19V C27JG50QQ C27JG52QQ C27JG54QQ C27JG56QQ C32JG50QQ C32JG52QQ C32JG54QQ C32JG56QQ C32JG50FQ C32JG51FD...

Page 15: ...d with your anti theft locking device for details To lock an anti theft locking device C27JG50QQ C27JG52QQ C27JG54QQ C27JG56QQ C32JG50QQ C32JG52QQ C32JG54QQ C32JG56QQ C32JG50FQ C32JG51FD C32JG53FD 1 Fix the cable of your anti theft locking device to a heavy object such as a desk 2 Put one end of the cable through the loop on the other end 3 Insert the locking device into the anti theft lock slot a...

Page 16: ...ing the monitor Do not directly apply pressure on the screen Do not hold the screen when moving the monitor Do not hold the product upside down only by the stand Hold the lower corners or edges of the monitor when moving it ...

Page 17: ...down on the Styrofoam as shown in the image If Styrofoam is unavailable use a thick sitting mat Hold the back of the monitor as shown in the figure Push the assembled stand into the main body in the direction of the arrow as shown in the figure Connect the power supply and the data cable as shown in the figure Caution Do not hold the product upside down only by the stand Caution Do not press down ...

Page 18: ...e Push the assembled stand into the main body in the direction of the arrow as shown in the figure Connect the power supply and the data cable as shown in the figure Caution Do not hold the product upside down only by the stand Caution Do not press down on the monitor There is a risk of damaging the monitor Attaching the Stand C32JG50FQ C32JG51FD C32JG53FD Before assembling the product place the p...

Page 19: ...t 1 2 3 Place the protective Styrofoam cushion included in the package on the floor and place the product facing down on the Styrofoam as shown in the image If Styrofoam is unavailable use a thick sitting mat While holding the monitorwith one hand pull the stand neck with your other hand to in detach the stand as shown in the figure Turn the connecting screw at the bottom of the stand base to sepa...

Page 20: ...ive Styrofoam cushion included in the package on the floor and place the product facing down on the Styrofoam as shown in the image If Styrofoam is unavailable use a thick sitting mat While holding the monitorwith one hand pull the stand neck with your other hand to in detach the stand as shown in the figure Turn the connecting screw at the bottom of the stand base to separate it Remove the stand ...

Page 21: ... the two screws in the direction as shown in the figure B Remove the bracket in the direction as shown in the figure C Detach the INLAY from the inside of the COVER CLEAN BACK TERMINAL and then attach it to the position as shown in the figure D Attach the wall mount kit or desktop stand here E F Bracket sold separately Align the grooves and tightly fasten the screws on the bracket on the product w...

Page 22: ...ktop stand using excessive force Samsung shall not be held liable for any product damage or personal injury caused by using a wall mount kit other than the one specified or from an attempt to install the wall mount kit on your own To mount the product on a wall ensure you purchase a wall mount kit that can be installed 10 cm or farther away from the wall Be sure to use a wall mount kit that compli...

Page 23: ...Connecting the power cable during connection may damage the product Check the types of ports at the back of the product you want to connect Connecting and Using a PC Select a connection method suitable foryour PC Connecting parts may differ in different products Provided ports may vary depending on the product Connection Using the HDMI Cable HDMI IN1 HDMI IN 2 Connection Using an HDMI DVI Cable HD...

Page 24: ...der1 5 m in length is recommended Using a cable longer than 1 5 m can affect the picture quality Connecting to Headphones Use headphones when activating sound with an HDMI HDMI or DP cable The earphone jack supports only the 3 conductor tip ring sleeve TRS type ...

Page 25: ... input voltage is switched automatically Specifications of the adapter may vary depending on the applicable quality requirements Connecting the Power C32JG50FQ C32JG51FD C32JG53FD DC19V 2 3 1 DC19V 4 1 Connect the power plug to the AC DC adapter 2 Connect the AC DC adapter cable to the DC19V port on the back of the monitor 3 Plug the AC DC adapter into the power outlet 4 Press the JOG button on th...

Page 26: ... stand with one hand and use the thumb on your other hand to remove the COVER CLEAN BACK TERMINAL in the direction of the arrow Tidying Up the Connected Cables C32JG50FQ C32JG51FD C32JG53FD 2 2 3 4 4 Connect cables to the appropriate ports Grab the stand with one hand and use your other hand to close the COVER CLEAN BACK TERMINAL in the direction of the arrow The cables are now tidied up Grab the ...

Page 27: ...atigue will be relieved Driver Installation You can set the optimum resolution and frequency for this product by installing the corresponding drivers To install the latest version of the product driver download it from the Samsung Electronics website at http www samsung com Setting Optimum Resolution An information message about setting optimum resolution will appear if you power on the product fo...

Page 28: ... 3D graphics and instant messaging on the RPG game screen AOS Increase the contrast ratio to obtain a picture quality optimized for the AOS game screen Cinema Obtain the brightness and sharpness of TVs suitable for enjoying video and DVD content Dynamic Contrast C32JG50FQ C32JG51FD C32JG53FD Obtain balanced brightness through automatic contrast adjustment In AV mode When the external input is conn...

Page 29: ...s with fixed refresh rates If the function is applied the screen may have malfunction Black Equalizer Adjust the brightness of the dark areas As the value gets closer to 1 the darker areas of the screen become brighter making it easier to find enemies when playing a game To find enemies more easily during a game use a lowervalue As the value gets closer to 20 the darker areas of the screen become ...

Page 30: ...e playing a game the following symptoms may occur The screen may flicker depending on the type of graphics card the game option settings or the video being played Try the following actions decrease the game setting values change the current FreeSync mode to Standard Engine orvisit the AMD website to check your graphics driver s version and update it with the latest one While you are using the Free...

Page 31: ...available when Refresh Rate is set to 60Hz If the refresh rate of the computer is different from the setting for Refresh Rate on the monitor the function may not be supported Screen Size Select the best screen size and ratio This menu is not available when FreeSync is enabled In PC mode Auto Display the picture according to the aspect ratio of the input source Wide Display the picture in full scre...

Page 32: ...h wide screen Pictures with a different aspect ratio will not be displayed 22 Wide 16 10 Use a 16 10 aspect ratio on a 22 inch wide screen Pictures with a different aspect ratio will not be displayed 23 Wide 16 9 Use a 16 9 aspect ratio on a 23 inch wide screen Pictures with a different aspect ratio will not be displayed The function may not be supported depending on the ports provided with the pr...

Page 33: ...ized for 3D graphics and instant messaging on the RPG game screen AOS Increase the contrast ratio to obtain a picture quality optimized for the AOS game screen Cinema Obtain the brightness and sharpness of TVs suitable for enjoying video and DVD content Dynamic Contrast C32JG50FQ C32JG51FD C32JG53FD Obtain balanced brightness through automatic contrast adjustment In AV mode When the external input...

Page 34: ...olor Adjust the tint of the screen This menu is not available when Eye Saver Mode is enabled This menu is not available when Picture Mode is set to Cinema or Dynamic Contrast mode Red Adjust the red saturation level Values closer to 100 mean greater intensity for the color Green Adjust the green saturation level Values closer to 100 mean greater intensity for the color Blue Adjust the blue saturat...

Page 35: ...urce devices The HDMI Black Level feature is only activated at a certain AV resolution such as 720P 60Hz and 1080P 60Hz Eye Saver Mode Set to an optimum picture quality suitable for eye relaxation TÜV Rheinland Low Blue Light Content is a certification for products which meet requirements for lower blue light levels When Eye Saver Mode is On the blue light that wavelength is around 400nm will decr...

Page 36: ...ations are subject to change without notice to improve quality Language Set the menu language A change to the language setting will only be applied to the onscreen menu display It will not be applied to other functions on your PC Display Time Set the on screen display OSD menu to automatically disappear if the menu is not used for a specified period of time Display Time can be used to specify the ...

Page 37: ...l The color and shape of parts may differ from what is shown Specifications are subject to change without notice to improve quality Self Diagnosis 1 Use the function key and go to System Self Diagnosis 2 Select OK when the following screen is prompted OK The test screen will now be shown Please look carefully at the screen for the next 5 seconds Review the test screen ...

Page 38: ...No OK Self Diagnosis Complete If the test screen is okay during Self Diagnosis your monitor may not have a problem If the problem persists follow the steps below Turn off your monitor and any other connected device such as a PC Turn on your monitorfirst and then the other connected device Update the operating system and graphics card driver to the latest version and restart your PC Connect the oth...

Page 39: ...depends on the customer screen brightness condition Low Saves up to 25 energy compared to the maximum brightness High Saves up to 50 energy compared to the maximum brightness Smart ECO Saving C32JG50FQ C32JG51FD C32JG53FD The Smart ECO Saving function reduces power consumption by controlling the electric current used by the monitor panel This menu is not available when Eye Saver Mode is enabled Th...

Page 40: ... monitor is in HDMI1 HDMI2 DisplayPort mode and the screen says Check Signal Cable or power saving mode activates press the JOG button to display the function button screen and then select the icon You can select PC or AV DisplayPort Ver Select your Displayport Incorrect settings may cause the screen to go blank If this occurs check the device specifications If the monitor when set to HDMI1 HDMI2 ...

Page 41: ...igure the settings to enable or disable the power LED located at the lower part of the product Working The power LED is on when the product is turned on Stand by The power LED is on when the product is turned off Reset All Return all the settings for the product to the default factory settings Information View the current input source frequency and resolution ...

Page 42: ...r the installation The Easy Setting Box icon may not appear depending on the computer system and the product specifications If the shortcut icon does not appear press the F5 key Restrictions and Problems with the Installation The Easy Setting Box installation may be affected by the Graphics Card Motherboard and the Networking Environment System Requirements OS Hardware Windows 7 32Bit 64Bit Window...

Page 43: ...esolution may vary depending on the computer system settings and cables Check the following Installation issue PC mode The screen keeps switching on and off Check the cable connection between the product and PC and ensure the connectors are locked Blank spaces are found on all four sides of the screen when an HDMI or HDMI DVI cable is connected to the product and PC The blank spaces found on the s...

Page 44: ...istorted Change the Color settings White does not really look white Change the Color settings There is no image on the screen and the power LED blinks every 0 5 to1 second The product is operating in power saving mode Press any key on the keyboard or move the mouse to return to normal operating mode Text is blurry If using a Windows OS e g Windows 7 Windows 8 Windows 8 1 orWindows 10 Go to Control...

Page 45: ...ngs How can I change the resolution Windows 7 Go to Control Panel Appearance and Personalization Display Adjust Resolution and adjust the resolution Windows 8 Windows 8 1 Go to Settings Control Panel Appearance and Personalization Display Adjust Resolution and adjust the resolution Windows 10 Go to Settings System Display Advanced display settings and adjust the resolution How do I set power savin...

Page 46: ... mm V 0 009177 Inches H x 0 009177 Inches V 0 2724 mm H x 0 2724 mm V 0 010724 Inches H x 0 010724 Inches V 0 36375 mm H x 0 36375 mm V 0 014321 Inches H x 0 014321 Inches V Maximum Pixel Clock HDMI1 250 MHz HDMI2 600 MHz DisplayPort 590 MHz HDMI1 250 MHz HDMI2 600 MHz DisplayPort 590 MHz HDMI1 300 MHz HDMI2 350 MHz DisplayPort 350 MHz Power Supply AC100 240V 50 60Hz Based on the AC voltage of the...

Page 47: ...u can customize the installation settings if desired Panel Dots Pixels Due to the nature of the manufacturing of this product approximately1 pixel per million 1ppm may be brighter or darker on the LCD panel This does not affect product performance The above specifications are subject to change without notice to improve quality This device is a Class B digital apparatus For detailed device specific...

Page 48: ...920 x 1080 120 Hz HDMI1 1920 x 1080 144 Hz HDMI2 1920 x 1080 144 Hz DisplayPort Maximum resolution 2560 x 1440 60 Hz HDMI1 2560 x 1440 144 Hz HDMI2 2560 x 1440 144 Hz DisplayPort 1920 x 1080 120 Hz HDMI1 1920 x 1080 144 Hz HDMI2 1920 x 1080 144 Hz DisplayPort If a signal that belongs to the following standard signal modes is transmitted from your PC the screen will automatically be adjusted If the...

Page 49: ... 250 36 000 VESA DMT 800 x 600 37 879 60 317 40 000 VESA DMT 800 x 600 48 077 72 188 50 000 VESA DMT 800 x 600 46 875 75 000 49 500 VESA DMT 1024 x 768 48 363 60 004 65 000 VESA DMT 1024 x 768 56 476 70 069 75 000 VESA DMT 1024 x 768 60 023 75 029 78 750 VESA DMT 1152 x 864 67 500 75 000 108 000 VESA DMT 1280 x 720 45 000 60 000 74 250 VESA DMT 1280 x 800 49 702 59 810 83 500 VESA DMT 1280 x1024 6...

Page 50: ...48 077 72 188 50 000 VESA DMT 800 x 600 46 875 75 000 49 500 VESA DMT 1024 x 768 48 363 60 004 65 000 VESA DMT 1024 x 768 56 476 70 069 75 000 VESA DMT 1024 x 768 60 023 75 029 78 750 VESA DMT 1152 x 864 67 500 75 000 108 000 VESA DMT 1280 x 720 45 000 60 000 74 250 VESA DMT 1280 x 800 49 702 59 810 83 500 VESA DMT 1280 x1024 63 981 60 020 108 000 VESA DMT 1280 x1024 79 976 75 025 135 000 VESA DMT...

Page 51: ...00 x 600 48 077 72 188 50 000 VESA DMT 800 x 600 46 875 75 000 49 500 VESA DMT 1024 x 768 48 363 60 004 65 000 VESA DMT 1024 x 768 56 476 70 069 75 000 VESA DMT 1024 x 768 60 023 75 029 78 750 VESA DMT 1152 x 864 67 500 75 000 108 000 VESA DMT 1280 x 720 45 000 60 000 74 250 VESA DMT 1280 x 800 49 702 59 810 83 500 VESA DMT 1280 x1024 63 981 60 020 108 000 VESA DMT 1280 x1024 79 976 75 025 135 000...

Page 52: ...7 40 000 VESA DMT 800 x 600 48 077 72 188 50 000 VESA DMT 800 x 600 46 875 75 000 49 500 VESA DMT 1024 x 768 48 363 60 004 65 000 VESA DMT 1024 x 768 56 476 70 069 75 000 VESA DMT 1024 x 768 60 023 75 029 78 750 VESA DMT 1152 x 864 67 500 75 000 108 000 VESA DMT 1280 x 720 45 000 60 000 74 250 VESA DMT 1280 x 800 49 702 59 810 83 500 VESA DMT 1280 x1024 63 981 60 020 108 000 VESA DMT 1280 x1024 79...

Page 53: ...00 x 600 48 077 72 188 50 000 VESA DMT 800 x 600 46 875 75 000 49 500 VESA DMT 1024 x 768 48 363 60 004 65 000 VESA DMT 1024 x 768 56 476 70 069 75 000 VESA DMT 1024 x 768 60 023 75 029 78 750 VESA DMT 1152 x 864 67 500 75 000 108 000 VESA DMT 1280 x 720 45 000 60 000 74 250 VESA DMT 1280 x 800 49 702 59 810 83 500 VESA DMT 1280 x1024 63 981 60 020 108 000 VESA DMT 1280 x1024 79 976 75 025 135 000...

Page 54: ...T 800 x 600 48 077 72 188 50 000 VESA DMT 800 x 600 46 875 75 000 49 500 VESA DMT 1024 x 768 48 363 60 004 65 000 VESA DMT 1024 x 768 56 476 70 069 75 000 VESA DMT 1024 x 768 60 023 75 029 78 750 VESA DMT 1152 x 864 67 500 75 000 108 000 VESA DMT 1280 x 720 45 000 60 000 74 250 VESA DMT 1280 x 800 49 702 59 810 83 500 VESA DMT 1280 x1024 63 981 60 020 108 000 VESA DMT 1280 x1024 79 976 75 025 135 ...

Page 55: ...e same picture dozens of times per second allows you to view natural pictures The repeat frequency is called vertical frequency or refresh rate and is indicated in Hz This product can be set to only one resolution for each screen size to obtain the optimum picture quality due to the nature of the panel Using a resolution other than the specified resolution may degrade the picture quality To avoid ...

Page 56: ...am If customer requests software installation and setup for the product If a service technician removes cleans dusts or foreign materials inside of the product If customer requests an installation additionally after purchasing a product through home shopping or online A Product damage caused by customer s fault Product damage caused by customer s mishandling orwrong repair If a product damage is c...

Reviews: