
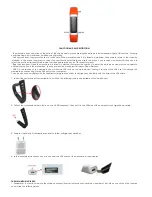

FUNCTION AND KEY DESCRIPTION:
· The wearable has one button at the base of the display and works by pressing the extreme left and extreme right of this button . For easy
understanding we will call them as left key and right key.
· Left key functions: Long press this key to switch on/off the wearable when it is in stand by interface. Short press to return to the stand by
interface. In the menu, long press to select the next function and while you are in the menu if you receive a call press this key once to
reject the call. In case the wearable does not repond press the key for 7/8 seconds to reset.
· Right key functions: When the wearable is in stand by, display, short press the right key to enter the main menu and press once again to
confirm your option in the main menu. In case you receive a call press this key to stop vibrations.
· USB. On the reverse of the wearable you will find an USB icon on the watch band. Unplug it to reveal the USB. Use it to charge the
wearable by connecting it to the USB port of your computer.
You can also use an adapter with the required voltage specifications to charge your wearable with the help of the USB cable.
1. Look at the underside of the wearable. You will see the following icon in one extreme of the watchband.
2. Pull out the watchband where the icon is and USB is exposed. Connect it to the USB port of the computer to charge the wearable.
3. Adapter. (optional) It is extremly important to follow voltage specifications.
4. Follow carefully instructions on how to connect the USB cable of the wearable to the adapter.
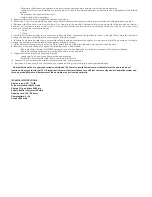
THE MAIN MENU INCLUDES:
1. Pedometer. Is used to calculate the distance walked (hours, minutes and seconds) and number of Km. When you click on this function
you will see the following menu.


