EN
16
BEFORE FIRST USE
-------------------------------------------------------------------------------------------------------------------------------------------------------------------------------------------------------------------------------------------------------------------------------------------------------------------------------------------------------------------------------------------------------------------------------------------------------------------------------------------------------------------------------------------------
1. Remove the Nutri Blender from the box.
Discard all bags, sti ckers and polystyrene
fi llers.
2. Inspect the Nutri Blender for damage which
may have been caused in transport. Con-
tact the seller when in doubt.
3. Verify that your power mains match the
nameplate rati ngs of the Nutri Blender.
4. Wash all Nutri Blender parts that are in-
tended for contact with food (see Secti on:
CLEANING AND MAINTENANCE).
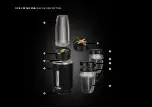
ASSEMBLING AND DISASSEMBLING
THE NUTRI BLENDER BOTTLES
1. Choose the bott le you need,
④
or
⑤
, and
place it upright, with the mouth up.
2. Place the blade rotor ring you need,
3A
or
3B
, on the threaded edge of the bott le
④
or
⑤
with the blades toward the bott om.
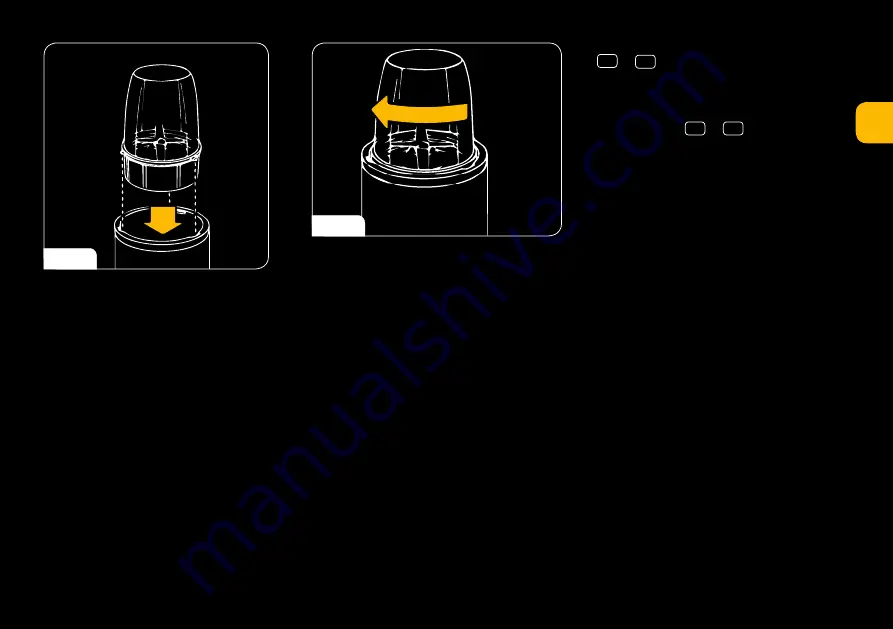
Next, twist the blade rotor ring to stop with
the thread
Fig. 1
properly aligned. Before
installing the blade rotor ring, check that its
sealing ring is clean and seated properly.
CAUTION!
The blades are very sharp. Pro-
ceed with care to avoid injury.
3. Each blender bott le is disassembled by
reversing the order of assembly.
USING THE NUTRI BLENDER
------------------------------------------------------------------------------------------------------------------------------------------------------------------------------------------------------------------------------------------------------------------------------------------------------------------------------------------------------------------------------------------------------------------------------------------------------------------------------------------------
1. Place the Nutri Blender housing
①
on a
dry, stable and fl at surface.
2. Before operati ng the Nutri Blender, check
that the sealing rings inside the blade rotor
ring
3A
and
3B
the drinking mouthpiece
cap and the twist-caps
⑦
are clean and
properly seated.
3. Cut the products into smaller pieces to
facilitate crushing. Keep the cuts 2 cm or
smaller in length.
4. Place the products into a bott le of
choice,
④
or
⑤
, and close it ti ght with
a blade rotor ring,
3A
or
3B
, by prop-
erly aligning the thread
Fig. 1
. The
2-blade rotor ring
3A
is for grinding hard
products, like coff ee beans, pepper beans
and other seeds, stones or cereals. The
6-blade rotor ring
3B
is for processing
other products.
CAUTION!
Do not overfi ll the bott les. Leave
at least 1 cm of headspace below the bott le
thread when upright. If the products are
foaming a lot when blended, the headspace
should be increased.
CAUTION!
To achieve the opti mum process-
ing effi ciency, put the products into the bott le
in the following order: liquids, fresh products,
yoghurt and ice cream.
CAUTION!
Do not use the Nutri Blender with
an empty bott le.
5. Plug in the Nutri Blender to the mains.
6. Turn the bott le sealed with a blade rotor
ring upside down and mount the blade
rotor ring in the seat
②
Fig. 2
inside the
Nutri Blender housing. The three bosses
around the bott le,
④
or
⑤
, must engage
the respecti ve three recesses in the Nutri
Blender housing. Next, press down the bot-
tle – the Nutri Blender will start processing
– and gently turn the bott le clockwise to
stop
Fig. 3
.
7. Operate the Nutri Blender by holding the
housing
①
with one hand and the bott le
with the processed product with the other
hand. Do not exceed the maximum operat-
ing ti me.
8. With the products blended in the bott le,
stop the Nutri Blender by releasing the
Fig. 1
EN
17
bott le,
④
or
⑤
, with the blade rotor ring,
3A
or
3B
, from the seat
②
. This is done
by gently rotati ng the bott le counterclock-
wise.
9. Unplug the Nutri Blender from the mains.
10. Remove the bott le,
④
or
⑤
, with the
blade rotor ring,
3A
or
3B
, from the Nutri
Blender housing
①
. Turn the bott le upright.
11. Remove the blade rotor ring from the
bott le. Empty the bott le to a container of
choice. You may also equip the bott le with
the processed food with:
a twist-cap
⑦
to carry the bott le without
a risk or spilling the contents;
the twist-on handle ring
⑥
to turn the
bott le into a handy mug for comfortable
drinking.
NOTES ON USE
-------------------------------------------------------------------------------------------------------------------------------------------------------------------------------------------------------------------------------------------------------------------------------------------------------------------------------------------------------------------------------------------------------------------------------------------------------------------------------------------------------------------------------------------------------------------
1. Cool down cooked vegetables and stock
before pouring them into a Nutri Blender
bott le.
2. The Nutri Blender is not intended for:
grati ng potatoes
beati ng eggs or dairy substi tutes
mincing raw meat
beati ng or mixing thick dough (as these
products tend to form heavy lumps that
can damage the Nutri Blender)
draining juice off fruits and vegetables
3. Check the consistency of the products
being blended every few seconds.
4. Do not exceed the maximum operati ng
ti me of the Nutri Blender specifi ed in the
Operati ng Manual.
5. If the motor stalls, immediately stop
blending and remove a part of the bott le
contents.
The motor is very effi cient and runs fast. Use
short blender pulses to prevent the food prod-
ucts from being broken up to fi nely.
To improve blending/cutti ng of cheese, choc-
olate, nuts, and similar products, refrigerate
them before processing.
If the food products tend to sti ck during pro-
cessing, remove the bott le with the blade rotor
ring, shake the bott le vigorously to free up the
contents, and conti nue processing.
Fig. 2
Fig. 3

