background image

Operating Instructions

5

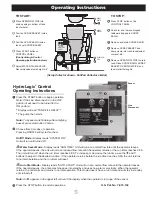
(Scrap Collector shown - Pot/Pan Collector similar)

3

B

C

SCRAP

BASIN

2

D

SCRAP

BASKET

1

E

OVERFLOW

PIPE

CONTROL

PANEL

TO START:

Place OVERFLOW PIPE into 

drain opening in bottom of tank 

(center hole).

Position SCRAP BASKET inside 

tank.

Position SCRAP BASIN inside 

tank over SCRAP BASKET.

Press START button on 

CONTROL PANEL. 

(See HydroLogic Control

Operating Instructions below.)

Adjust WATER PLUME VALVE.

Recommended plume height 4-6”.

TO STOP:

Press STOP button on the 

CONTROL PANEL.

Check for and remove dropped 

tableware trapped in SCRAP 

BASIN.

Remove and drain SCRAP BASIN.

Remove SCRAP BASKET and 

dump waste into trash receptacle or 

compost bin.

Remove OVERFLOW PIPE to drain 

tank. Rinse SCRAP BASIN, SCRAP 

BASKET, OVERFLOW PIPE, and 

tank interior thoroughly.

1.

  Press the START button to begin operation. 

  Note: If the Line Disconnect is in the OFF 

  position it will need to be turned to the 

  ON position.
 

 Display will read “TANK FILL DELAY”.*


 The pump then starts.

  Note: To bypass tank fill delay after emptying 

 basket, 

press start button 2 times.


2.

  Choose from 3 modes of operation. 

  Pressing ON/OFF will cycle thru them.

  On/Off Mode - Display reads “SYSTEM ON”. 

  Unit will run until turned off. 


        Water Saver Mode - Display reads “RUN TIME”. Unit will run at a normal flow rate until the operator leaves. 

  If the operator leaves, the unit will run at a reduced flow rate until the operator returns or the run timer reaches 0:00.  

  The unit will turn off when the run timer reaches 0:00. To increase or decrease the run time, use the 

+

 and 

-


  buttons to adjust to the desired run time. If the operator returns before the run timer reaches 0:00, the unit returns 

  to normal operation and the run timer will reset.


        Auto Start Mode - Display reads “AUTO START”. Unit will run at a normal flow rate until the operator leaves. 

  If the operator leaves, the entire machine goes into standby and uses no water or electricity. When the operator 

  returns, the unit starts and returns to normal operation. This mode doesn’t have a run timer and will stay in standby 

  until turned off.

 Note: 

An

*

appears in the upper left corner of the display when the operator is in range of the sensor.


Press the STOP button to end all operations. 

HydroLogic

®

 Control

Operating Instructions

Line

Disconnect

Sensor

U.S. Pat. No. 7,815,134

Summary of Contents for S914

Page 1: ...ATIONAL PLUMBING AND ELECTRICAL CODES Scrap Collector Model S914 Pot Pan Scrap Collector Model P914 Installation Operating I N S T R U C T I O N S FOR PRODUCT WARRANTY REGISTRATION Go to www salvajor com Click on SUPPORT at the top of home page Click on PRODUCT REGISTRATION The Salvajor Company 4530 East 75th Terrace Kansas City Missouri 64132 2081 USA 1 888 SALVAJOR FAX 1 800 832 9373 www salvajo...

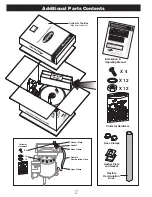
Page 2: ... Top Box May ship separate Installation Operating Manual Collector Hardware Hose Clamps Gusher Plate and Gasket Flexible Recirculation Hose Collector Hardware X 12 X 12 X 4 Flexible Recirculation Hose Gusher Plate Gasket Hose Clamp Hose Clamp X 12 X 12 X 4 ...

Page 3: ... table STOP If you have any questions about this installation call 1 888 SALVAJOR for installation advice X 12 X 12 X 4 Collector Top Collector Tank COLLECTOR HARDWARE GUSHER PLATE GASKET HOSE CLAMP FLEXIBLE RECIRCULATION HOSE ADJUSTABLE LEGS FLEXIBLE RECIRCULATION HOSE PUMP CONTROL HOSE CLAMP The control and sensor can be mounted on either side of the Collector with existing fasteners mounting ho...

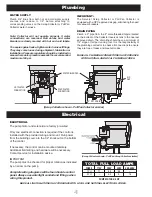
Page 4: ...ENDER Plumbing IMPORTANT The Salvajor Scrap Collector or Pot Pan Collector is equipped with a UPC approved air gap eliminating the need for vacuum breakers DRAIN PIPING Plumb a 2 pipe from the 2 male threaded nipple located on the bottom of the Collector reservoir tank to the nearest approved drain The drain line should have a minimum of 1 4 slope of fall per running foot It is the responsibility ...

Page 5: ... button 2 times 2 Choose from 3 modes of operation Pressing ON OFF will cycle thru them On Off Mode Display reads SYSTEM ON Unit will run until turned off Water Saver Mode Display reads RUN TIME Unit will run at a normal flow rate until the operator leaves If the operator leaves the unit will run at a reduced flow rate until the operator returns or the run timer reaches 0 00 The unit will turn off...

Page 6: ...oken Clamps loose Clogged pump Clogged pump intake screen Water plume valve turned down Pump motor running backwards Object blocking sensor Water Saver or Auto Start not turned on Dirty sensor Reset breaker Turn to ON position Replace blown fuse s Install overflow pipe Open valves Open valves Adjust setting of blender Correct water connections Wait for overload to reset and check for cause of rese...

Page 7: ...unaltered has been properly installed maintained and operated Salvajor will repair or replace at no cost defective parts due to material or workmanship if such service is performed by a Salvajor Authorized Service Center Parts wear is not considered a defect Conditions not covered by this warranty Faulty or improper electrical installations faulty or improper plumbing installations disposer jammed...

Page 8: ...bility to Buyer and or its customers exceed the price paid by Buyer for the specific goods provided by Seller giving rise to the claim or cause of action Buyer agrees that in no event shall seller s liability to buyer and or its customers ex tend to include incidental consequential or punitive damages The term consequential damages shall include without limitation loss of anticipated profits busin...

Reviews: