background image

Plumbing

Recommended Cold Water Supply

Models 75, 100, 150, 200

5GPM

Models 300, 500, 750

8GPM

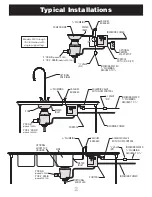
DRAIN PIPING

1.

Before installing the Salvajor disposer,

the waste line should be properly cleaned
out to the connecting main sewer.

2.

Use as few elbows, tees and bends as

possible when making connections.

3.

All horizontal drain lines should have a

minimum fall of 1/4" per foot.

4.

A 3" diameter pipe is recommended for

Salvajor disposers models 300 thru 750.
A 2" adapter is supplied for existing 2" drains.
Models 75 thru 200 require a 2” drain.

IMPORTANT!

It is imperative to have a proper downward pitch from the
disposer outlet to the main sewer line to assure proper
gravity flow. Improper drain line installation can result in
drain backups.

5.

Do not connect into a grease trap,

interceptor or drum trap.

NOTE: Pressure regulators should be installed in areas
where pressure exceeds the recommended maximum of
80 psi.

WATER SUPPLY

6.

Connect COLD WATER ONLY to disposer.

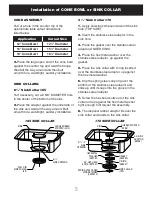
TYPICAL CONE LAYOUT

TYPICAL SINK LAYOUT

Water volume can be controlled by a properly
rated flow control valve or hand operated
valve.

(

Nos. 7-9

below for

NEW INSTALLATIONS ONLY!

)

7.

Plumb 3/4" IPS line and reduce to 1/2" at

the hand valve. Install the factory-supplied
solenoid valve with built-in flow control.

8.

From the solenoid, plumb 1/2" IPS line

above the flood plane of the table and install
the factory supplied vacuum breaker to local
code.

9.

Plumb 1/2" IPS line from the vacuum

breaker to either cone bowl, sink or top
housing inlet on the disposer. If connecting
to cone or sink, use 1⁄2" water inlet supplied
by the factory.

NOTE:

CONNECT COLD WATER ONLY TO DISPOSER.

Tempered water from pre-rinse or Salvajor scrapping

system is acceptable, but only in conjunction with an

independent, continuous cold water supply.

5

MAKE ALL PLUMBING CONNECTIONS IN ACCORDANCE

WITH LOCAL AND NATIONAL PLUMBING CODES.

Summary of Contents for 75

Page 1: ... Commercial Food Waste Disposing Systems since 1944 Salvajor Commercial Disposers For All Models 75 100 150 200 300 500 750 Installation Operating I N S T R U C T I O N S 2 Typical Installations 3 Installation of Cone Bowl or Sink Collar 4 Attaching Disposer to Cone Bowl or Sink Collar 5 Plumbing 6 Electrical 7 Operating Instructions 8 Warning and Safety Instructions FOR PRODUCT WARRANTY REGISTRAT...

Page 2: ...ITH FLOW CONTROL VACUUM BREAKER WATER INLET OPTIONAL PRE RINSE CONE INCOMING WATER 3 4 PLUMBING REDUCED TO 1 2 1 2 VALVE NF 1 2 PLUMBING 2 DRAIN models 75 200 2 OR 3 DRAIN models 300 750 Typical Installations INCOMING POWER CONTROL WITH P OR PP OPTIONAL REMOTE START STOP VACUUM BREAKER WATER INLET CONE OR SINK INCOMING WATER 3 4 PLUMBING REDUCED TO 1 2 1 2 VALVE NF 1 2 PLUMBING P PP 2 DRAIN models...

Page 3: ...stainless steel adaptor in the sink hole 3 Place the gasket over the stainless steel adaptor UNDER SINK 4 Place the hex metal washer over the stainless steel adaptor up against the gasket 5 Place the sink collar with O ring inserted over the stainless steel adaptor up against the hex metal washer 6 Slip the spring steel snap ring over the bottom of the stainless steel adaptor and slide up until it...

Page 4: ...ttom of the top housing to floor 5 Turn the disposer on its side and install the leg support optional on Models 75 200 standard on Models 300 750 on the bottom of the disposer and adjust the leg extension so the disposer will stand approximately 1 2 below the bottom of the top housing 6 Carefully balancing the disposer on the leg support walk it under the top housing aligning the ears on the shred...

Page 5: ... installed in areas where pressure exceeds the recommended maximum of 80 psi WATER SUPPLY 6 Connect COLD WATER ONLY to disposer TYPICAL CONE LAYOUT TYPICAL SINK LAYOUT Water volume can be controlled by a properly rated flow control valve or hand operated valve Nos 7 9 below for NEW INSTALLATIONS ONLY 7 Plumb 3 4 IPS line and reduce to 1 2 at the hand valve Install the factory supplied solenoid val...

Page 6: ...e 12 1 Amps 230 Volts 1 Phase 12 0 Amps 208 Volts 3 Phase 6 6 Amps 230 Volts 3 Phase 6 0 Amps 460 Volts 3 Phase 3 0 Amps Model 300 208 Volts 3 Phase 8 8 Amps 230 Volts 3 Phase 8 0 Amps 460 Volts 3 Phase 4 0 Amps Model 500 208 Volts 3 Phase 13 8 Amps 230 Volts 3 Phase 12 5 Amps 460 Volts 3 Phase 6 3 Amps Model 750 208 Volts 3 Phase 19 8 Amps 230 Volts 3 Phase 18 0 Amps 460 Volts 3 Phase 9 0 Amps Mo...

Page 7: ...sposer is jammed above See The disposer motor overload is tripped above Turn the disposer control off and press the reset button on the disposer If the disposer was running allow the unit to cool for 3 5 minutes before pressing the reset button Never strike the reset button with an object The water flows continuously before the controls are turned on Reinstall so that the arrow on the solenoid is ...

Page 8: ...s Warning SAFETY INSTRUCTIONS INTERNAL THROAT OPENING 61 2 ID CONE BOWL DEEP SINK DISPOSER TOP HOUSING 53 8 MIN CONTROLS Per UL 430 install using a UL listed electrical control panel The following Salvajor electrical control panels manufactured as of 11 01 96 comply with UL Standard 430 Section 28 3 1 Exception 1 and 28 3 2 model numbers MSS MSS LD MRSS MRSS LD ARSS 2 ARSS and ARSS LD HOPPERS SINK...

Reviews: