background image

7-5

Section 7

SC102ZB/ST103ZB Installation and Operation Manual 

Device Joining & Pairing

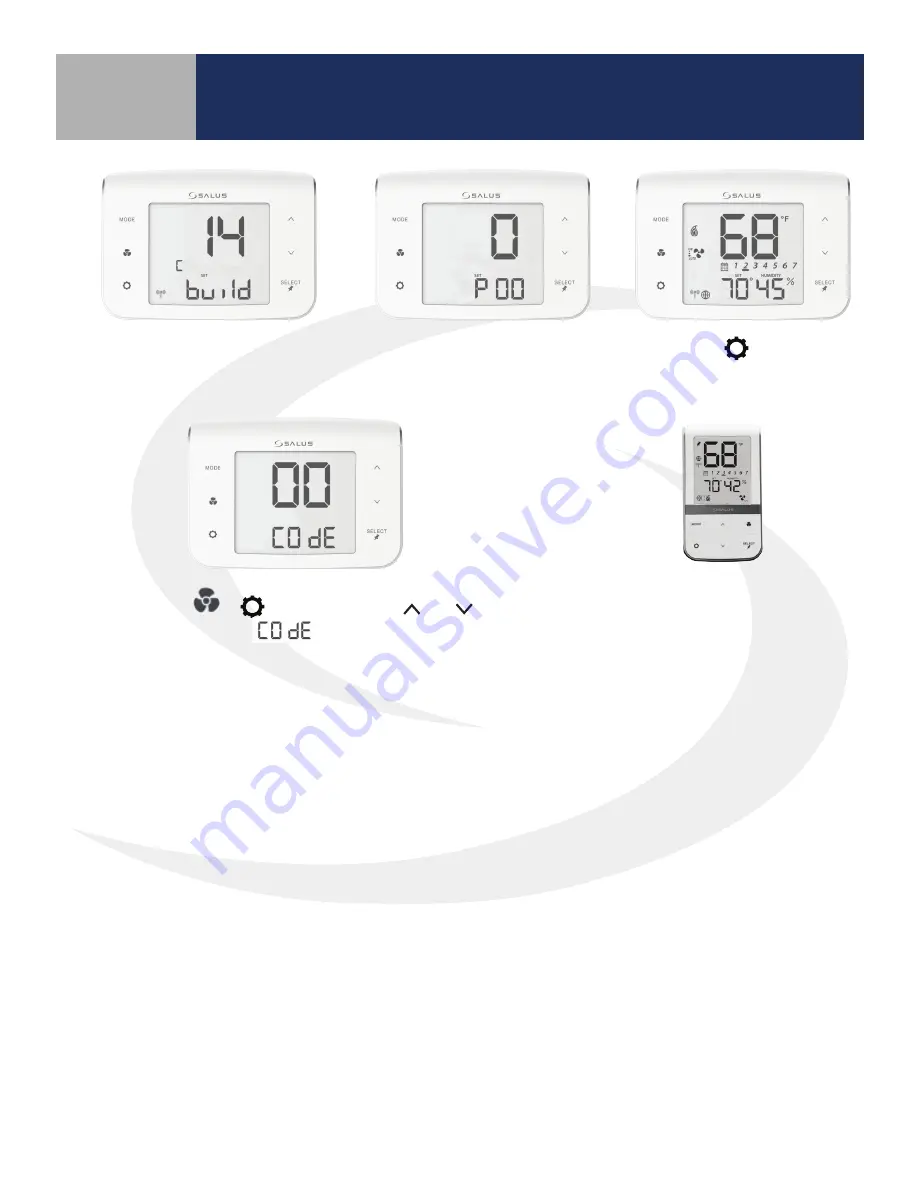
Next, the SC102ZB Fan Coil 

Controller enters Parameter 

Setup . 

Press the 

 key to enter 

the operation screen .

Once network building is complete, 
the controller will display the radio 
channel number being used .

Press 

MODE


 +


 keys 

simultaneously to enter 


functions .

After pulling the battery tab on the 
ST103ZB Fan Coil Remote, it will 
automatically pair with the SC102ZB .

Use the   and   keys 
to set digits to “00” .

Summary of Contents for SC102ZB

Page 1: ...SMC IOM SC102ZB ST103ZB 2020 02v1_2020 02 10 Installation Operation Manual SC102ZB Fan Coil Controller ST103 Wireless Fan Coil Remote...

Page 2: ...External Antenna Sold Separately Installation 3 4 4 ST103ZB Wireless Fan Coil Remote Installation Wall Plate Mounting 4 1 Desk Stand Mounting 4 1 5 SS909ZB Remote Temperature Sensor Installation Wall...

Page 3: ...ble Thermostat Standalone or Local Mode Only 9 2 Set Point Override 9 2 Heating Cooling Modes 9 2 Fan Modes 9 3 P22 Accessory Function 9 4 P16 AWAY Mode 9 5 10 Troubleshooting Troubleshooting 10 1 11...

Page 4: ...ermostats a smart home hub smart plugs water valve shutoff and door and window sensors A proven leader in the European market since 2003 Salus is currently expanding across North America Using this Ma...

Page 5: ...et connection By connecting the SG888ZB Gateway to your home network the system is connected to the worldwide web Monitor or adjust your Fan Coil system from anywhere via the SALUS Smart Home applicat...

Page 6: ...red in the U S and other countries App Store is a service mark of Apple Inc registered in the U S and other countries Codes Regulations Installation and setup of this product must be performed in stri...

Page 7: ...C102ZB Smartphone or digital camera for wiring reference photos Small screwdriver for removing wiring from old thermostat terminals Pencil for holding wires in place during installation 2 1 Wiring Lab...

Page 8: ...Wire Designation Record Terminal Wire Color Function 4 Pipe System 2 Pipe System R 24 VAC Input 24 VAC Input C 24 VAC Common 24 VAC Common Gl Fan Low Speed Fan Low Speed Gm Fan Medium Speed Fan Mediu...

Page 9: ...al 2 x 4 Box Vertical 2 x 4 Junction Box wall plate sold separately 4 x 4 Junction Box wall plate sold separately Install the Wiring Mount in the desired location using the wall screws provided making...

Page 10: ...102ZB ST103ZB Installation and Operation Manual SC102ZB Fan Coil Controller Installation SC102ZB Internal Block Diagram SC102ZB 2 Pipe Application SC102ZB 4 Pipe Application SC102ZB 2 Pipe Auxiliary H...

Page 11: ...sary to splice Tc Attach controller to the wiring mount by aligning the connector pins Make sure the connector pins are not bent and that the controller is fully seated on the wiring mount If an exter...

Page 12: ...different location at any time Wall Plate Mounting Desk or Cabinet Top Mounting Remove the Wall Mount from the back of the ST103ZB Wireless Fan Coil Remote Attach the Wall Mount in the desired locati...

Page 13: ...wall mounted or mounted on a stand for desk or cabinet top operation The Remote Temperature Sensor can be paired prior to mounting see Section 7 Device Joining Pairing for details For desk top operat...

Page 14: ...Display Keypad MODE Heat Cool Auto Off selection Increase Value Fan On Auto Low Speed Medium Speed or High Speed Decrease Value Enter Exit Settings mode SELECT Confirm Change Display Mode Acti vate P...

Page 15: ...Code 22 Keys Locked Mode Battery Low ST103 Wireless Remote Only Change Filter Timer expired Accessory Output On Humidifier Dehumidifier ERV or HRV Internal External Temperature Sensor External Sensor...

Page 16: ...en show the firmware version If the Fan Coil Controller is not connected to a network the devices will display and a countdown timer will start ST103ZB Wireless Fan Coil Remote Preparation for Joining...

Page 17: ...Temperature Sensor Preparation for Joining Network When the battery tab is removed the red LED will begin to flash Remove the SS909ZB Remote Temperature Sensor from the Wall Plate or Desk Stand Use a...

Page 18: ...application select the drop down menu from the upper right of the screen and select Settings Devices Add New Equipment Scan for New Equipment Check all devices to be connected and press Connect equip...

Page 19: ...e dashboard by pressing the SALUS Logo When the tile flips on the screen choose available controllers Pairing without an Internet Connection Next the SC102ZB Fan Coil Controller enters Parameter Setup...

Page 20: ...Setup Press the key to enter the operation screen Once network building is complete the controller will display the radio channel number being used Press MODE keys simultaneously to enter functions A...

Page 21: ...ation Use the and keys to toggle between INT and EXT Press SELECT to choose the flashing value and move to the next setting If INT is chosen INT will not be displayed on the home screen Setback Use th...

Page 22: ...is available in standalone or local mode only Year To set the year use the or keys to change the flashing year value Press SELECT to choose the value displayed and move to the next setting Note This...

Page 23: ...t point and move on to the next interval Set points for remaining time intervals Set the start time and heating and or cooling temperature for the remaining interval for a total of 6 intervals Skippin...

Page 24: ...e internet will be visible if a connection is established Test Mode Press SELECT to initiate Test Mode Parameter Setup Mode Press SELECT to initiate Parameter Setup Mode Use the and keys to change the...

Page 25: ...s under Pairing in Section 3 If the thermostat is paired with a network UnPAir is displayed with flashing Press the or key to change the flashing letter to Press SELECT to remove the thermo stat from...

Page 26: ...None SC102ZB acts as a Zigbee coordinator Thermostat is part of a network disconnected from SG888ZB Thermostat is connected to SG888ZB Universal Gateway RF Icon Display None Flashing SALUS Smart Home...

Page 27: ...the thermostat is following the schedule Permanent Hold Once in Temporary Hold press SELECT to toggle between temporary and permanent override When in permanent override the LCD display on the Fan Coi...

Page 28: ...pendix A High Gh Medium Gm Low Gl ON Fan output is constant at the selected speed The fan will remain running when a thermostat call is not present High Gh Medium Gm Low Gl ON AUTO Fan output is only...

Page 29: ...t depending on which accessory is selected under parameter 22 See Appendix A Table 9 3 Parameter 22 Accessory Function Parameter P22 Setting Operation of Ac1 Ac2 dry contacts 0 No Function Open 1 Humi...

Page 30: ...ff Close Inactive Inactive 2 Normally Open Open Inactive Inactive Close Setback Off A contact state change detected between the two terminals will initiate the Away timers P19 or P20 and once the time...

Page 31: ...uit If sensor is set to Internal default replace thermostat or use external sensor Error 04 Room temperature sensor circuit is open If sensor is set to Internal Default replace thermostat or use exter...

Page 32: ...11 1 Section 11 SC102ZB ST103ZB Installation and Operation Manual Installer Notes Installer Notes...

Page 33: ...5 C 41 F 5 C Not displayed if P02 1 P05 P04 P05 P07 1 5 C P06 Max cooling setpoint 44 to 95 F 6 5 to 35 C 95 F 35 C Not displayed if P02 0 P07 P06 P06 P04 1 5 C P07 Min cooling setpoint 44 to 95 F 6...

Page 34: ...play only if P16 1 2 P20 Setback Unoccupied to Occupied delay 2 to 30 minutes 2 mins Display only if P16 1 2 P21 Setback mode or Off mode when unoccu pied 0 Setback mode 1 Display only if P16 1 2 1 Of...

Page 35: ...unlock by and 0 In Standalone Mode user can un lock by and regardless P37 setting 1 user cannot unlock by and P38 Service filter OFF OFF 1 to 99 x 100 operating hrs e g 99 9 900 oper hrs 1 to 99 99 me...

Reviews: