background image

In Car Installation

5

4

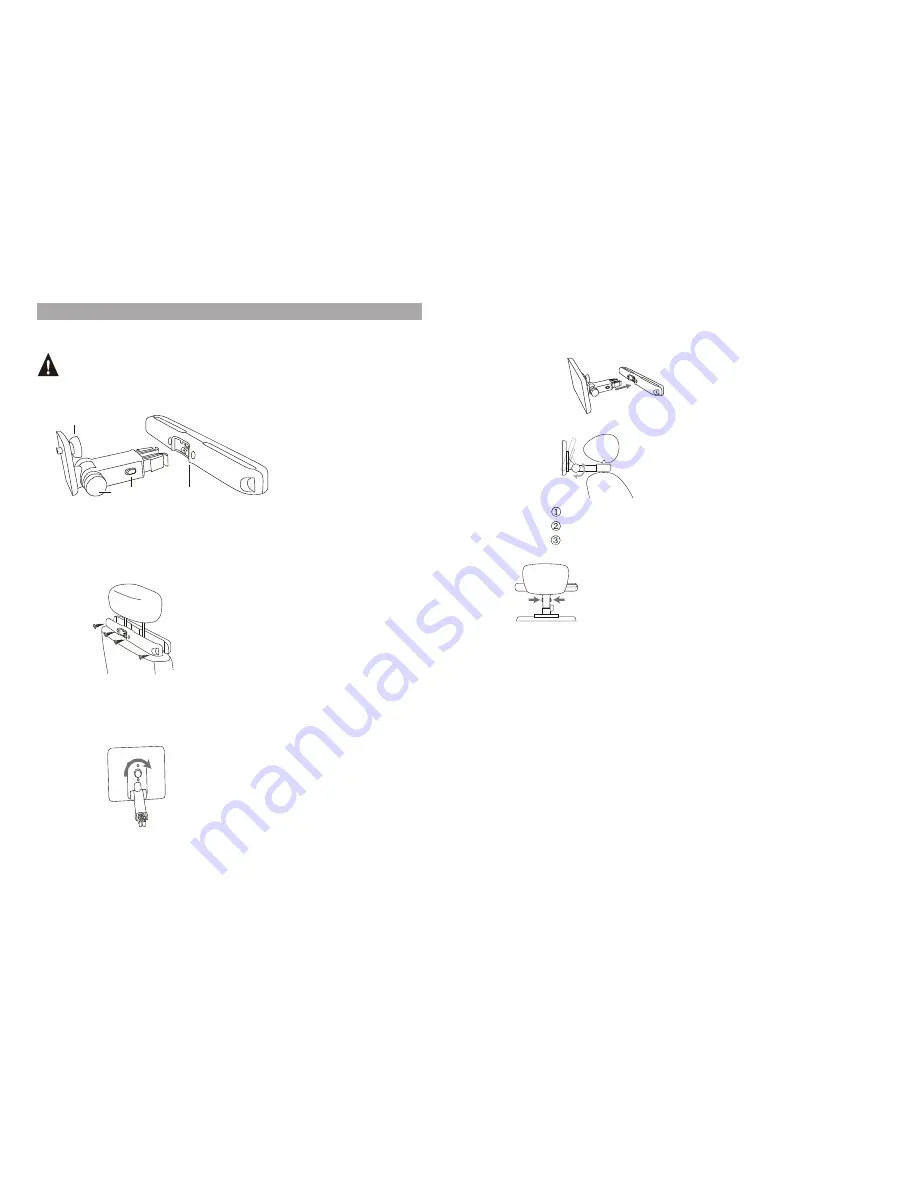
Buckle DVD bracket into the headrest mount bracket.


 Release the node.

Adjust the viewing angle as desired.
Fasten the node.


To attach the second screen, repeat the above steps.

6.Press the release button to release the DVD player from headrest.

3.Aim the sc rew of the b racket t o the scre w nut on th e back of the DV D player.

S c

  r  e  w tight the bracket onto the DVD player.


4.Install the DVD player to the headrest.

5.Adjust the viewing angle

To use the player in a car, attach the main unit and the second screen to the back of  t h  e front 

seat headrests.

A. DVD player fastening screw node

B. Viewing angle adjustment node 

C. Buckle release button

D. Headrest mount bracket 


    A:Position the bracket on the bars of the headrest.

B:Fasten t he screw to fix the bracket firmly on the cars.    

N


ote:

 there are three holes on the bracket. Use any one as you like.

A

D

C

B

Preparation

     1.Remove the mounting kit and the DVD player from the seat when the DVD players 

   are not in use.
 2.Take out all accessories including car mount kit from the car when the units are not in use.

1.Fix the headrest mount bracket on to the front seat headrest

2.Fix the DVD mount bracket to the portable DVD player.

Note

: There are 4 short screws for fixing the 

on the 11mm metal bars, other 4

           longer screws for 14mm metal bars.  

bracket  

Summary of Contents for DVP7748DUO

Page 1: ...DVP7748DUO ...

Page 2: ...stroomkabel beschadigd is wanneer er vloeistof in of andere voorwerpen op het toestel gevallen zijn wanneer het blootgesteld is aan vocht of wanneer het niet goed meer functioneert Probeer niet zelf het toestel te herstellen wegens het gevaar van hoge spanningen en het risico op een elektrische schok 8 Gebruik geen discs met een onregelmatige vorm zoals een hart of een ster vermits deze een slecht...

Page 3: ... MPEG4 CD JPEG enz Ingebouwde stereo luidspreker Ingebouwde oplaadbare lithiumpolymeer batterij Geschikt voor PAL en NTSC Meertalige OSD snel voorwaarts achterwaarts herhaalfunctie Zoom in out functie Overzicht eenheden A B 1 Openen 2 AAN UIT SCHAKELAAR 3 SETUP instellingen 4 MODUS 5 6 OK 7 Weergave pauze 8 STOP 9 DC IN 9 12 V 10 AVOUT 11 Oortelefoon 12 Volume 13 SD slot 14 USB poort 15 Haak 16 B ...

Page 4: ...e delen van de montagekit op de hoofdsteun B Gebruik de schroeven om de twee delen stevig rond de hoofdsteun te bevestigen Opmerking er zijn 4 korte schroeven voor montage aan stangen van 11mm en 4 langere schroeven voor montage aan stangen van 14 mm 2 Monteer de steun op de DVD speler Opmerking er zijn drie openingen U kan kiezen welke u wil gebruiken 3 Lijn de schroef van de steun uit op de open...

Page 5: ...Gebruik alleen de sigarenaanstekeradapter als de voeding van de auto 9 12 V is Aansluiting van de eenheden A B 1 Sluit eenheid A aan eenheid B aan met de AV kabel 2 Sluit de eenheden aan via de AC DC adapter of via de sigarenaanstekeradapter 3 Schakel de twee eenheden in Stop een disc in eenheid A Druk op de IN OUT toets van de afstandsbediening van eenheid B om deze in AVIN modus te zetten U kan ...

Page 6: ...ker Het toestel kan aangesloten worden aan een externe luidspreker Zie illustratie hieronder AV kabel niet meegeleverd VERSTERKER Linkse luidspreker vooraan Center luidspreker Rechtse luidspreker vooraan SUBWOOFER Linkse luidspreker achteraan Rechtse luidspreker achteraan Opmerking er is geen 5 1 kanaal geluidweergave in het toestel maar via aansluiting met een versterker is deze wel beschikbaar A...

Page 7: ...ertitels te kiezen 14 HOEK om de weergavehoek te wijzigen 15 A B om een deel gemarkeerd tussen Aen B te herhalen 16 Herhaling om een titel hoofdstuk of nummer te herhalen 17 Return teruggaan naar noofdmenu 18 ZOOM om het beel in uit te zoemen tijdens weergave 19 VOL om het volumete regelen 20 Enter om te bevestigen Gebruik van de afstandsbediening Plaats de batterij in de afstandsbediening zoals h...

Page 8: ...chte werking veroorzaken Basisbediening Cursortoetsen Weergave pauze DVD MPEG4 SVCD VCD CD 2X 4X 8X 16X 32X 2X 4X 8X 16X 32X DVD MPEG4 SVCD VCD CD Chapter Title All Repeat off one folder Repeat off Track All Repeat off Bij weergave van DVD MPEG4 SVCD VCD en CD kan er snel voorwaarts en achterwaarts gezocht worden 1 Druk op om voorwaarts te zoeken Druk verschillende malen om de snelheid te kiezen t...

Page 9: ...1 Mp3 Mp3 TRACK03 TRACK05 Mp3 TRACK04 1 Plaats een JPEG disc in de lade en het toestel begint met de weergave 2 Gebruik om een JPEG file te selecteren en druk op ENTER om te bevestigen 3 Druk op om het beeld tegen wijzerzin te draaien druk op om met wijzerzin te draaien 4 Druk op OSD terwijl u de beelden bekijkt U kan verschillende overgangswijzen kiezen 1 van boven naar beneden 2 van beneden naar...

Page 10: ... niet worden weergegeven In de Browser modus toont het systeem de documentlijst en de folder ENTER selecteren en weergeven in de folder gaan de folder verlaten Opmerking Als u terug wil gaan naar het hoofdmenu zorg ervoor dat u in de documentlijst of folder bent en druk dan op de RETURN toets Fotomodus In fotomodus toont het systeem eerst de thumbnail modus ENTER selecteren en weergave Diaweergave...

Page 11: ...rgegeven Gebruik en ENTER om een beeld te selecteren Opmerking Om terug te keren naar het hoofdmenu druk op RETURN in de thumbnail modus In de muziekmodus wordt de muzieklijst zoals Mp3 weergegeven Druk op ENTER selecteren en weergeven Druk op om versnelde voorwaartse achterwaartse weergave tijdens MP3 weergave Druk op om in stop de functie te kiezen Page pagina naar boven weergave Page pagina naa...

Page 12: ...eminstelling General Setup TV Display Wide Angle Mark ON OSD Lang ENG Screen Saver ON Normal PS Normal LB Wide Move Return Entry General Setup TV Display Wide Angle Mark ON OSD Lang ENG Screen Saver ON On Off Move Return Entry General Setup TV Display Wide Angle Mark ON OSD Lang ENG Screen Saver ON English French German Dutch Move Return Entry TV Display Wide Angle Mark ON OSD Lang ENG Screen Save...

Page 13: ...orkeurpagina Audio Gebruik deze optie om uw voorkeurtaal van de gesproken taal in te stellen bij weergave van DVD Standaardinstelling Opmerking De gesproken taal hangt af van wat beschikbaar is op de DVD Gebruiker kan ook de taal instellen tijdens de weergave door op de Audio toets te drukken Nederlandse Ondertitels Gebruik deze optie om uw voorkeurtaal van de ondertitels in te stellen bij weergav...

Page 14: ...aarts of achterwaarts zoeken Sommige discs verbieden het snel doorspoelen op bepaalde delen U kan niet snel doorheen de openingsfase en de verwittiging aan het begin van de film omdat dit verboden is OPLOSSING Wegens voortdurende verbeteringenkunnen wijzigingen aan de eigenschappen en specificaties aangebracht worden zonder voorafgaande verwittiging Indien u zich van het toestel wil ontdoen zorg e...

Page 15: ... not operating normally Don t try to repair the machine by yourself because of the danger of high voltage and electric shock 8 Do not use irregular shaped discs such as heart or star shaped discs as they may cause to the unit malfunction Hi voltage Don t Open it Remind user to be careful to avoid electric shock Thank you for choosing our portable DVD player It includes two DVD players The unit app...

Page 16: ...VD to TV 2 1 2 3 4 5 6 7 8 9 10 11 12 13 14 15 CLOSE B UNIT A B AV IN OUT ON OFF 1 Open knob 2 Power ON OFF switch 3 SETUP button 4 MODE button 5 6 OK button 7 PLAY PAUSE button 8 STOP button 1 Open knob 2 Power ON OFF switch 3 SETUP button 4 MODE button 5 6 OK button 7 PLAY PAUSE button 8 STOP button 9 DC IN 9 12V 10 AVOUT 11 Earphone jack 12 Volume knob 13 SD card slot 14 USB Port 15 Bracket 16 ...

Page 17: ...nt seat headrests A DVD player fastening screw node B Viewing angle adjustment node C Buckle release button D Headrest mount bracket A Position the bracket on the bars of the headrest B Fasten t he screw to fix the bracket firmly on the cars Note there are three holes on thebracket Use any one as you like A D C B Preparation 1 Remove themounting kit and the DVD player from theseat when the DVDplay...

Page 18: ...er end into the car cigarette lighter socket See illustration below System Connection AV OUT AV IN OUT AV OUT Car cigar ette lighter AV IN OUT Connecting to Unit A B 1 Connect unit A and unit B with AVcable 2 Connect the unit to power by AC DC adapter or cigarette light adapter 3 Turn on these two units insert a disc into the disc compartment of the main unit A press the IN OUTkey on remote contro...

Page 19: ...rd backward at 2 4 8 16 or 32 times 7 OSD To display disc information during playing such as elapsed and remaining time 8 PLAY PAUSE 9 STOP press oncetostop playback then press to resume playback from the point where you stopped press stop button twice to stop playback completely 10 MODE To select the source The Remote Control of Unit A 11 ZOOM To zoom in out the image during the playback 12 MENU ...

Page 20: ...tle language when playing DVD disc ANGLE To change viewing angle when playing disc with multi angle A B Repeat a specific portion from point Ato B press it again to cancel repeat playing REPEAT To repeat playing title chapter or track RETURN To return to the main menu ZOOM To zoom in out the image during the playback 20 1 2 CR2025 CR2025 Please put the battery into the remote control as per illust...

Page 21: ...r the source you want DVD SD USB Play pause Cursor button ENTER Title Menu DVD MPEG4 SVCD VCD CD 2X 4X 8X 16X 32X 2X 4X 8X 16X 32X Search forward When playing disc of DVD MPEG4 SVCD VCD CD the machine can search forward or backward 1 Press the unit will search forward Press it repeatedly the machine will play at 2 4 8 16 32 times of speed 2 Press the unit will search backward Press it repeatedly t...

Page 22: ...isc into the disc door Press or ENTER button to choose an MP3 file Press or ENTER button to play the file selected TRACK05 Mp3 TRACK04 MP3 VCD SVCD MPEG4 DVD CD DVD SVCD DVD MPEG4 VCD 1 Place a JPEG disc into the tray the unit will start reading and play 2 Press to select a JPEG file and press ENTER button to confirm 3 To rotate the picture counter clockwise press Press to rotate the picture clock...

Page 23: ...cards formatted in exFAT file systemare not supported 00 00 03 43 001 008 Ctyy Mp3 TRACK01 Mp3 TRACK02 Mp3 TRACK03 Mp3 TRACK04 Mp3 TRACK05 Browser mode Photo mode Slide Show Menu Prev Next In the Photo Mode the System will show the thumbnail Mode first select and play Slide Show play the JPEG Menu Enter the Help Menu Prev Page Up Next Page Down ENTER In the Browser Mode the system will show the li...

Page 24: ...3 Mp3 TRACK04 Mp3 TRACK05 128Kbps P P 3 During viewing files may appear when pressing Angle or Subtitle or Audio or A B or Title etc in this situation these options are unavailable to operate 4 When viewing JPEG files press and RETURN key pictures will be displayed in thumbnail mode press or ENTER button to select one picture to view In the Movie Mode the system will show the list of Movie file li...

Page 25: ...t General Setup Video Setup Preference Setup Setup Menu MainPage General Setup TV Display Wide Angle Mark ON OSD Lang ENG Screen Saver ON Normal PS Normal LB Wide Move Return Entry General Setup Page TV display Enter this option user can set screen display format Nomal PS Nomal LB Wide The default is Wide Note The function dependson the display ratio with which the DVD disc is recorded Please choo...

Page 26: ... Default Reset Preference Setup Move Return Entry Audio ENG Subtitle Off Disc Menu ENG Parental Default English French German Dutch Off Disc Menu This function allows you to choose the menu language stored on thedisc The default is Dutch Note the disc menu languages depend on the information available on thedisc Parental Enter this option to set the parental control level to some unsuitable disc s...

Page 27: ...eading JPEG photos depend on the resolution and compression ratio of the photos Some JPEG photo may not be played due to the disc quality and the formats 2 Some DVD R RW DVD R RW CD R RW disc may not be played due to the quality on burning conditions Troubleshooting PROBLEM SOLUTION Picture is distorted If at any time in the future you should need to dispose of this product please note that waste ...

Page 28: ...li d une liquide au dessus de l appareil 3 Ne pas placer l appareil à côté d une source de chaleur telles que des radiateurs ou des appareils qui produisent du chaleur y compris un amplificateur 4 Déconnectez la prise courant secteur pendant des orages ou quand vous n utilisez pas l appareil pendant un certain temps 5 Nettoyage déconnectez le système et utilisez un chiffon légèrement humide Ne pas...

Page 29: ...eur stéréo incorporé Accu lithium polymère rechargeable incorporé Prévu pour systèmes PAL et NTSC OSD multi langues avancement rapide en avant arrière fonction de répétition Fonction zoom Commandes appareil A 1 Ouvrir 2 En hors fonction 3 Réglages 4 Mode 5 6 Bouton OK 7 Lecture pause 8 Arrêt 9 Entrée DC 9 12 V 10 Sortie AV 11 Prisepour casque d écoute 12 Volume 13 Carte SD 14 Porte USB 15 Crochet ...

Page 30: ...itionez le montage autour des bars de l appuie tête B Fixez bien les vis 1 Remarque il y a 4 vis courts pour le montage aux bars de 11mmet 4 vis longs pour montage aux bars de 14mm 2 Fixez le support sur le lecteur DVD portable Remarque il y a trois troux sur le support Utilisez les comme vous désirez 3 Allignez le bouton de fixation du support avec le trou sur le dos du lecteur DVD Fixez bien le ...

Page 31: ...ntation de la voiture est 9 12 V Connexion les unités A et B 1 Connectez l unité A à l unité B par un câble AV 2 Connectez l appareil par l adaptateur AC DC ou l adaptateur allume cigare 3 Mettez en fonction les deux unités et insérez un disque dan l unité A Poussez le bouton IN OUT dela télécommande de l unité B pour le mettre en position AV IN Vous pouvez regarder les même images sur les deux éc...

Page 32: ...cédent suivant pour aller vers un chapitre ou une scène précédente ou suivante 6 Bouton avancement rapide en arrière en avant 2 4 8 16 ou 32 fois la vitesse normale 7 OSD pour afficher des informations du disque telles que temps écoulé ou temps restant 8 Lecture pause 9 Arrêt poussez pour arrêter la lecture poussez pour continuer la lecture à partir du point ou vous avez arrêté poussez deux fois p...

Page 33: ...la source 12 Menu pour entrer dans le menu 13 Sous titres pour choisir la langue des sous titres avec DVD 14 Angle pour changer l angle de prise de vue sur disques avec multi angles 15 A B répétition entre deux points A et B déterminés d avance 16 Répétition pour répéter le titre chapitre ou numéro 17 Retour pour retourner au menu principal 18 ZOOM pour agrandir l image pendant la lecture 19 VOL p...

Page 34: ... curseurs ENTER Lecture pause DVD MPEG4 SVCD VCD CD 2X 4X 8X 16X 32X 2X 4X 8X 16X 32X DVD MPEG4 SVCD VCD CD Track All Repeat off Avancement rapide en avant ou en arrière Les disques DVD MPEG4 SVCD VCD CD permettent un avancement rapide en avant ou en arrière 1 Poussez et la recherche en avant commence Poussez plusieurs fois pour changer la vitesse entre 2 4 8 16 ou 32 fois la vitesse normale 2 Pou...

Page 35: ... et l appareil commence la lecture 2 Poussez pour sélectionn er un document JPEG et poussez ENTER pourconfirmer 3 Pour tourner l image vers le gauche poussez pour tourner l image vers la droite poussez Pendant que vous regardez les images poussez le bouton OSD pour sélectionner le mode de transition entre les images 1 Du haut vers le bas 2 Du bas vers le haut 3 Du gauche vers la droite 4 De la dro...

Page 36: ... 001 008 Ctyy Mp3 TRACK01 Mp3 TRACK02 Mp3 TRACK03 Mp3 TRACK04 Mp3 TRACK05 Slide Show Menu Prev Next Mode Browser Le mode browser affiche la listedes documents et du folder ENTER sélectionner et lecture entrer dans le folder quitter le folder Remarque si vous voulez retourner au menu principal vérifiez que vous vous trouvez dans la liste des documents et du folder et poussez RETURN Mode Photo Le mo...

Page 37: ...sez et les images sont réduites utilisez les boutons ou ENTER pour sélectionner une image Remarque Pour retourner au menu principal poussez le bouton RETURN dans la page thumbnail Mode Musique Dans le mode musique le système affiche la listedes documents musiques comme Mp3 Poussez ENTER sélectionner et lecture Poussez pour avancement rapide en avant arrière pendant la lecture MP3 Poussez en mode a...

Page 38: ...le bouton SETUP pour quitter General Setup TV Display Wide Angle Mark ON OSD Lang ENG Screen Saver ON Normal PS Normal LB Wide Move Return Entry General Setup TV Display Wide Angle Mark ON OSD Lang ENG Screen Saver ON On Off Move Return Entry General Setup TV Display Wide Angle Mark ON OSD Lang ENG Screen Saver ON English French German Dutch Move Return Entry TV Display Wide Angle Mark ON OSD Lang...

Page 39: ...idéo du AVOUT Pour régler la qualité vidéo Page de préférence Audio Dans cette option vous pouvez mémoriser la langue parlée préférée pour les disques DVD Réglage standard n Remarques La langue disponible dépend du disque DVD Vous pouvez changer la langueen poussant le bouton Audio pendantla lecture éerlandais Sous titres Dans cette option vouspouvez mémoriser la langue préférée pour lessous titre...

Page 40: ...devient chaud pendant l utilisation cequi est normal Néanmoins n utilisez pas l appareil pendant de longues périodes 4 Evitez que des objets tombent sur l appareil et ne le placez pas dans des environnements humides ou trop chauds En cas de problèmes PROBLEME Pas de son ou son déformé Ne peut pas avancer dans le film Le symbole apparaît sur l écran Image avec distorsion Pas d avancement rapide en ...

Reviews: