background image

EN 


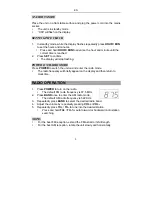
STANDBY MODE 


Place the unit on a flat stable surface and plug the power cord into the mains 
socket. 


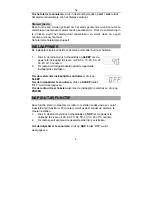
The unit is in standby mode   


“0:00” will flash on the display.   


SETTING THE CLOCK   

 
1. 

In standby mode, while the display flashes repeatedly press 

HOUR / MIN


to set the hours and minutes. 


Press and hold 

HOUR / MIN t

o advance the hour and minute until the 

correct time is reached.   

2. Press 

SET

 to confirm. 

  The display will stop flashing. 


POWER ON/RADIO MODE 

Press 

POWER

 to switch the unit on and enter the radio mode.   


The radio frequency will briefly appear on the display and then return to 
clock time.     


RADIO OPERATION 


1. Press 

POWER

 to turn on the radio. 


The default FM radio frequency is 87.5 MHz. 

2. Press 

BAND

 once to enter the AM radio mode. 


The default AM radio frequency is 522 KHz. 

3. Repeatedly 

press 

BAND

 to select the desired radio band. 

4. 

Adjust the volume by repeatedly pressing


VOL+ 

VOL-

5. Repeatedly 

press 

TU+

 / 

TU-

 to tune into the desired station.   


Press and hold 

TU+

 / 

TU-

 for auto forward or backward radio station 

searching. 
 

NOTE:


For the best FM reception, extend the FM aerial to its full length.


For the best AM reception, rotate the unit slowly and horizontally. 


Summary of Contents for CR616

Page 1: ...DIGITALE WEKKERRADIO RADIO R VEIL NUM RIQUE DIGITAL RADIO ALARM CLOCK CR616 GEBRUIKSAANWIJZING MANUEL D INSTRUCTIONS INSTRUCTION MANUAL...

Page 2: ...de stekker uit het stopcontact voordat u het apparaat schoonmaakt of onderhoudt Stel batterijen accupack of ge nstalleerde batterijen nooit bloot aan overmatige warmte zoals zonlicht vuur enz Om het...

Page 3: ...en Een kind mag dit apparaat alleen gebruiken als het batterijdeksel op de juiste manier op het batterijvak is bevestigd Het apparaat werkt op n 9V batterij die op een eenvoudige manier kan worden ver...

Page 4: ...oud ingedrukt om het uur en de minuten te wijzigen totdat de juiste tijd is ingesteld 2 Druk op SET om te bevestigen Het display stopt met knipperen INSCHAKELEN RADIOMODUS Druk op POWER om het apparaa...

Page 5: ...slaan Om naar een voorkeurstation te luisteren drukt herhaaldelijk op MEM totdat u het gewenst radiostation hebt gevonden WERKING VAN HET DUBBEL ALARM Controleer voordat u de wekker instelt of de klo...

Page 6: ...en uit 90 80 70 60 50 40 30 20 of 10 minuten 2 De radio wordt uitgeschakeld nadat de ingestelde inslaaptijd is verstreken Om de resterende inslaaptijd te controleren druk op SLEEP Om de inslaaptimer t...

Page 7: ...ische apparaten mogen niet bij het huishoudelijke afval worden gegooid We verzoeken u het apparaat naar een afvalscheidingsstation te brengen Neem contact op met de plaatselijke autoriteiten of uw dea...

Page 8: ...al D branchez l appareil de la prise secteur avant de le nettoyer ou d effectuer une autre op ration d entretien Les piles et les batteries ne doivent pas tre expos es une chaleur excessive par exempl...

Page 9: ...ais les enfants utiliser cet appareil sauf si le couvercle du logement des piles est solidement ferm Cet appareil fonctionne avec une pile 9 V qui est accessible et peut tre chang e Ouvrez le couvercl...

Page 10: ...ge clignote plusieurs fois r glez les heures et les minutes avec les touches HOUR MIN Maintenez la touche HOUR ou MIN appuy e pour que les chiffres des heures ou des minutes changent rapidement 2 Appu...

Page 11: ...ET pour m moriser la station 4 R p tez les tapes 1 et 3 pour pr r gler d autres stations Pour couter l une des stations radio pr r gl es appuyez plusieurs fois sur la touche MEM pour la s lectionner U...

Page 12: ...d lais d arr t automatique suivants 90 80 70 60 50 40 30 20 ou 10 minutes 2 La radio s teint automatiquement une fois le d lai s lectionn coul Pour afficher le d lai restant appuyez sur SLEEP Pour an...

Page 13: ...duits lectriques ne doivent pas tre mis au rebut avec les d chets m nagers Nous vous invitons utiliser les points de collecte de recyclage pr vus cet effet Consultez vos autorit s locales ou votre rev...

Page 14: ...ce the appliance must be disconnected from the supply mains Batteries battery pack or batteries installed shall not be exposed to excessive heat such as sunshine fire or the like To protect the enviro...

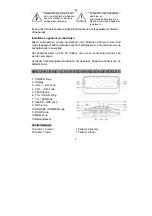
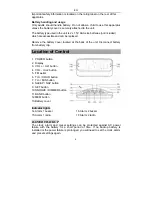
Page 15: ...he unit Disconnect battery from battery clip Location of Control 1 POWER button 2 Display 3 VOL AL1 button 4 VOL AL2 button 5 FM aerial 6 TU HOUR button 7 TU MIN button 8 SLEEP NAP button 9 SET button...

Page 16: ...t on and enter the radio mode The radio frequency will briefly appear on the display and then return to clock time RADIO OPERATION 1 Press POWER to turn on the radio The default FM radio frequency is...

Page 17: ...n the display 2 While 0 00 is flashing set the alarm time by repeatedly pressing HOUR MIN Press and hold HOUR MIN respectively for fast advance 3 Repeatedly press AL1 AL2 to select the desired alarm m...

Page 18: ...ndby mode repeatedly press NAP to select the desired nap time from 90 80 70 60 50 40 30 20 or 10 minutes 2 When the selected nap time has elapsed the radio will sound To cancel the nap timer press NAP...

Reviews: