background image

21

7.1.3.  Common abbreviations shown on the display.

Code

On display

Meaning

ENA

A

U

E

Enabled.

DIS

d1S

Disabled.

ON

ON

Startup.

EPO

EP

Emergency power off.

ESC

ESC

Escape.

HLS

HLS

Upper voltage limit for transfer to battery 
mode.

LLS

LLS

Lower voltage limit for transfer to battery 
mode.

AO

AO

EPO normally open.

AC

AC

EPO normally closed.

EAT

EAt

Estimated backup time.

RAT

tAt

Current time in backup mode.

Ok

OK

Ok.

SD

Sd

Shutdown.

BL

bL

Battery low.

OL

OL

Overload.

OI

OI

Input overcurrent

NC

NC

Battery not connected

OC

OC

Battery overcharge

SF

SF

Connection error. Rotate the connection of 
the input, phase and neutral cables.

TP

TP

Overtemperature.

CH

CH

Charger

BF

bF

Battery failure, low voltage.

BV

bV

Bypass voltage out of range.

FU

FU

Bypass frequency out of range.

BR

bR

Replace batteries.

EE

EE

Internal EEPROM error.

Tab. 5. 

Abbreviations shown on the LCD display.

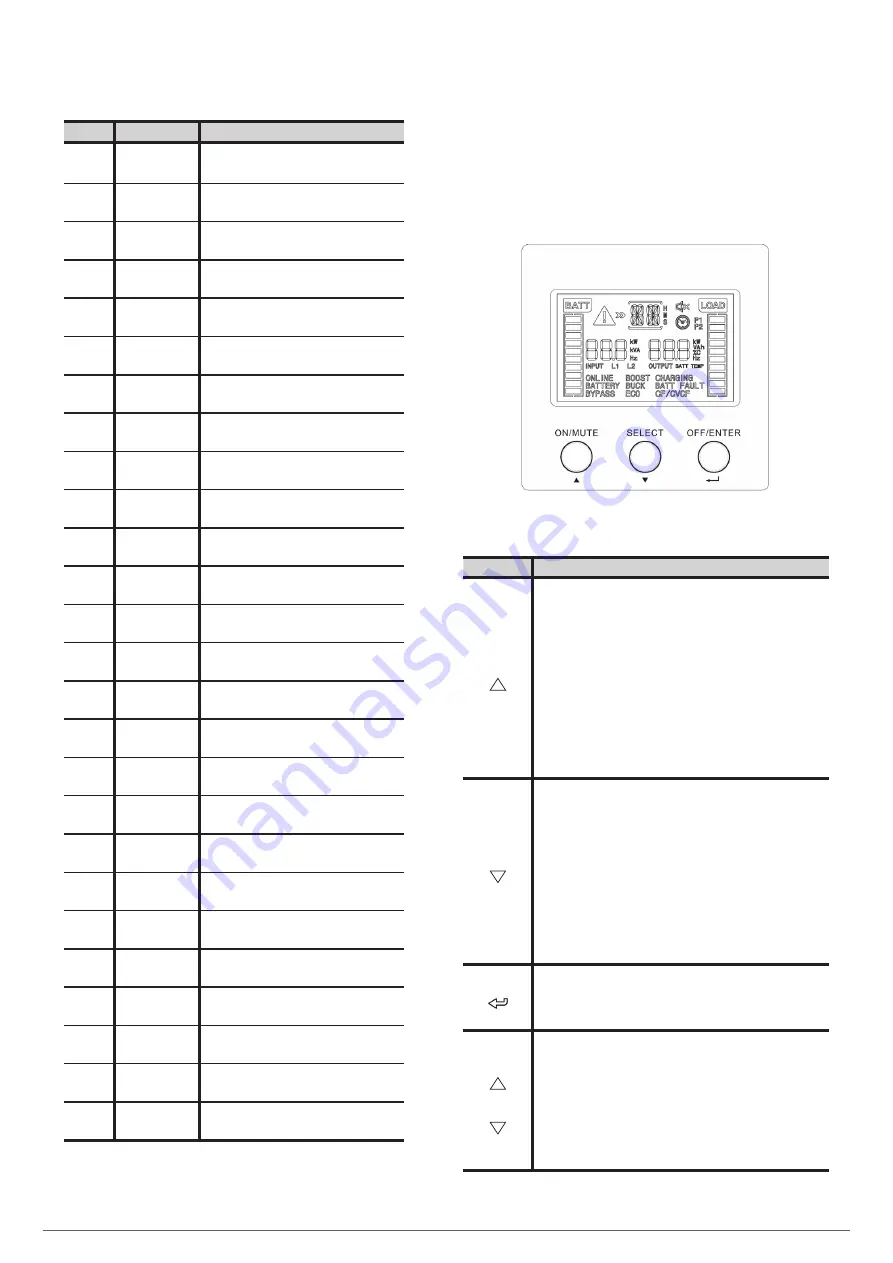
7.2.  CONTROL PANEL.

7.2.1.  Composition of the control panel with LCD display.


The control panel consists of:


ˆ

Three buttons with the functions described in Tab. 6.


ˆ

An LCD display with backlighting.

Fig. 9. 

View of the control panel.

Button

Description

ON/MUTE

- Starting up the UPS.

Press the button for at least 2 seconds.

- Muting the alarm.

Press the button for at least 3 seconds to mute or unmute the 
audible alarm.

- Button to navigate upwards.

When this button is pressed in UPS settings mode, it will move 
upwards through the menu structure in relation to the point where 
it is located, accessing the previous variable with each press.

- Activating the battery test.

Press this button for 3 seconds while in normal or frequency 
converter (CF) mode. At the end of the test, it returns to the 
respective mode.

SELECT

- Parameter reading.

Through this key you can read the following values: voltage, 

frequency and input intensity, voltage, intensity and battery 
capacity, ambient temperature, voltage and output frequency and 
intensity and percentage of charge.

- Settings or configuration mode.

Press this key for at least 3 sec. to access this mode, when the UPS 
inverter is stopped (bypass mode).

- Key to navigate down.

When you press on this key from the UPS settings mode, you will 
scroll down the menu structure in relation to where you are, by 
accessing the next variable with each press.

OFF/ENTER

- UPS shutdown.

Press this button for at least 2 seconds.

- Confirmation of selection.

Press this button to confirm selection in the device’s settings mode.

ON/MUTE

+

SELECT

- Transfer to bypass mode.

With normal main power, press ON / Mute and Select at the same 
time for 3 seconds to transfer to bypass mode. This action will be 
ineffective if the input voltage is outside the acceptable range. 
Similarly you can return to Online mode.

- Exit the setting / configuration mode or return to the top menu.

In setup mode, press ON / Mute and Select simultaneously for 0.2 
seconds to return to the top menu. If you are already there, press 
these two buttons at the same time to exit the configuration mode.

Tab. 6. 

Functionality of the control panel buttons.

SLC TWIN PRO2

 UNINTERRUPTIBLE POWER SUPPLY (UPS)

USER MANUAL        

Summary of Contents for SLC TWIN PRO2 A Series

Page 1: ...USER MANUAL UNINTERRUPTIBLE POWER SUPPLY UPS SLC TWIN PRO2 A 1 2 and 3 kVA...

Page 2: ...Communicationport 5 2 5 1 RS232portandUSBinterface 5 2 5 2 Smartslot 5 2 6 Protectionagainstvoltagespikesforthemodem ADSL Fax line 5 2 7 Software 5 2 8 Considerationsbeforestartup 6 OPERATION 6 1 UPSS...

Page 3: ...3 8 3 2 Exclusions 8 4 TECHNICALSERVICESNETWORK 9 ANNEXES 9 1 GENERALTECHNICALSPECIFICATIONS 9 2 GLOSSARY SLC TWIN PRO2 UNINTERRUPTIBLE POWER SUPPLY UPS USER MANUAL...

Page 4: ...personnel Although no effort has been spared to ensure that the informa tion in this user manual is complete and accurate we accept no liability for any errors or omissions that may exist The images...

Page 5: ...belled for correct identification of each of its parts which together with the instructions described in this user manual allows installation and startup operations to be performed in a simple and org...

Page 6: ...B digital device pur suant to part 15 of the FCC Rules These limits are designed to provide reasonable protection against harmful interference in a residential installation This equipment generates u...

Page 7: ...accordance with ISO 14001 Recycling of the device at the end of its useful life Our company undertakes to use the services of authorised and regu latory companies to treat the set of products recover...

Page 8: ...ight contradic tions may arise If in any doubt the labelling on the device itself will always prevail The nameplate of the device shows all of the values relating to its main properties and characteri...

Page 9: ...OUTPUT 2kVA model USB RS232 INTELLIGENT SLOT OUTPUT INPUT 3K EPO IN OUT NETWORK FAX MODEM PROGRAMMABLE OUTLETS P1 3kVA model Fig 2 Rear views 1 2 and 3kVA models USB port with HID RS 232 serial port S...

Page 10: ...KER Max 50A BATTERY BREAKER Max 50A BATTERY BREAKER Max 50A TOWER 12BATTERY Rack 12BATTERY TOWER 4BATTERY TOWER 6BATTERY BATTERY BREAKER Max 50A BATTERY BREAKER Max 50A BATTERY BREAKER Max 50A BATTERY...

Page 11: ...c TWIN PRO2 Device series 2000 Power in VA SLC Brand acronym for UPSs CF Frequency converter devices without batteries EE Special EE battery module CO MadeinSpain markingonthedeviceandpackaging for cu...

Page 12: ...ectorsforconnection to the device and or other identical modules Charger current setting up to 8 A to decrease battery recharge time High performance selectable mode 0 97 ECO MODE Energy saving which...

Page 13: ...ation port makes possible a dialogue between the equipment with other machines or devices through the relays supplied in the terminal strip arranged on the same card with a single common terminal for...

Page 14: ...corners polyethylene cover and strapping all of which are recyclable materials consequently if it requires disposal it must be car ried out in accordance with current laws We recommend keeping the pac...

Page 15: ...pt the B1s In the first battery protection is by means of internal fuses and is not accessible to the user Similarly the battery modules also have internal protections by means of fuses and as in the...

Page 16: ...lied for the same device the connection between modules should be made through the hose supplied with the second battery module Fig 11 shows an example of the connection of an SLC TWIN PRO2 A B1 with...

Page 17: ...the user can configure the action to be taken in the event of a low battery alarm such as stopping the computer automatically This feature is ideal for powering network attached storage NAS systems wi...

Page 18: ...h the device can operate correctly without charging the batteries for the indicated time the risk of a prolonged power cut during the first hours of operation and the UPS s available backup time shoul...

Page 19: ...will supply output voltage through its static bypass To carry out a complete shutdown it is necessary to set the dis tribution board protection to OFF 6 1 5 Turn off the UPS without mains voltage in...

Page 20: ...e level connected to the output as a by displaying four equivalent segments respectively in the following proportion 0 25 26 50 51 75 and 76 100 Information about programmable outputs P1 Indicates tha...

Page 21: ...o the point where it is located accessing the previous variable with each press Activating the battery test Press this button for 3 seconds while in normal or frequency converter CF mode At the end of...

Page 22: ...own and provided that it has connected batteries whether internal or external If a complete shutdown is not carried out the setting will not be saved to the memory 7 2 4 Settings Tab 8 shows a summary...

Page 23: ...f frequent mains failures b Entering the value in Ah is vital for the control to be able to calculate and show the backup available on the LCD display without further alterations The settings values a...

Page 24: ...with output frequency of 60 Hz 1 With parameter 02 ENA the CF 50 or CF 60 variables are displayed instead of BAT 50 or BAT 60 DIS ECO mode disabled ENA ECO mode enabled ENA Bypass enabled with the in...

Page 25: ...mode energy saving LCD display 128 128 CF mode Description When the input frequency is between 46 and 64 Hz the UPS can be set to a constant output frequency of 50 or 60 Hz The device will still charg...

Page 26: ...ery voltage too high 28 Battery voltage too low 2A Battery charger short circuited at its output 41 Overtemperature 43 Output overload 45 Charger fault 49 Input overcurrent Tab 13 Error or fault code...

Page 27: ...del and serial number Date on which the issue occurred Full description of the issue including any information provided by the LCD and state of the alarm Power supply conditions type of load and level...

Page 28: ...n on the LCD diplay The audible alarm sounds continuously Charger shorted at its output Check if the connection of the external battery pack connected to the UPS is shorted Fault code 45 is shown on t...

Page 29: ...ctor 1 Transfer time inverter to battery 0 ms Transfer time inverter to bypass 4 ms Transfer time inverter to ECO 4 ms Transfer time ECO to battery 10 ms Performance at full load in line mode with bat...

Page 30: ...tic this is the physical connection between the input of an electrical device and its output DC Direct current is the continuous flow of electrons through a conductor between two points with different...

Page 31: ...when it exceeds certain maximum values On line mode A device is said to be on line when it is con nected to a system is operative and normally has its power supply connected Inverter An inverter is a...

Page 32: ...ce Support T S S network Commercial network and warranty information are available in website www salicru com www linkedin com company salicru salicru_SA Product Range Uninterruptible Power Supplies U...

Reviews: