background image

14’ Arc™ Meeting Table (6 Person) Assembly


501-780-6  v10.23           page  5 of 8

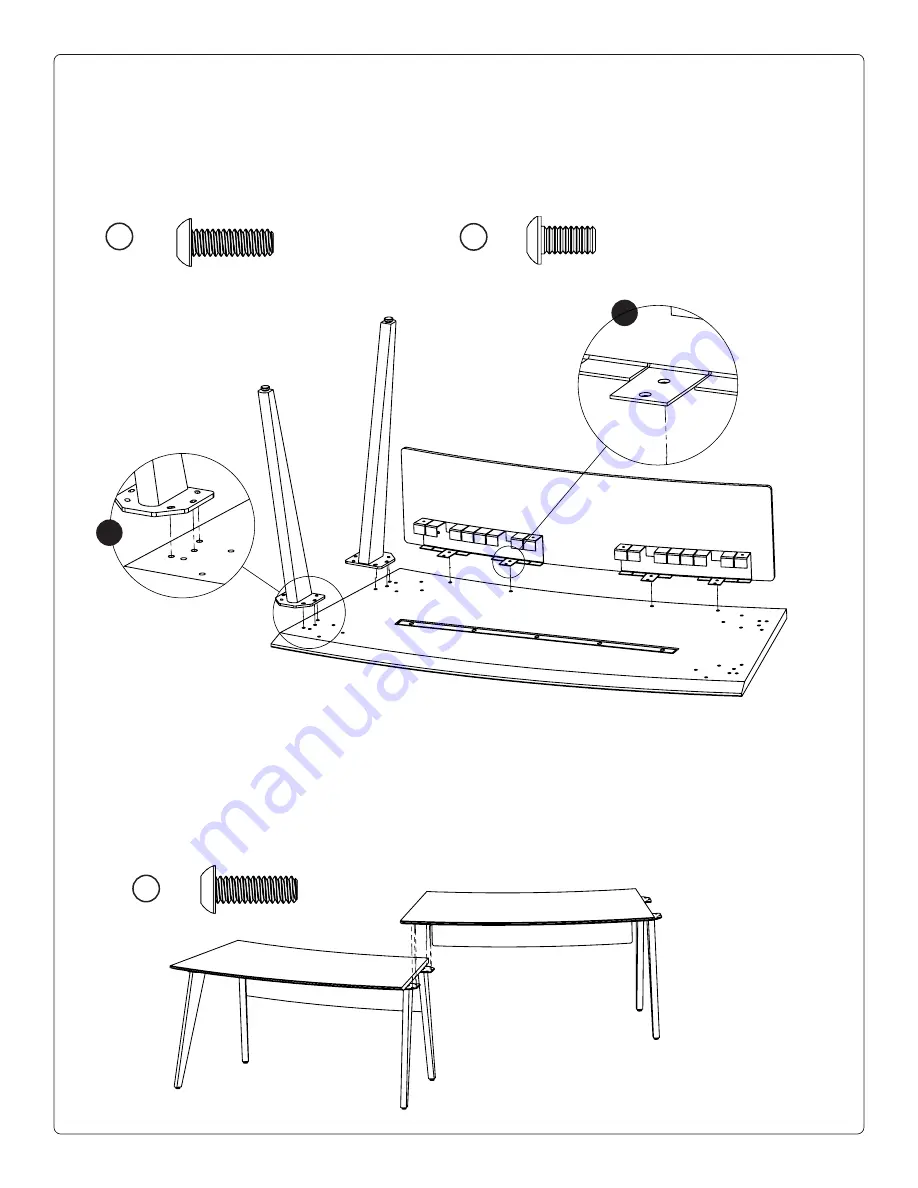
3. Table Segment #2

A.


Attach Legs

Use (3) C screws per leg.

B. Accoustic Panel 

Use (1) B screws per bracket.

B   X4

B


A

Flip the table segment 2 and position it over the mounting plates of the standing table leg. 
Attach (3) C screws to each leg from underneath the table, connecting the two table segments.  

If needed, slightly loosen the bolts on the mating legs to ensure proper hole alignment and a snug fit.

C. Join Table Segments

C   X6

C   X6

Summary of Contents for Arc AT/6P/G2

Page 1: ...14 Arc Meeting Table 6 Person Assembly 501 780 6 v10 23 page 1 of 8 14 Arc Meeting Table 6 Person AT 6P G2 ASSEMBLY...

Page 2: ...Screw D 2 P 305 590 BO CM Table Leg with Wireloom E 6 P 305 590 Table Leg F 6 305 585 Cable Raceway G 2 204 300 Cable Raceway Bridge H 3 204 320 Modesty Panel 302 355 8 32 x 1 2 Modesty Panel Fastene...

Page 3: ...ceway BEFORE YOU BEGIN Table will be assembled starting with the left seated segment WIRELOOM Place table leg D with pre installed wireloom at desired location Typically installed in the back side of...

Page 4: ...ge of top Use 8 C screws to attach the two outer legs to the top B Acoustic Panel Attach the acoustic modesty panel to the table top using B screws Note Some flexing of the metal cable raceway may be...

Page 5: ...B screws per bracket B X4 B A Flip the table segment 2 and position it over the mounting plates of the standing table leg Attach 3 C screws to each leg from underneath the table connecting the two ta...

Page 6: ...ing table leg Attach 3 C screws to each leg from underneath the table connecting the two table segments If needed slightly loosen the bolts on the mating legs to ensure proper hole alignment and a snu...

Page 7: ...odesty panel and the table segments 6 Install Cable Bridge Centered between table segments Position table in the desired location and level if needed using the threaded leveling feet 5 Level Table Thr...

Page 8: ...dustry leading warranties Should you ever encounter any problem with your Salamander product let us know We are here to make it right 1 800 535 5659 860 761 9500 Full warranty including limitations an...

Reviews: