

SAL National Pty Ltd. 40 Biloela Street Villawood NSW 2163 ABN 21 633 189 474
Copyright SAL V12 FEB 2020 |
www.sal.net.au
| Page 2 of 2
Scan QR code or go to App store (IOS) or Google Play (Android) to download the free PIXIE
app to your smart phone. IOS: Requires IOS
6.0 or later. Compatible with iPhone, iPad and iPad touch Android: Requires Android 4.4 or
above, devices must support Bluetooth 4.0
Specifications above are for reference only and may vary without prior notice
13. Warranty – In accordance with SAL’s standard terms and conditions of sale, SAL warrant this product to be free from defects in materials and or workmanship for a
period as stated below for goods not subject to incorrect installation, maintenance, operation, mishandling, environmental, unauthorised modifications or electrical
operating conditions outside the nominated product specification as detailed in these installation instructions. The benefits to you given by this warranty are in addition
to other rights and remedies you have under law. Our goods come with guarantees that cannot be excluded under the Australian Consumer Law. You are entitled to
a replacement or refund for a major failure and compensation for any other reasonably foreseeable loss or damage. You are also entitled to have the goods repaired
or replaced if the goods fail to be of acceptable quality and the failure does not amount to a major failure.
Warranty term – Residential usage (12) months, Commercial usage (12) months and batteries where supplied (12) months from date of purchase.
How to make a claim?
Step # 1 – Within 30 days of the fault discovery, please contact the original place of the SAL product purchase during standard (local) business hours, with the following
information (a) proof of purchase (b) description and quantity of the claimed fault (c) address of installation. (d) operating hours of the product.
Step # 2 – It is then the responsibility of the original place of product purchase to report the matter to SAL aftersales;
NSW | ACT
- SAL National Pty Ltd, 40 Biloela Street Villawood NSW 2163
| P # 02 9723 3099
QLD
- SAL National Pty Ltd, 36 Whitelaw Place Richlands QLD 4077
| P # 07 3879 5999
VICT | TAS | SA | NT
- SAL National Pty Ltd, 46-48 Keys Road Moorabbin Victoria 3189 | P # 03 9532 3168
WA
- SAL National Pty Ltd, 29 Beringarra Av Malaga WA 6090
| P # 08 9248 7458
Step # 3 - Upon review of your claim and if the product is required to be returned to SAL for technical evaluation, then at the owners expense the product must be
returned to SAL as per the above nominated locations.
Step # 4 - Pending the evaluation, the claim will be validated resulting in the product being repaired or replaced with the same or best equivalent product at the
discretion of SAL, or rejected if the product fault was found to be caused by conditions beyond the responsibility of SAL warranty obligations. Consideration of
installation, product removal, return freight and or testing fees are not the responsibility of SAL.
How to pair with a PIXIE master device – without the use of a phone
1. For PIXIE master devices, quickly pressing the button 4 times will
commence the pairing mode, then quickly press the PIXIE
Multifunction Control 4 times within 30 seconds. When the LED
indicator flashes twice and then remains solid for 2 seconds, the
pairing is then successful
2. For PIXIE Smart strip kits, long press the “Power button” on the
remote will commence the pairing mode. Then quickly press the
PIXIE Multifunction Control 4 times within 30 seconds. When the LED
indicator flashes twice and then remains solid for 2 seconds, the
pairing is then successful
How to pair with a PIXIE master device – with the use of a phone
(Recommended)
1. Make sure the PIXIE master device is added into the App, either
PIXIE or PIXIE PLUS
2. Stand close to the PIXIE Multifunction Control
3. Launch the App, navigate to “Devices”, then find the PIXIE
master device that requires pairing, then go to the device detail
page by pressing its icon
4. Tap the top right three dots on the app, then tap “Pairing” in the
pop-out list
5. Quickly press the button of the PIXIE Multifunction Control 4
times within 30 seconds, the LED indicator flashes twice and
remains solid for 2 seconds, the pairing is then successful
Case Issue
Suggestions
The LED indicator of SMF/BTAS/BP
doesn’t light up
The LED indicator of SMF/BTAS/BP
flashes after quickly pressing the
button 4 times, but it doesn’t pair
in the end
The LED indicator of SMF/BTAS/BP
shows it’s paired successfully,
but it doesn’t control
• Please check the wiring and make sure the wiring is correct
• Press the button 7 times see if the standby LED indicator was
turned off
• Make sure there is at least a PIXIE master device, a group
or a scene in pairing mode prior to pressing the SMF/BTAS/BP
button 4 times
• Make sure the SMF/BTAS/BP is within wireless signal coverage of
paired PIXIE master devices (within 15 meters in open space, may
require closer proximity depending on installation environment)
• If it has to be beyond wireless coverage, please add PIXIE signal
boosters between SMF/BTAS/BP and PIXIE master devices
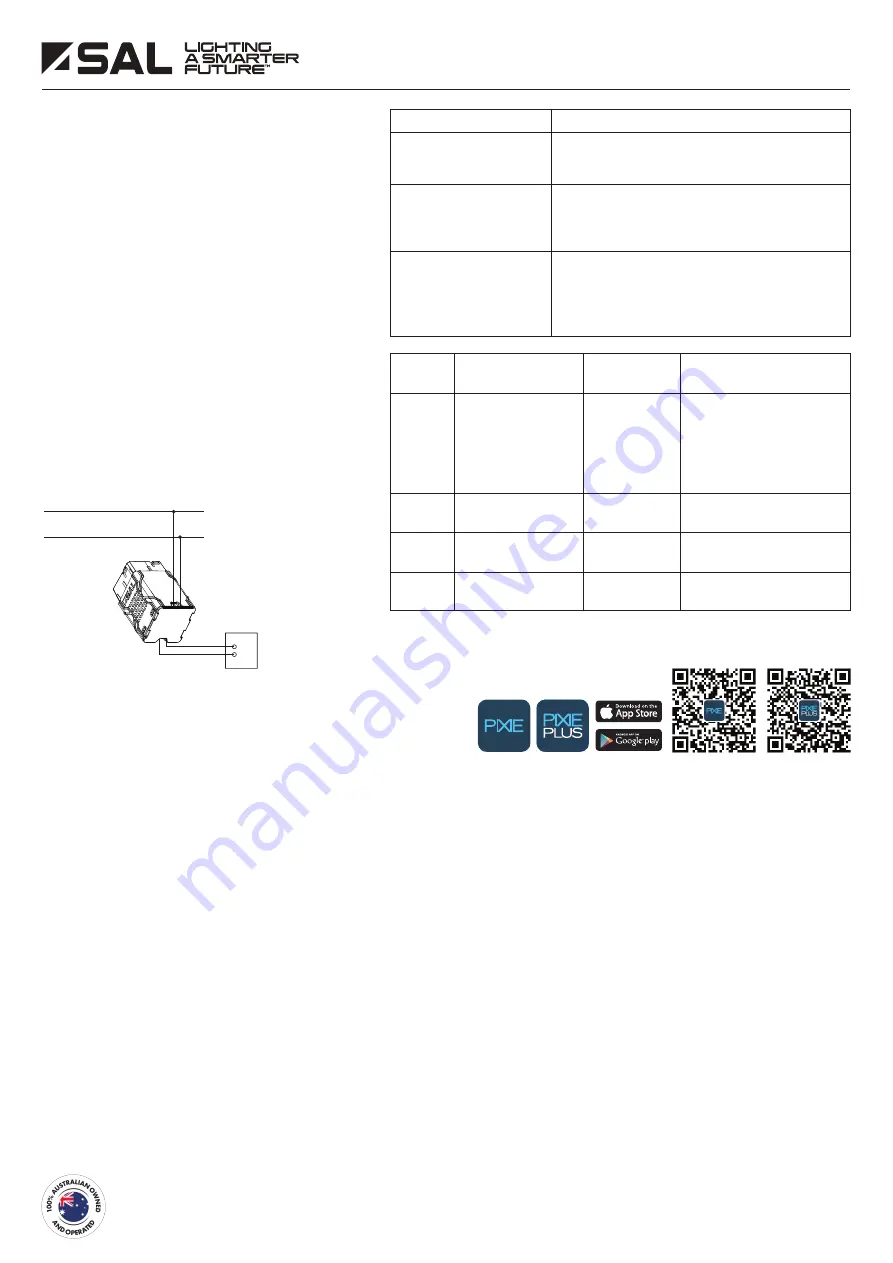
Active
240V/50Hz AC
Neutral
SMF/BTAS/BP
A N
OPTIONAL-
Bell Press Input
There is no polarity on the
bell press conductors.
Bell Press Input: SMF/BTAS/BP accepts a bell press input. Bell press operation is
identical to the button operation as described above.
Generic
Operation
Function Description
LED Indicator
Remark
Enter pairing mode, to
finalise the pairing process
with a PIXIE master device,
a group or a scene
Quickly flash in
blue for 10 seconds
• Can pair with a PIXIE master
device, a group or a scene.
• After a successful pairing, pairing
mode will end. Pressing any button
on this product during pairing mode
will cancel and exit pairing mode.
Change the LED
indicator color
• Can toggle LED indicator color
between blue and amber
• Can toggle LED indicator on/off
at standby mode
• All the previous pairing will lost
after reset
Turn on/off the standby
LED indicator
Reset the product to
factory default
Flash in blue for
3 seconds
4 clicks
5 clicks
7 clicks
9 clicks


