background image

2

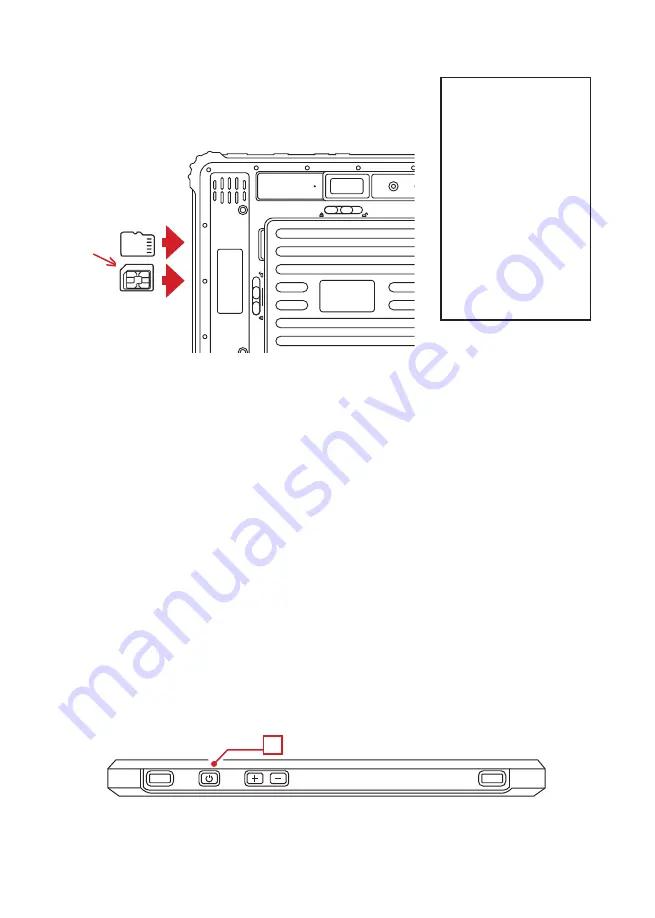
2.1. Install the SIM Card

(Note: check the section 2.7 to locate the right port)
The card is a 

Micro-SIM

 size (intermediate size between SIM and Nano-SIM). Open  

the cap and insert the SIM card according to the following arrow direction (as shown  
below). You willl hear a click when it’s locked. Push it down again to unlock.

2.2. Install the SD Card 

(Note: check the section 2.7 to locate the right ports)
Open the cap and insert the SD card according to the following arrow direction (as shown above). You willl hear a click 
when it’s locked. Push it down again to unlock.

Note:
The maximum size of the SD card is 256 GB. 

2.3. Connect Power

Please use the power adapter provided with this product only. Using other power adapters may damage your computer.

Note:
The tablet is shipped to you in a power-saving mode, which protects the battery from charging or discharging. When you 
install the battery for the first time and connect your tablet to AC power, the battery will automatically exit this mode and 
you will be ready to use.
Connecting the power adapter will start charging the battery. AC power must be activated when power is turned off.

Plug the DC power cord of the power adapter into the power jack of the SAILPROOF SP10 tablet.

2.4. SAILPROOF SP10 Tablet On/Off Key

Press the button (1) to switch on/off the tablet.

1

BE CAUTIOUS


when inserting 

a SIM card or memory 
card 

and follow exactly the 

instructions in our manual. 
A card slipped upside down 
(be careful: the picture of the 
operating instructions shows 
the BACK SIDE of the tablet) 
or crooked may damage the 
contacts of the port. This is not 
covered by the guarantee. 


In addition, the port is a bit 
large and if you force the 
insertion of the card obliquely, 
it could slip inside the 

tablet.

!

Summary of Contents for SP10W

Page 1: ...1 SAILPROOF SP10W Rugged Tablet 2 Universal Power Adapter UK USA Australia NZ and EU compatible 3 12v cigarette lighter power adapter 4 USB A to USB c cable 5 Hand Straps 6 Screws 4 pieces 7 Windows 1...

Page 2: ...to you in a power saving mode which protects the battery from charging or discharging When you install the battery for the first time and connect your tablet to AC power the battery will automaticall...

Page 3: ...n and receive touch 2 Microphone receives sound for recording 3 Front camera 4 Charging indicator When SAILPROOF SP10 tablet is charging it shows red When SAILPROOF SP10 tablet is in sleep mode it bec...

Page 4: ...lder 4 SIM card holder 5 Not in use 2 8 Left side 1 HDMI port connects an HDMI monitor or TV 2 Composite audio port connects to headphones or external speakers with amplifier 3 USB c port USB 2 0 conn...

Page 5: ...the battery in a temperature range of 10 C 30 C 50 F 86 F Higher ambient tempera tures will cause the battery temperature to rise Avoid charging the battery in closed cars and hot weather It is recomm...

Page 6: ...al use and water resistance ensure that all the rubber plugs on the ports are correctly sealed Never open these rubber plugs in the water or a very humid environment When the tablet gets wet with salt...

Page 7: ...orts USB C OTG charge USB A Mini HDMI Ethernet RJ 45 1000 mbps RS 232 POGO pin DC jack Charge DC jack 5V 3A or USB c 5V 0 5 to 2 0A Headphone 3 5mm jack Operating temperature 10 50 c storage temperatu...

Page 8: ...ded by the manufacturer Damages caused by the customer incorrectly inserting the port caps an accessory that is essential for ensuring the product remains water resistant Damages that occur through ac...

Reviews: