background image

In order to carry out maintenance, repairs or cleaning, first 

disconnect the unit from the compressed air network, after 

having correctly carried out the DEPRESSURISATION 

procedure described in Section 9 of the Manual.
Never point the unit towards yourself, other personnel or 

animals.The thinners and dilution media used can cause 

serious injury. With this unit the product is sprayed at a very 

high pressure. The stream coming from the gun, from leaks, 

or due to the breakage of a component in the unit, could cause 

the product to be injected at high pressure under the skin. 

LIkewise if the product is sprayed or splashed in the eyes it 

can cause serious harm. 
Never attempt to stop the application stream or a leak with 

your hand or any other part of your body. If you suspect you 

may have sprayed the product on your skin, IMMEDIATELY 

SEEK MEDICAL ATTENTION. This incidence must not be 

treated as a simple cut. Describe the product with which it 

ocurred to the Doctor in as much detail as possible.
The location where work is carried out must have sufficient 

ventilation in accordance with current legislation and regulations.
Near the unit, only keep the amount of product and thinner 

required for the work being done at that time. After work has 

been completed, thinners and the product to be applied must 

be returned to their corresponding storage location.
Keep the working area clean and free of potentially dangerous 

waste (thinners, rags, etc.) While work is in progress, there 

must not be any source of ignition (naked flames, lighted 

cigarettes, etc.) in the working area as these might generate 

easily flammable gases. Likewise, the approved protective 

means must be used (breathing, hearing, etc.) in accordance 

with the regulations established in this regard.
If the unit is used in an inadequate manner or its components 

are altered in any way, severe material damage may occur 

and bodily harm may be caused to the operator, other 

personnel and/or animals and may even cause death. 

SAGOLA, S.A. accepts no responsibility in for any damage 

caused through the incorrect use of the unit.
Always use approved breathing units in accordance with current 

standards and regulations in order to protect yourself from 

emissions produced during application.
Never exceed the maximum operation pressure.

As a general preventive measure we advise you to wear 

goggles in accordance with the specific environmental 

regulations and characteristics for the work centre.
Use gloves when handling the product (see the manufacturer's 

recommendations) and cleaning the gun.
If, when the gun is in use, the ambient noise level exceeds 

90 dB. the use of approved hearing protection is 

recommended. The gun in itself does not propitiate any 

mechanical risk of perforations, impact or pinching, except 

those deriving from incorrect installations and handling.
USE SAGOLA ANTISTATIC HOSES TO ELIMINATE 

POSSIBLE ELECTRICAL DISCHARGES THAT MIGHT 

CREATE THE RISK OF FIRE OR EXPLOSION.
Pay adequate attention when handling the unit in order to 

prevent any damage that might lead to dangerous situations 

for the user or personnel standing near the unit, as a 

consequence of leaks, breakages, etc.
The equipment has been designed for use at ambient 

temperature. The maximum operating temperature is 50ºC.
The use of solvents and/or detergents that contain halogenated 

hydrocarbons (trichloroethane, methyl chloride, etc.), may 

cause chemical reactions in the unit as well as in its zinc-coated 

components (trichloroethane mixed with small amounts of 

water produces hydrochloric acid). For this reason, these 

components may rust and in extreme cases the chemical 

reaction caused may be explosive. We recommend you use 

products that do not contain the aforementioned components. 

Do not use acids, soda (alkalis or pickling substances, etc.) 

for cleaning under any circumstances.
In general, precautions must be taken whenever the unit is 

handled, in order to prevent any deterioration to it.
Connectors must be securely tightened and in good condition.
Safety standards must be understood and applied.
Any non-compliance with the indications set out in this manual 

may lead to incidents affecting the physical integrity of the 

user or other personnel or animals.
Respect and comply with indications relating to the 

conservation of the environment.

15. HEALTH AND SAFETY

16. OBSERVATIONS

By following the instructions set out in this manual you will 

ensure good spraying and quality of finish. 

Should you have any doubts, please contact SAGOLA S.A. 

Customer Service.

17. WARRANTY CONDITIONS

This device has been manufactured with great precision and 

has been subjected to a large number of controls before 

leaving the factory.
The WARRANTY is valid for three years, counted as of the 

date of purchase, which will be indicated by the seller in the 

place provided for this purpose, together with his stamp.
Once the unit has been received, please complete the 

warranty and send this to the manufacturer for validation.
This WARRANTY covers any manufacturing defect, which 

will be repaired free of charge. However, any malfunction 

resulting from he incorrect use of the unit, such as inadequate 

connections, breakage due to dropping, or similar, the normal 

wear of components and in general any deficiency not 

attributable to the manufacturer of the device, are expressly 

excluded. Likewise, the WARRANTY shall be rendered null 

and void when it is evident that the unit has been handled 

by persons other than our Technical Assistance Service.

This WARRANTY does not support any undertaking made 

by anyone outside our Technical Service.
In the case of any breakdown during the guarantee period, 

please attach the completed warranty certificate to the unit 

and deliver this to the nearest Technical Assistance Service 

or get in touch with the factory.
Any demand of greater importance against the supplier, in 

particular compensation for damages, is excluded. This is 

also applicable to any damages that might arise during 

counselling, while acquiring practice and during demonstration.
Consequently, the services rendered under guarantee do 

not involve an extension of the warranty period.
Any device for which there is no duly completed guarantee 

certificate in the files of SAGOLA S.A. will be rejected.
The manufacturer reserves the right to make technical 

modifications.

-  24  -

Summary of Contents for ATLANTA 500

Page 1: ...u a l d e i n s t r u c c i o n e s l i s t a d e r e p u e s t o s i n s t r u c t i o n m a n u a l s p a r e p a r t s l i s t m a n u a l d e i n s t r u e s d e s m o n t a g e m d e p e a s ATL...

Page 2: ......

Page 3: ...uesta en marcha p g 7 9 Despresurizaci n p g 7 10 Funcionamiento p g 8 11 Parada p g 8 11 1 Parada de corta duraci n p g 8 11 2 Parada con finalizaci n de trabajo p g 8 12 Limpieza p g 9 13 Mantenimie...

Page 4: ...junto a un muy bajo nivel de contaminaci n Equipo compuesto de serie por Bomba modelo ATLANTA 500 ATLANTA 800 Manual de Instrucciones Envase Como elementos opcionales y complementarios del equipo Mang...

Page 5: ...Tuber a de retorno del producto 4 Llave de retorno del producto 5 Regulador de Presi n 6 Salida de Producto 7 Man metro 8 Interruptor el ctrico 9 V vula antirretorno 10 V lvula 11 Tacos fabricados en...

Page 6: ...ante de los productos que vaya a utilizar productos a aplicar diluyentes etc ya que pueden generar reacciones qu micas incendios y o explosiones o ser t xicos irritantes o nocivos y en todo caso pelig...

Page 7: ...ubo de purga n 3 fig 1 Para ello accionar el interruptor de arranque del motor posici n de encendido Accionar el regulador n 5 fig 1 hacia la derecha suavemente En unos segundos empezara a salir disol...

Page 8: ...l producto atomiza si necesita aplicar mayor cantidad de producto recomendamos que preferentemente utilice una boquilla de mayor paso antes que aumentar la presi n de aplicaci n 13 3 Para conseguir la...

Page 9: ...terruptor el ctrico n 8 fig 1 3 Cuando salga el disolvente por la Tuber a de retorno de producto n 3 fig 1 cierre la llave de retorno n 4 fig 1 4 Accione suavemente el mando del regulador de presi n n...

Page 10: ...1 39 57250804 4 40 81560016 1 41 85760075 1 42 87260407 1 43 87261813 1 44 82560001 1 45 86060010 1 46 80860004 1 47 80660314 1 48 80660413 1 49 86060012 1 50 86464002 1 51 80660308 5 52 80860402 4 5...

Page 11: ...20 1 39 57250804 4 40 81560016 1 41 85760078 1 42 87260407 1 43 87260414 1 44 82560001 1 45 86060010 1 46 80860004 1 47 80660314 1 48 80660413 1 49 86060012 1 50 86464001 1 51 80660308 5 52 80860402 4...

Page 12: ...para el usuario o las personas que se hallen pr ximas como consecuencia de escapes roturas etc El equipo est preparado para su uso a temperatura ambiente La temperatura m xima de servicio es de 50 C L...

Page 13: ...est deteriorada La Pistola carece de Boquilla de Pulverizaci n El Filtro de producto de la Pistola est obturado La Boquilla de Pulverizaci n de la pistola est deteriorada El producto tiene viscosidad...

Page 14: ...o Sale aceite por la pistola o purga El motor se calienta en exceso El equipo toma excesiva presi n El Filtro de producto de la Pistola est obturado La Boquilla de Pulverizaci n de la pistola est atas...

Page 15: ...s page 18 8 Start up page 19 9 Depressurisation page 19 10 Operation page 20 11 Stopping page 20 11 1 Short stop page 20 11 2 Stopping when work is finished page 20 12 Cleaning page 21 13 Maintenance...

Page 16: ...d comply with all the indications described in this Manual This manual must be kept in a safe place accessible to all users of the unit The unit must be started and handled exclusively by personnel in...

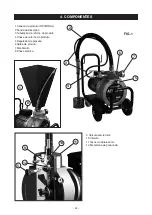
Page 17: ...on Probe 3 Product return hose 4 Product return key 5 Pressure Regulator 6 Product Outlet 7 Pressure Gauge 8 Electrical switch 9 Non return valve 10 Valve 11 Tacks manufactured in duralumin 12 Polyami...

Page 18: ...es suited to the product to be transferred You must always connect the equipment and all the elements involved in the work process to a grounding connection to eliminate static electricity If its resi...

Page 19: ...mp by means of the drain tube n 3 fig 1 To do this set the motor start up switch to ON Turn the regulator n 5 fig 1 gently to the right Within a few seconds solvent will begin to run from drain tube n...

Page 20: ...o increase the pressure during application 13 3 To set the shape of the spray width set the spray gun safety catch loosen the cap attachment bolt and turn to the desired direction Tighten the cap atta...

Page 21: ...rom the gun hoses and the rest of the unit with a cloth soaked in thinner Keep gasket areas free of accretions and foreign bodies The air cap is a precision component Any deformation especially in the...

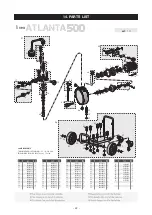
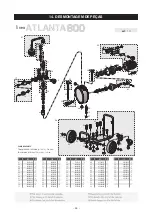
Page 22: ...0 1 39 57250804 4 40 81560016 1 41 85760075 1 42 87260407 1 43 87261813 1 44 82560001 1 45 86060010 1 46 80860004 1 47 80660314 1 48 80660413 1 49 86060012 1 50 86464002 1 51 80660308 5 52 80860402 4...

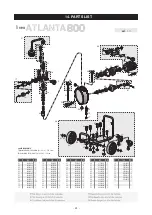
Page 23: ...320 1 39 57250804 4 40 81560016 1 41 85760078 1 42 87260407 1 43 87260414 1 44 82560001 1 45 86060010 1 46 80860004 1 47 80660314 1 48 80660413 1 49 86060012 1 50 86464001 1 51 80660308 5 52 80860402...

Page 24: ...erous situations for the user or personnel standing near the unit as a consequence of leaks breakages etc The equipment has been designed for use at ambient temperature The maximum operating temperatu...

Page 25: ...ilter is clogged The cap is worn The paint is too thick The material is too thick Insufficient pumping pressure The gun filter is clogged The suction probe and or suction filter are loose dirty or dam...

Page 26: ...tor Place the equipment in a location where the ventilator air intake is not impeded Replace the bearings or the motor Replace it Send the unit to the S A T SAGOLA In accordance with Directive 2006 42...

Page 27: ...rranque p g 31 9 Despressuriza o p g 31 10 Funcionamento p g 32 11 Parada p g 32 11 1 Parada de curta dura o p g 32 11 2 Parada com finaliza o de trabalho p g 32 12 Limpeza p g 33 13 Manuten o p g 33...

Page 28: ...amento leia atentamente tenha em conta e cumpra integralmente todas as indica es descritas neste manual Conserve o equipamento num lugar seguro e acess vel para todos os usu rios do mesmo O equipament...

Page 29: ...bsor o 3 Tubula o de retorno do produto 4 Chave de retorno do produto 5 Regulador de press o 6 Sa da de produto 7 Man metro 8 Chave el trica 9 V lvula anti retorno 10 V lvula 11 Tacos de duralum nio 1...

Page 30: ...cas Se for necess rio aplicar produtos especiais consulte a SAGOLA S A Leia e aplique com aten o todos os dados instru es e medidas de seguran a indicados pelo fabricante dos produtos que vai utilizar...

Page 31: ...para ON Rode o regulador n 5 Fig 1 suavemente para a direita Dentro de poucos segundos solvente come ar a correr a partir do tubo de drenagem n 3 Fig 1 Recolhe se o solvente a partir de emiss o do tu...

Page 32: ...o m ximo do produto recomenda se que de prefer ncia usar uma etapa principal do bocal em vez de aumentar a press o de aplica o 13 3 Para obter a forma desejada do ventilador operar a trava de seguran...

Page 33: ...a de suc o n 2 fig 1 e introduza a tubula o de retorno do produto n 3 fig 1 2 Desligue o motor operando o interruptor de alimenta o No 8 Fig 1 3 Quando o solvente sair pela tubula o de retorno do prod...

Page 34: ...360320 1 39 57250804 4 40 81560016 1 41 85760075 1 42 87260407 1 43 87261813 1 44 82560001 1 45 86060010 1 46 80860004 1 47 80660314 1 48 80660413 1 49 86060012 1 50 86464002 1 51 80660308 5 52 808604...

Page 35: ...82360320 1 39 57250804 4 40 81560016 1 41 85760078 1 42 87260407 1 43 87260414 1 44 82560001 1 45 86060010 1 46 80860004 1 47 80660314 1 48 80660413 1 49 86060012 1 50 86464001 1 51 80660308 5 52 8086...

Page 36: ...situa es de perigo para o usu rio ou para as pessoas que se encontrem nas imedia es em decorr ncia de escapamentos rupturas etc Aequipamento est preparado para ser usado temperatura ambiente A temper...

Page 37: ...anificados A v lvula de suc o est danificada A pistola n o tem bocal de pulveriza o O filtro do producto da pistola est obturado O bocal de pulveriza o da pistola est danificado Aviscosidade do pintur...

Page 38: ...do regulador Verifique a tens o de entrada para o motor Colocar el equipo en un lugar en el que no se impida la aspiraci n de aire por parte del ventidalor Mudan a de rolamentos ou motor Substituir En...

Page 39: ......

Page 40: ...CHER DIENST PROFESSIONNELLE REPARATURGARANTIE SERVI O DE ASSIST NCIA T CNICA GARANT A DE REPARA AO PROFISSIONAL SERVIZIO DI ASSISTENZA TECNICA GARANZIA DI RIPARAZIONE PROFESSIONALE Tel 34 945 214 150...

Reviews: