


26
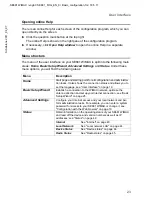
Basic Setup Wizard
SE681 WiMAX / engbt / SE681_FUG_EN_9 / Basic_configuration.fm / 18.5.11
Schablo
ne 201
1_04
_07
Selecting the antenna
Select whether you want to operate your SE681 WiMAX with an outdoor antenna
or the integrated one.
– Click the first option button if you want to use the integrated antenna. Your
SE681 WiMAX must be positioned by the window with the cable connections
pointing inwards and must be connected.
– Click the second option button if your SE681 WiMAX came with an outdoor
antenna. This antenna must have been installed and connected by an electrical
specialist.
Click
Next
.
Adjusting the antenna
If you are using the integrated antenna, adjust your SE681 WiMAX by the window.
If you are using the outdoor antenna, this must already be installed and facing
towards the base station, see "Installing the SE681 WiMAX" on page 12.
Click
Next
.
Establishing a radio connection to a WiMAX network
The Basic Setup Wizard will now scan the frequencies to establish an initial radio con-
nection to a WiMAX network.
The frequency scan begins automatically. A progress bar indicates how far the scan
has progressed. In addition, you will see in the
Remaining time
area roughly how
much time is still needed for the complete scan. Depending on how your SE681 WiMAX
has been preconfigured by your provider, the scan can last several minutes before the
first radio connection is established.
As soon as a radio connection has been established with a WiMAX network, the scan
will end. The progress bar is fully filled in and the display in the
Remaining time
area
jumps to
0 seconds
.
If the scan has been successful, read on in Chapter "Precisely aligning the antenna"
on page 28.
i
During the scan, the SE681 WiMAX or antenna must not be moved; this
is the only way to guarantee a complete scan with the current antenna
alignment.


