Safety Basement SB-CC8434 Instruction Manual Download Page 11

PRODUCT MANUAL

Multi-Functional Clock Camera : SB-CC8434

Page 11

www.SafetyBasement.com     Phone: 877-345-2336   Fax: 888-236-2524
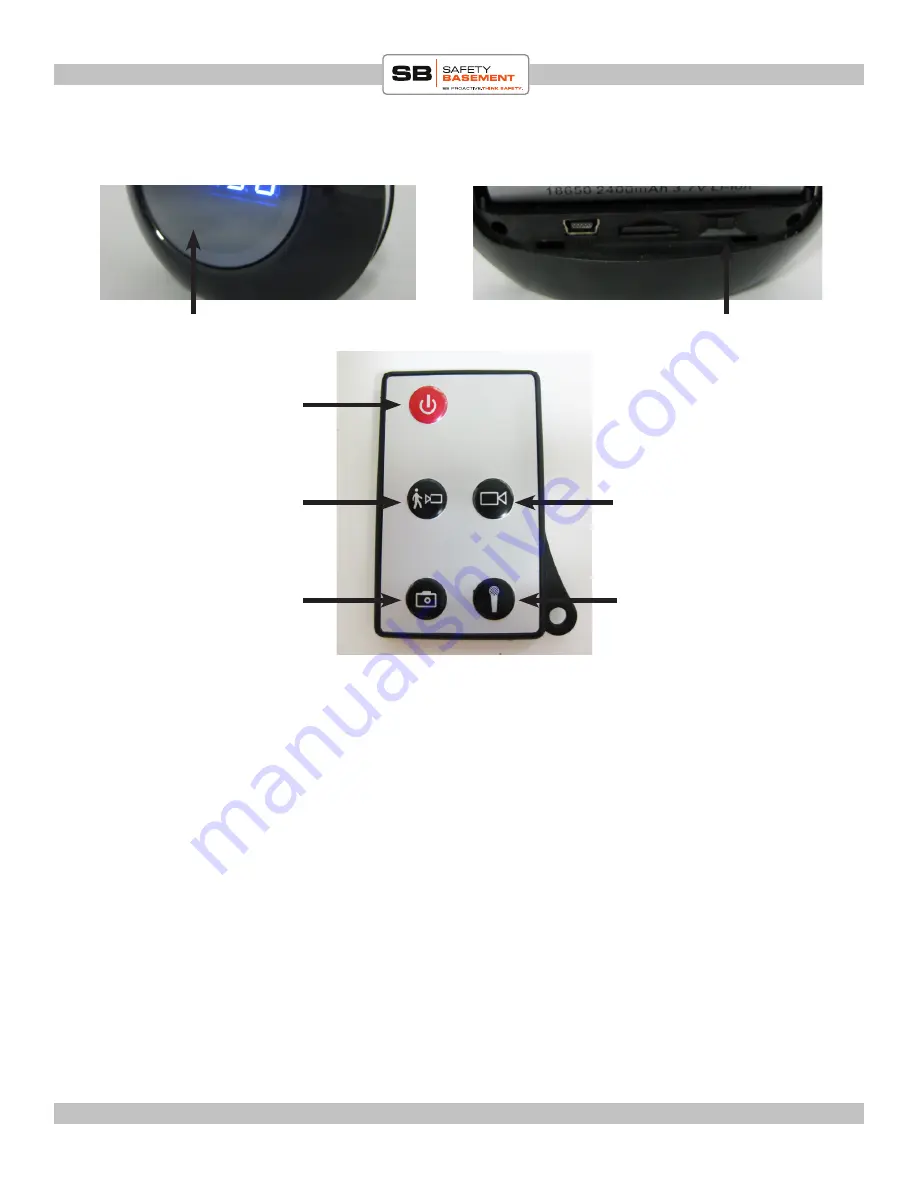
RECORDING

Power On / Off

Blue Status Light

Motion Activated 

Recording

Photo

Audio Recording

Standard Video 

Recording

Power Switch

NOTE: The main Power Switch on the back of the clock must be ON for recordings. Camera 

functions will not work while connected to USB.

1.  Press the POWER button on the Remote Control. A blue status light will appear on the 

clock face. This status light will go dark in certain cases.

2.  To Stop using Recoding functions of this clock: first, stop the current mode by pressing the 

appropriate button on the remote. For example, to stop using Motion Activation, press the 

Motion Activation button. The blue status light will appear when in Stand By Mode.

3.  In Stand By Mode, with blue status light ON, press the Power Button on the Remote 

Control. The blue status light should go OFF.

4.  Now you can turn OFF the main Power Switch on the back of the clock.

Refer to instructions for retreiving your files using the USB cable and your PC.

Summary of Contents for SB-CC8434

Page 1: ...his simple manual to help you enjoy your new product as quickly and easily as possible Be sure to check the TECH SUPPORT tab on your product page at SafetyBasement com for the latest available manual...

Page 2: ...om Phone 877 345 2336 Fax 888 236 2524 PRODUCT REFERENCE Remote Control Power On Off Camera Status Light Speak Time Snooze Motion Activated Recording Photo Audio Recording Standard Video Recording Not...

Page 3: ...Camera SB CC8434 Page 3 www SafetyBasement com Phone 877 345 2336 Fax 888 236 2524 PRODUCT REFERENCE USB Connector SD Memory Card Power Switch Clock Controls Rechargeable Battery Note You may need to...

Page 4: ...the gold connections facing DOWN and the printing facing UP 3 Gently push the SD card into the slot It will click into place DO NOT FORCE the SD card into place If there is any resistance remove the...

Page 5: ...BEFORE FIRST USE FILES No other files are required for use of your Clock Camera with Windows or Mac PCs It uses standard drivers that are already installed on your computer Please refer to the last pa...

Page 6: ...ndard drivers This is normal You are now going to use the TIME TXT file you downloaded from our website 6 OPEN the TIME TXT file on your desktop using a simple text editor on your computer For Windows...

Page 7: ...e Power Switch ON 16 Use the Remote Control and press the Power Button The blue status light in the front will turn on 17 Your device time and date is now set Later when reviewing your files if you do...

Page 8: ...ctions are controlled separately and are similar to any other standard alarm clock 2013 SET DATE TIME 1 Press the SET button The front display will blink 2 Use the UP and DOWN buttons to set the YEAR...

Page 9: ...our Alarm It will be blinking 12 00 3 Use UP and DOWN to choose the Hour for your Alarm 4 Press SET again and the MINUTES will blink Use the UP and DOWN buttons to set the MINUTES 5 Press SET again No...

Page 10: ...NOOZE bar NATURE SOUNDS You can fall asleep to the sounds of nature with this option 1 Press the TIME button to choose how long you want the sounds to play 10 20 30 40 50 or 60 minutes 2 HOLD the SNOO...

Page 11: ...lue status light will appear on the clock face This status light will go dark in certain cases 2 To Stop using Recoding functions of this clock first stop the current mode by pressing the appropriate...

Page 12: ...will continue to record additional 3 minute videos as long as motion is detected MOTION ACTIVATED 1 With the clock in Stand By Mode see previous step press the Video Recording button on the Remote Con...

Page 13: ...the Photo button on the Remote Control 2 The status light will go dark It is waiting for motion before starting 3 Wave your hand in front of the camera and the status light will blink 2 times You are...

Page 14: ...T your device from Windows before unplugging it MAC OS X RETRIEVE YOUR FILES 1 Plug one end of USB cable into device 2 Plug the other end into a free USB port on your Mac Do not use a USB hub 3 Turn O...

Page 15: ...45 2336 Fax 888 236 2524 Video Format AVI Motion JPEG Video Resolution 1280x960 Audio in Video File PCM Mono Audio Sample Rate in Video File 8000 Hz Photo Format JPEG Photo Resolution 1600x1200 Audio...

Page 16: ...org vlc index html The VLC Media Player can play almost any video or audio file type There is a version for Windows and for Mac OS X VIDEO EDITING for WINDOWS MOVIE MAKER 2012 http windows microsoft...

Reviews: