


©2017 Dorel Juvenile.
(800) 544-1108
Styles and colors may vary. Estilos y colores pueden variar.
Made in CHINA. Hecho en CHINA.
Made for Dorel China America, Inc.
c/o Dorel Juvenile Group, Inc.
Hecho para Dorel China America, Inc.
c/o Dorel Juvenile Group, Inc.
2525 State St., Columbus, IN 47201-7494
07/1 7 /18 WM2490-001
Dash Travel System
Dash Travel System
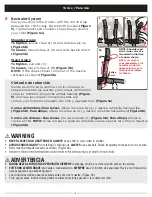
FOR THE SAFETY OF YOUR CHILD, PLEASE READ
THE FOLLOWING WARNINGS AND ASSEMBLY
INSTRUCTIONS AND KEEP FOR FUTURE REFERENCE.
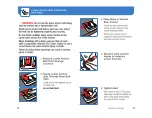
• Adult assembly required.
CAUTION:
Keep small
parts away from children during assembly.
• NEVER LEAVE CHILD UNATTENDED.
ALWAYS
keep
child in view when in stroller.
• AVOID SERIOUS INJURY
from falling or sliding out.
ALWAYS
use seat belt. Check frequently to make
sure it is secure.
• ALWAYS
when folding, unfolding or adjusting stroller to
• ALWAYS
make sure stroller is
FULLY OPEN AND
LOCKED
before using.
• ALWAYS
use the brakes when stroller is stopped.
• ALWAYS
remove protective material and poly bags
and dispose before assembly.
• NEVER
put hot liquids in the cup holder.
• NEVER
use stroller on stairs or escalators.
• NEVER
rollerblade with stroller.
• NEVER
allow children to play with or hang onto the
stroller.
• NEVER
allow children to climb into the stroller
unassisted. Stroller may tip over and injure child.
• NEVER
place or hang parcels, bags or accessories
on the handle or canopy. The stroller may tip over
or the canopy may collapse.
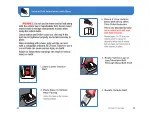
• This product will become unstable if a parcel bag or
rack is used when there is no provision for one.
• This product may become unstable if a parcel
bag, other than the one recommended by the
manufacturer is used.
• This product will become unstable if the
manufacturer’s recommended load is exceeded.
• DO NOT
carry additional children, goods or
accessories in or on this product except as
recommended in the manufacturer’s instructions.
• NEVER
place more than 2 lbs. (0.91 kg) in parent’s
tray to prevent tipping.
POR LA SEGURIDAD DE SU HIJO, POR FAVOR LEA
LAS SIGUIENTES ADVERTENCIAS E INSTRUCCIONES
DE ENSAMBLE, Y GUÁRDELAS PARA CONSULTA
FUTURA.
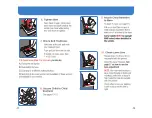
• El armado debe ser realizado por un adulto.
PRECAUCIÓN:
Durante el armado, mantenga las
piezas pequeñas fuera del alcance de los niños.
• NUNCA DEJE AL NIÑO SIN SUPERVISIÓN.
SIEMPRE
mantenga al niño a la vista cuando esté
en la carriola.
• EVITE UNA LESIÓN GRAVE
por caída o
resbalamiento.
SIEMPRE
use el cinturón de
seguridad. Revise con frecuencia para asegurarse
que esté asegurado.
• SIEMPRE
mantenga los dedos alejados de las
piezas movibles, al plegar, desplegar o ajustar la
dedos.
• SIEMPRE
asegúrese de que la carriola esté
COMPLETAMENTE ABIERTA Y BLOQUEADA
antes
de usarla.
• SIEMPRE
use los frenos cuando la carriola esté
parada.
• SIEMPRE
quite el material de protección y las
bolsas de plástico y deséchelos antes de ensamblar.
• NUNCA
ponga líquidos calientes en el apoyavasos.
• NUNCA
use la carriola en escaleras ni escaleras
eléctricas.
• NUNCA
patine junto con la carriola.
• NUNCA
deje que los niños jueguen con ni se
cuelguen de la carriola.
• NUNCA
deje que los niños se suban a la carriola sin
ayuda. La carriola podría volcarse y lesionar al niño.
• NUNCA
coloque ni cuelgue paquetes, bolsas ni
accesorios en el asa ni en la capota. La carriola
podría volcarse o la capota podría colapsarse.
• Este producto se volverá inestable si se usa una
bolsa de paquetes o una rejilla cuando no hay
provisión para ello.
• Este producto puede volverse inestable si se usa
Read all instructions before assembly and use.Keep
instructions for future use.
Lea detenidamente las instrucciones antes de armar y usar.
Guarde estas instrucciones para su uso futuro.nk
WARNING:
ADVERTENCIA:
IC261 User Guide
IC261 Guía del Usuario
Summary of Contents for onBoard 35 LT
Page 2: ......
Page 3: ......
Page 4: ...Head Rest...
Page 5: ......
Page 6: ...1 2 3...
Page 7: ...1 2 3...
Page 8: ...sewn end...
Page 9: ...sewn end...
Page 10: ......
Page 11: ......
Page 12: ......
Page 13: ......
Page 14: ......
Page 15: ......
Page 16: ...sewn end...
Page 17: ......
Page 19: ......
Page 20: ......
Page 21: ......
Page 22: ......
Page 23: ......
Page 24: ......
Page 25: ......
Page 26: ......
Page 27: ......
Page 28: ......
Page 29: ...1 in 2 5 cm...
Page 30: ......
Page 31: ......
Page 32: ......
Page 46: ......


