3
2a
2
Chair Straps
D
:
Pass the bottom chair strap completely
under base of chair and secure buckle
(Figure 2a)
. Tighten chair strap for
security.
Pass rear chair strap around back of
chair and secure buckle
(Figure 2b)
.
Tighten chair strap for security.
2b
2
Correas de la silla
D
:
Pase la correa inferior de la silla
completamente debajo de la base de la
misma y ajuste la hebilla
(Figura 2a)
. Ajuste
la correa de la silla por seguridad.
Pase la correa trasera de la silla alrededor
del respaldo de la misma y ajuste la hebilla
(Figura 2b)
. Ajuste la correa de la silla por
seguridad.
WARNING:
•
ALWAYS
use both sets of chair straps
to completely secure booster to the
chair.
• If chair is cushioned and cushion
cannot be removed,
BE CERTAIN
that
the bottom chair strap is fastened
snugly after putting child in seat.
• Make sure all pieces are assembled
correctly. Test for proper assembly
before placing child in seat.
•
ALWAYS
ensure that all chair protector
pads are located completely on the
adult chair surface.
AVISO:
•
SIEMPRE
use ambas correas de la silla para
asegurar completamente el asiento elevador a
la silla.
• Si la silla es acojinada y el cojín no puede
quitarse,
ASEGÚRESE
de que la correa inferior
de la silla esté ajustada firmemente luego de
colocar al niño en la silla.
• Asegúrese de que todas las piezas estén
armadas correctamente. Antes de sentar al
niño, controle el armado de la silla.
•
SIEMPRE
asegúrese de que las almohadillas
protectoras del asiento estén bien ubicadas
sobre la superficie de las sillas para adultos.
To Use
Cómo utilizar
•
ALWAYS
remove child before adjusting booster seat.
CAUTION:
•
SIEMPRE
retire al niño antes de ajustar el asiento elevador.
PRECAUCIÓN:
1
Height Adjustment
A
C
:
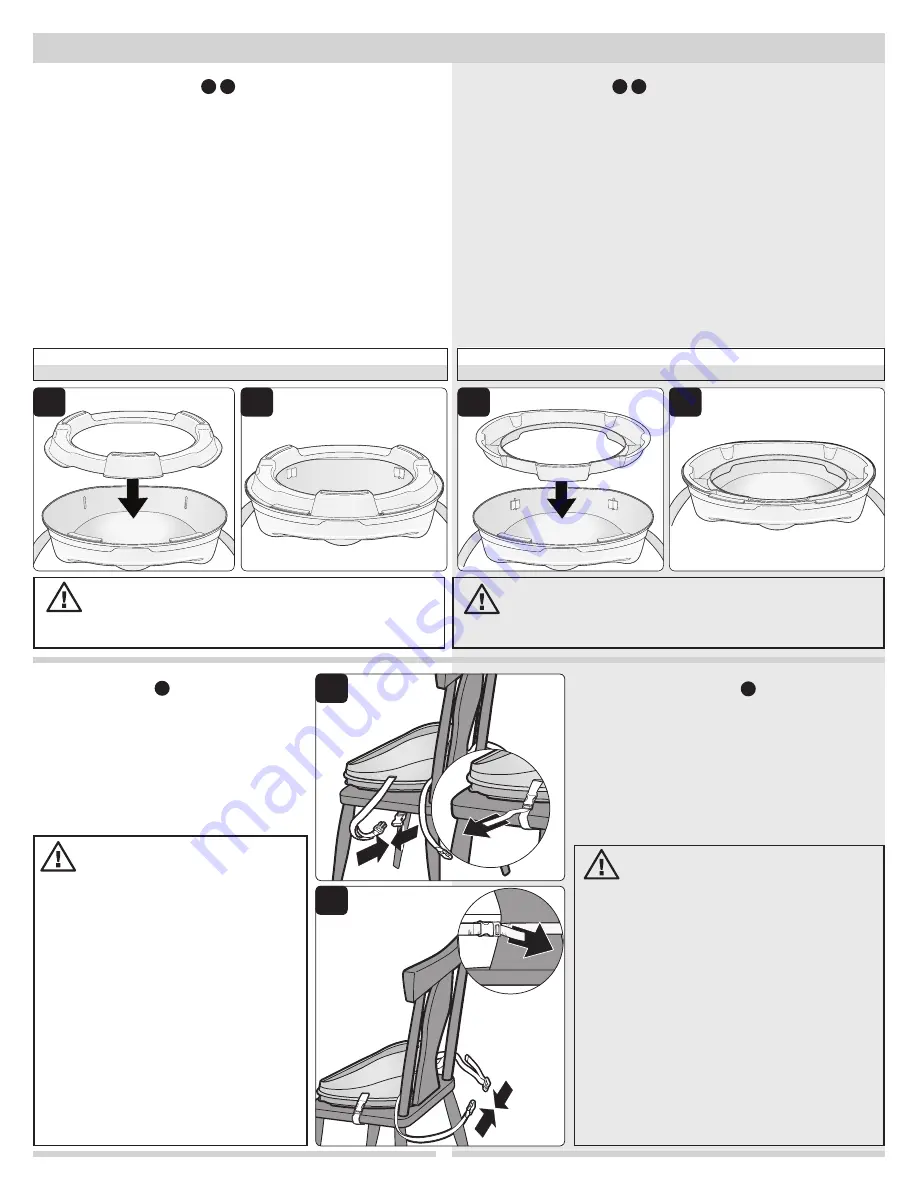
Depending on the distance from the chair to the table and the
height of the child, the height adjust ring may or may not be
needed.
To use added height:
Turn seat upside down. Flip height adjust ring so that the
protector pads face upward. Line up the front of the ring (side
with one protector pad) with the front of the seat
(Figure 1a)
.
Insert the ring into the seat until it clicks and locks in place
(Figure 1b)
.
To use without added height:
Turn seat upside down. Flip height adjust ring so that the
protector pads face downward. Line up the front of the
ring (side with one protector pad) with the front of the seat
(Figure 1c)
. Insert the ring into the seat until it clicks and locks
in place
(Figure 1d)
.
Turn seat assembly over to ensure ring is locked in place.
1
Ajuste de altura
A
C
:
Dependiendo de la distancia de la silla a la mesa y de la altura
del niño, será o no necesario usar el anillo de ajuste de altura.
Para usar con altura adicional:
De vuelta el asiento. De vuelta el anillo de ajuste de altura de
manera que las almohadillas de protección queden hacia arriba.
Alinee el frente del anillo (tiene una almohadilla protectora)
con el frente del asiento
(Figura 1a)
. Encaje a presión el anillo
en el asiento hasta escuchar un clic
(Figura 1b)
.
Para usar sin altura adicional:
De vuelta el asiento. De vuelta el anillo de ajuste de altura de
manera que las almohadillas de protección queden hacia abajo.
Alinee el frente del anillo (tiene una almohadilla protectora)
con el frente del asiento
(Figura 1c)
. Encaje a presión el anillo
en el asiento hasta escuchar un clic
(Figura 1d)
.
De vuelta el asiento entero para comprobar que el anillo haya
quedado asegurado en el lugar correspondiente.
1a
1b
1d
1c
WITH HEIGHT ADJUST
CON AJUSTE DE ALTURA
WITHOUT HEIGHT ADJUST
SIN AJUSTE DE ALTURA


