Safety 1st alpha omega elite Owner'S Manual Download Page 27

50

51

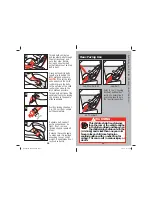
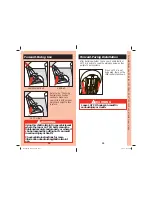
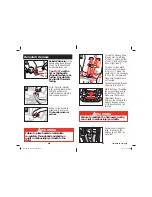
From the back, use a 

screwdriver to press in on 

lip of upper harness guides 

and pop guides through 

the front. Pull cover off 

headrest.
Clean with warm sudsy 

water, rinse clean and air 

dry.  Do not use bleach or 

use other harsh cleaners.

Pull pad off the top of seat 

and off of headrest.  

3

4

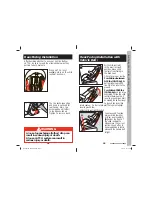
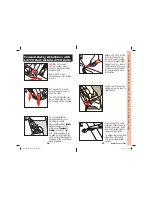
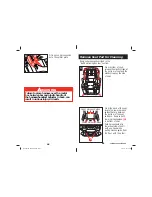
Replace seat pad by reversing order; put pad on headrest 

and replace upper harness guides.  Starting from bottom 

of child restraint, slip pad on shell; tuck in pad around 

harness adjuster and over upper belt guides.  Make sure 

pad is under headrest and replace lower harness guides.  

Rethread harness (see belt-positioning booster section).
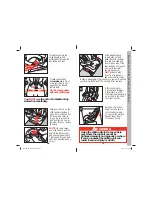
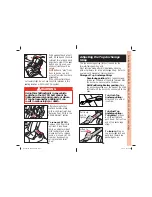
1.

 If your child restraint is not held securely by the 

belt: 
Press down firmly on the child restraint and remove all the 

slack in the belt. Make sure the belt buckle is not up against 

the child restraint where the belt cannot be tightened. 

Review Locking Clip section and Top Anchorage Strap 

Section.  If you cannot secure the child restraint tightly, 

move it to another seating location.

2. 

If the child restraint buckle or harness adjustment 

lever sticks or you cannot get the straps tight 

enough around child:  
DO NOT LUBRICATE. Check around lever and retractor 

for dropped food, sticky spilled drinks, dirt, leaves, etc. 

Clean with warm water and/or remove object with tweezers. 

If you cannot get the harness to adjust and remain tight with 

the buckle securely locked, do not use the child restraint.
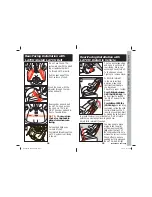
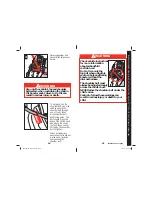
3.

 If your harness twists or ropes: Straighten the 

harness each time you put your child in the seat to help 

prevent twisting.  Lock the buckle and tighten harness and it 

will be ready for next use.
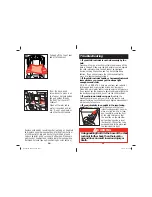
4.

 If your infant sits too upright in the rear-facing 

position: If your vehicle seat slopes so much that your 

infant is sitting upright, you may 

place a rolled towel(s) or foam 

pool noodle(s) under the front 

of the child restraint so that 

the level line on the shoulder 

belt positioning guide is level 

(horizontal). Check often to be 

sure padding is still in place and 

the vehicle belt is tight.

WARNING

Using padding that tilts the base of the child 

restraint farther back than the level-to-

ground line can result in serious injury or 

death.

 Troubleshooting

!

LEVEL

TO GROUND

4358-5834A  40lb Elite.indd   53-54

4358-5834A  40lb Elite.indd   53-54

6/5/14   10:18 AM

6/5/14   10:18 AM

Summary of Contents for alpha omega elite

Page 1: ...1 50 X ____ ____________ Locking Clip 2 50 X ____ ____________ Tether Kit 9 99 X ____ ____________ Latch Kit 24 99 X ____ ____________ Instructions 0 00 X ____ ____________ Merchandise Total _________...

Page 2: ...6 7 Child Restraint Parts 8 9 Choosing Restraint and Position 10 Preparing the Child Restraint to Fit Your Child 11 Check Harness Headrest Height 12 13 Securing Your Child in the Child Restraint 14 1...

Page 3: ...tructions which are most critical for your child s safety we use this symbol 2 WARNING The vehicle or LATCH belt must stay tight at the belt path When you switch from one mode to the next review the s...

Page 4: ...s Vehicle Safety Hotline at 1 888 327 4236 TTY 1 800 424 9153 or go to http www NHTSA gov This restraint is certified for aircraft use only when used with the internal harness Do not use as a belt po...

Page 5: ...features Understanding Your Vehicle A B C E 7 D A Anchor Bracket For Top Anchorage Strap Forward Facing Only B LATCH Anchors In seat bight C Seat Buckles D Airbag Consult your vehicle owner s manual f...

Page 6: ...ning the child in this boost er seat DO NOT USE with lap belt only WARN ING DEAT H or SERIO US INJUR Y can occur Belt Posit ionin g Boos ter Use only with childre n who weigh betwe en 40 10 0 pound s...

Page 7: ...bs 10 1 18 kg 34 43 in 85 1 110 cm and at least 1 year old Forward Facing using 5 point harness Child and child restraint face the front of the vehicle and are placed in the back seat 11 10 Preparing...

Page 8: ...t does not cover your infant s face in any way Remove the insert for older babies and toddlers To remove the insert unthread the harness from splitter plate remove harness guides see belt positioning...

Page 9: ...ine without sagging It does not press on the child s flesh or push the child s body into an unnatural position WARNING Failure to fasten and tighten the harness system correctly and snugly can result...

Page 10: ...eat must be in the upright position 17 Removing Your Child From the Child Restraint Press on release button and pull apart 2 1 Push down on harness release lever while pulling up on harness straps abo...

Page 11: ...n the lap belt let it return part way then pull on it again If it moves freely it is an ELR belt and the child restraint could work loose during normal driving Refer to your vehicle owner s manual ELR...

Page 12: ...l to Ground Line Most Upright Level to Ground Line Recline range is between the 2 level to ground lines Review instruction manual Use only the vehicle s lap and shoulder belt system when restraini ng...

Page 13: ...plate and unbuckle NOTE If the latch plate ends up behind the child restraint grasp the belts to the outside of the child restraint as close to the latch plate as possible 4 Thread both portions of t...

Page 14: ...Ground Line Recline range is between the 2 level to ground lines Review instruction manual 4360 xx xx WARN ING DEAT H or SERIO US INJUR Y can occu r s 5SE ONLY WITH CHILDREN WHO WEIGH BETWEE N POUNDS...

Page 15: ...ed by pulling on it can result in serious injury or death Recheck the recline angle to make sure it is reclined according to your child s weight Repeat steps if not reclined correctly After checking f...

Page 16: ...AND can sit up unassisted Most Reclined Level to Ground Line Most Upright Level to Ground Line Recline range is between the 2 level to ground lines Review instruction manual 4360 xx xx WARN ING DEAT...

Page 17: ...aint section 6 Using this child restraint in any vehicle seat where the LATCH belt cannot be tightened securely and properly or where it can be loosened by pulling on it can result in serious injury o...

Page 18: ...s for more information about airbag child restraint use Refer to the Choosing Restraint and Position section to make sure your child is at the proper weight and height to face forward 33 32 After deci...

Page 19: ...anchorage strap information See Adjusting Top Anchorage Strap section 3 35 34 NOTE If your vehicle does not have an anchor bracket attach the top anchorage hook tether to the base as shown Tighten to...

Page 20: ...ward facing in the back seat The recline position is to be used only to install the child restraint flush against the back of the vehicle seat back if needed 3 37 36 5 Push down firmly while pulling u...

Page 21: ...checking for hot seat and buckles place child in child restraint See Securing Your Child in the Child Restraint section 8 39 38 The top anchorage strap tether is used for the forward facing position o...

Page 22: ...least 4 years old you must remove the harness and use this seat as a belt positioning booster Loose LATCH hooks can result in injury or death 40 Removal of Harness From the back of the seat unfasten h...

Page 23: ...tes into buckle for future use 6 Belt Positioning Booster Installation 3 Place booster seat against the back of the vehicle seat in the upright most position Have child sit in seat with his back and b...

Page 24: ...and across the chest not the face or neck Pull up on the shoulder belt to tighten Check periodically to ensure your child has not moved out of position and loosened the shoulder belt 5 continued on ne...

Page 25: ...Pull harness through the back Make sure the harness goes OVER the metal bar Thread the harness down through slot on left side of shell 1 across bottom of seat 2 and up through slot on right side 3 Th...

Page 26: ...back of the seat locate the lower harness guides that are between the bottom of the seat and base Remove both lower harness guides A in bottom of seat Push harness guide lip toward outside of shell wi...

Page 27: ...e or harness adjustment lever sticks or you cannot get the straps tight enough around child DO NOT LUBRICATE Check around lever and retractor for dropped food sticky spilled drinks dirt leaves etc Cle...

Page 28: ...ons as to how long an implied warranty lasts or the exclusion or limitation of incidental or consequential damages so the above limitations may not apply to you This warranty gives you specific legal...

Reviews: