background image

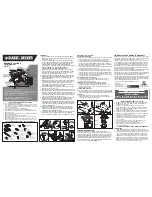
HOW TO ADJUST HINGES

A

A

B

C

To adjust the ver�cal height.

Loosen the four screws “A” on both hinges. Two of

them are usually in slo�ed holes which allows you to

adjust up or down by few mm. Then �ghten back up.

To adjust depth.

Loosen screw “B” and adjust door, if the door can not

be adjusted, please loosen screw “C”, then try again.

Tighten screw “B” and “C”.

To adjust side ways.

Turning the screw “C” on BOTH hinges

on each door.

Summary of Contents for Ophelia MED9615

Page 1: ...bber bases on items can discolor wood Wipe up spills immediately and avoid common hazards such as hot dishes harsh solvents and abrasives Cleaning should be done with a so lint free co on cloth dampen...

Page 2: ...W1x8 6 x 35 mm HW7x40 HW2x8 15 mm HW3x8 HW4x16 HW5x8 HW8x2 HW9x2 HW10x14 HW11x14 HW6x2 HW12x10 M 7 x 50 mm L 4 M 3 5 x 15 5 mm M 4 5 x 12 5 mm M 4 x 25 mm 8 x 30 mm HW HS26Ax4 HW US90x1 HW13x4 M 6 x 1...

Page 3: ...o om Board Side Board Le Side Board Right Door Le Door Right Center Board Le B C D E F G 1 of 1 1 Center Board Right H 1 of 1 1 Adjustable Shelf I 1 of 1 2 Back Board 1 J 1 of 1 1 Back Board 2 K 1 of...

Page 4: ...4 into Side Board Le C Side Board Right D Center Board Le G and Center Right H STEP2 A ach Side Board Le C Side Board Right D Center Boards G H into Top Board A Insert Camlock HW2 then ghten using scr...

Page 5: ...6 Insert Leg LC15A2 into Moun ng Plate ghten by rota ng the leg clockwise STEP7 insert Shelf Pin HW13 into the between Center boards on the desired level Then place the Adjustable Shelf I onto the She...

Page 6: ...Handle HW8 and Screw M4x25 mm HW9 into Doors STEP10 Use Wedge HW11 Screw M 3 5 x15 5 HW10 to ghten the back of media stand by using screwdriver Please align the top board and bo om board in 90O posi...

Page 7: ...ws AA3 are designed for fixi Grids Surface AA1 AA4 1 5 TIPPING RESTRAINTS KIT INSTALLATION GUIDANCE AA1 x 2 AA2 x 4 AA3 x 4 AA4 x 4 Different wall materials require unique wall fasteners The wall plug...

Page 8: ...them are usually in slo ed holes which allows you to adjust up or down by few mm Then ghten back up To adjust depth Loosen screw B and adjust door if the door can not be adjusted please loosen screw C...

Reviews: