SAFARI Montage G3011 Installation And Setup Manual Download Page 6

        G3013 

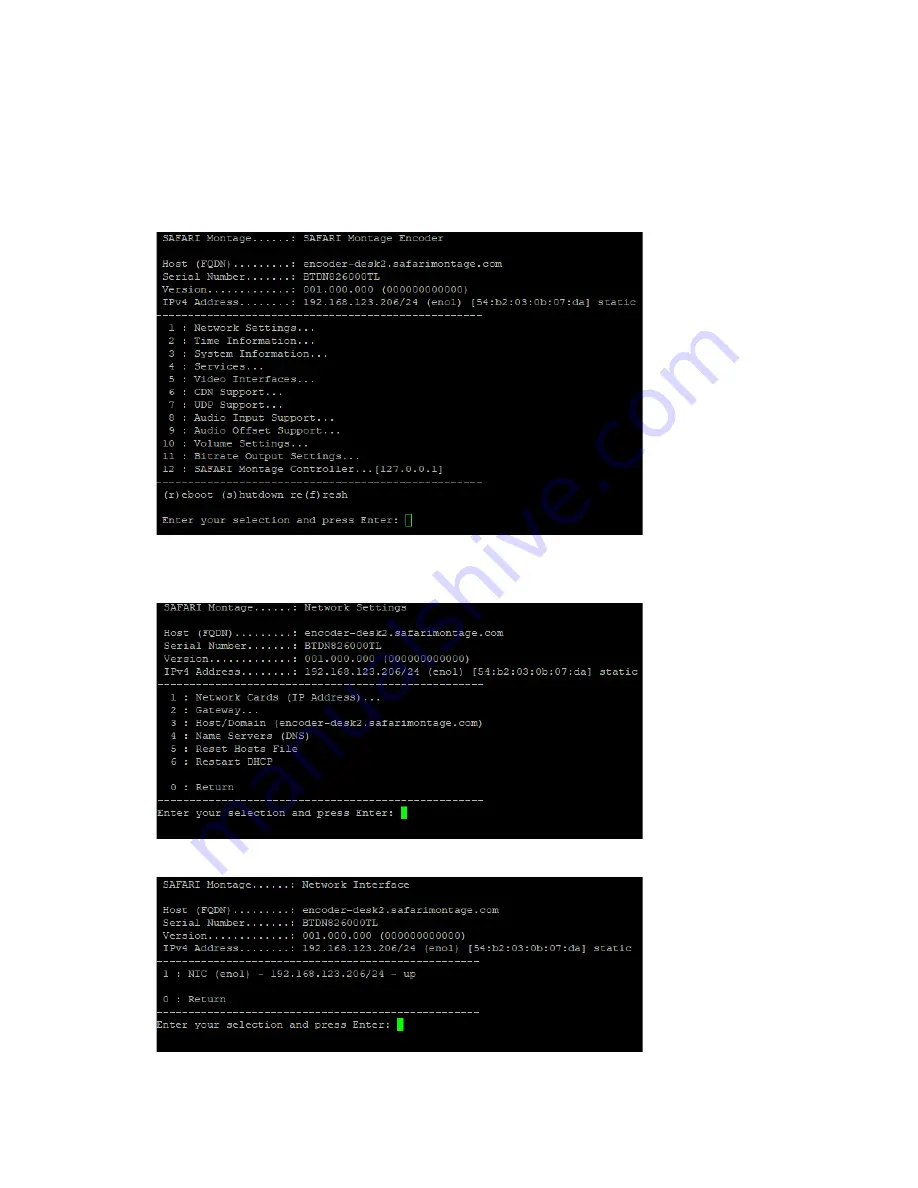
Initial Network Configuration: 

1.  Connect a monitor and keyboard to the encoder. 

2.  Connect the encoder to the network. 

3.  Power the encoder via the supplied power adapter or cord. 

4.  Configure the network settings as required to conform to the local network addressing scheme. 

a.  The console menu will display when the encoder’s boot process completes. 


b.  Press 1 and enter to go to the 

Network Settings…


c.  Press 1 and enter again to go to 

Network Cards (IP Address)…


d.  Press 1 and enter to go to 

NIC (eno1)


e.  Press 1 and enter to 

Disable DHCP and Assign Static IP


Summary of Contents for G3011

Page 1: ...SAFARI MONTAGE G3011 BROADCAST ENCODER INSTALLATION AND SETUP GUIDE ...

Page 2: ...supplied with the appropriately rated power cord The use of any other power cord could cause damage and invalidate the manufacturer s warranty DO NOT connect the power cord to the device if the power cord is damaged DO NOT cut the power cord DO NOT plug the power cord into an AC outlet until all cables and connections to the device have been properly connected The device should be installed in an ...

Page 3: ...classrooms directly When paired with this encoder SAFARI Montage IPTV Live Media Streaming solutions will dynamically select the optimal streaming format through client auto detection delivering UDP multicast or HLS ABR unicast streams Unpacking and Inspection Ensure that all items are removed and inspected prior to discarding any packing material Thoroughly inspect the unit and all contents to ma...

Page 4: ...TMP 720p Bitrates Variable Audio Encoding AAC 128 kbps Audio Input HDMI Digital 3 5 mm Analog with optional USB adapter Network 10 100 1000 Base T Ethernet Dimensions 4 5 W x 4 6 D x 2 1 H Warranty 3 Years Environmental 0 C to 40 C Weight 1 6 lbs Included 6 RJ45 Cat 5e Patch Cable 6 HDMI Cable CDN Streaming Centralized Management Requirements IPTV Maintenance or IPTV Streaming Software Upgrade Pla...

Page 5: ...t meet the System Requirements found at http www safarimontage com support releases sm 7 5 x aspx system Before You Begin Make all connections before powering the encoder Note that all Encoders ship with a default o Static IP address 191 53 51 216 o Gateway 191 53 51 1 o Netmask 255 255 0 0 SAFARI Montage strongly recommends that video sources be connected directly to the Encoder with the supplied...

Page 6: ...ord 4 Configure the network settings as required to conform to the local network addressing scheme a The console menu will display when the encoder s boot process completes b Press 1 and enter to go to the Network Settings c Press 1 and enter again to go to Network Cards IP Address d Press 1 and enter to go to NIC eno1 e Press 1 and enter to Disable DHCP and Assign Static IP ...

Page 7: ...the subnet in CIDR notation and press enter h Enter the Gateway IP address and press enter i Enter DNS server s leaving a space between each address j The information will be saved and applied to the unit k The static IP will be reflected in the menu when it reloads ...

Page 8: ...ing 1 Login to SAFARI Montage as an administrator 2 Navigate to Admin Selective Video Streaming Video Streaming 3 Click on the New Stream link 4 Select a school enter a descriptive name and enter the streaming URL in one of the following formats Example SVS Supported URLs Description URL ABR Stream http x x x x 0 master m3u8 576P HLS Stream http x x x x 0 vs0 manifest m3u8 720P HLS Stream http x x...

Page 9: ...wser Use the following example URLs to view the streams within a browser Example Direct playback URLs Description URL ABR Stream http x x x x 576P HLS Stream http x x x x 0 576 html 720P HLS Stream http x x x x 0 720 html 1080P HLS Stream http x x x x 0 1080 html Replace x x x x with the IP address of the encoder Connecting to a CDN Connecting a Stream to a CDN can be done through the console menu...

Page 10: ...g a multicast UDP stream can be done through the console menu 1 From the main menu press 7 and enter to go to UDP Support 2 Press 1 and enter to Add UDP Support to HDMI Input 0 3 Enter a valid multicast address udp 239 0 0 1 udp 239 255 255 254 NOTE it is recommended that the last 3 octets of the multicast address match the encoder s IP address 4 Enter a valid multicast port number e g 1234 5 The ...

Reviews: