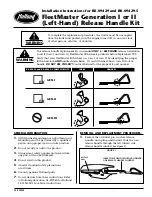
REMOVAL AND REPLACEMENT PROCEDURES:
1.
Remove the old cotter pin, washer, release
handle, and spring and discard. Slide the new
release handle through the left (driver) side
release handle window (
see Figure 1
).
XL-FW345
Installation Instructions for RK-09429 and RK-09429-5
FleetMaster Generation I or II
(Left-Hand) Release Handle Kit
To complete the replacement procedures, the tractor must be uncoupled
from the trailer and parked, with the engine turned off, in an area clear
of other persons, vehicles, or obstacles.
INSERT NEW HANDLE THROUGH DRIVER
SIDE RELEASE HANDLE WINDOW
RELEASE
ARM
FIGURE 1
GENERAL INFORMATION:
1.
All fifth wheel maintenance, adjustment and
rebuilding must be performed by a qualified
person using proper tools and safe practices.
2.
Do not modify or add to the product.
3.
Always wear safety goggles and never strike
any part with a steel hammer.
4.
Do not weld on this product.
5.
Observe standard safety precautions
at all times.
6.
Use only genuine Holland parts.
7.
Do not deviate from these instructions. Refer
to Holland publication XL-FW340 for Holland
TF-TLN-5001 Lock Tester instructions.
WARNING
WARNING
This release handle replacement kit is intended
ONLY
for
LEFT-HAND
release Generation
I and II (Gen. I and Gen. II) FleetMaster fifth wheels produced before September 1999.
Verify that your FleetMaster fifth wheel is a Gen. I or Gen. II by identifying the proper
fifth wheel lock
AND
handle shown below. If your fifth wheel has a Gen. III lock or
handle,
DO NOT USE THIS KIT!
Contact Holland for the proper kit part number.
✔
✔
GEN. I
LOCKS
RK-09429 and RK-09429-5 COMPATIBILITY
HANDLES
GEN. II
GEN. III
2
OK
OK


