background image


16 


5) De achterwand / hitteschild weer terug monteren 


                                                         Afbeelding 4.8 Rugwand monteren 


Verbrandingslucht 
 

Voor een optimale verbranding moet er voldoende verse lucht voorzien worden. De nodige zuurstof 
wordt aangevoerd via de opening aan de rugzijde en dit bij voorkeur van buiten de woning. 
TIP : Hou rekening met andere haarden of luchtafvoerinstallaties in dezelfde ruimte of met dezelfde 
verbrandingsluchtverbinding. Deze kunnen een storend effect hebben op de werking van de kachel. 
Indien  er  15  minuten  na  het  ontsteken  nog  steeds  terugslag  is  van  de  rookgassen  door  de 
weersomstandigheden (mist, sto

rm,…

) dient men het aansteken te stoppen tot er weersverbetering 

is. 
 
OPGELET ! Er mag in geen enkel geval lucht genomen worden in lokalen of kelders waar vluchtige of 
brandbare stoffen aanwezig zijn. 

 
Klassieke systeem 
 

Wanneer de lucht voor de verbranding uit de ruimte wordt aangevoerd waarin de kachel staat 
opgesteld, dan moet deze voldoende geventileerd worden. Indien er onvoldoende luchttoevoer is, 
dan kan dit resulteren in een onvolledige verbranding en terugslag van rookgassen. Extra lucht kan 
aangevoerd worden door vlakbij de kachel een ventilatorrooster te plaatsen naar buiten ( min. 100 
cm² )  


Summary of Contents for Peak

Page 1: ...SAEY PEAK PEAK S HOUT BOIS WOOD NL Installatie en gebruiksaanwijzing FR Notice d installation et d utilisation EN Installation and user manual ...

Page 2: ...2 ...

Page 3: ...3 ...

Page 4: ...4 ...

Page 5: ...5 ...

Page 6: ...DUCTION 27 2 EMBALLAGE ET CONTENU 27 3 CARACTÉRISTIQUES TECHNIQUE 28 4 INFORMATIONS GÉNÉRALES ET CONSIGNES DE SÉCURITÉ 30 5 CONSIGNES D INSTALLATION 32 6 CONSIGNES D UTILISATION ET RECOMMANDATIONS 38 7 ENTRETIEN 42 8 PANNES CAUSES ET SOLUTIONS 43 9 VUE ÉCLATÉE ET PIÈCES DÉTACHÉES 44 10 GARANTIE 46 11 NUMÉRO DE SÉRIE 46 ENGLISH 1 INTRODUCTION 47 2 PACKAGING AND DELIVERY CONTENT 47 3 TECHNICAL INFOR...

Page 7: ... kachel en dus jarenlang stookplezier Door uw kachel te registreren kan u bovendien rekenen op een feilloze dienst na verkoop en garantieafhandeling en kunnen wij u op de hoogte houden van eventuele nieuwsjes over uw toestel We zijn dan ook overtuigd dat u vele gezellige dagen tegemoet gaat en wensen u veel succes 2 VERPAKKING EN LEVEROMVANG Wij besteden de grootste zorg om uw nieuwe kachel in de ...

Page 8: ...tuur C 233 Schouwtrek bij nominaal vermogen g s 7 5 Schouwtrek limieten Pa 12 20 Toevoer verse lucht m h 28 Brandstof Brandstof Brandhout en houtbriketten Max capaciteit brandhout kg 1 6 Verbruik bij nominaal vermogen kg h 2 1 Max capaciteit houtbriketten kg 1 5 Verbruik bij nominaal vermogen kg h 1 9 Afmetingen Max lengte houtblokken cm 33 Bovenaansluiting Achteraansluiting ...

Page 9: ...chouwtrek bij nominaal vermogen g s 8 8 Schouwtrek limieten Pa 12 20 Toevoer verse lucht m h 32 Brandstof Brandstof Brandhout en houtbriketten Max capaciteit brandhout Kg 2 3 Verbruik bij nominaal vermogen Kg h 2 6 Max capaciteit houtbriketten Kg 2 1 Verbruik bij nominaal vermogen Kg h 2 3 Afmetingen Max lengte houtblokken Cm 50 Bovenaansluiting Achteraansluiting ...

Page 10: ...plosieve materialen in dezelfde of naburige ruimten gebruiken Dit toestel is geen allesbrander Gebruik enkel de geschikte brandstoffen Er mogen geen wijzigingen aan het toestel worden aangebracht Gebruik enkel de originele wisselstukken van de fabrikant Deze kachel is niet geschikt om te installeren op een rookkanaal waarop meerdere kachels zijn aangesloten De Saey Peak en Peak S zijn enkel geschi...

Page 11: ... weersomstandigheden sterke wind nevel storm kan dit tot slecht functioneren van uw schoorsteen leiden Dit onderdeel is bij de inwerkingstelling van uw toestel zeker noodzakelijk Bij lange inactiviteit van uw kachel kunnen er in uw schoorsteen afvoerkanaal of andere leidingen verstoppingen voorkomen Let erop dit regelmatig na te kijken Jaarlijkse reiniging van uw rookkanaal is wettelijk verplicht ...

Page 12: ...gesloten wordt moet gecontroleerd worden of de afmetingen en de kwaliteit van de schoorsteen beantwoorden aan de lokaal geldende voorschriften De afmetingen moeten desgevallend berekend worden De kachel kan direct op de schoorsteen aangesloten worden De diameter van de afvoerbuis moet overeenkomen met de diameter van het verbindingspijpstuk aan de kachel Wij kunnen u een goede werking van het toes...

Page 13: ...rdoor wordt de opwaartse druk van de rookgassen verhinderd De schoorsteen mag geen valse lucht aanvoeren Let op gesloten schoorsteenschuiven en reinigingsopeningen in de kelder of op het dak De afvoerbuis moet veilig op het verbindingspijpstuk bevestigd zijn De veiligheidsafstanden tot brandbare voorwerpen moeten gerespecteerd worden Montage van het aansluitstuk bij achteraansluiting 1 Achterwand ...

Page 14: ...wand hitteschild opnieuw monteren Afbeelding 4 3 Achterwand opnieuw monteren Montage van het aansluitstuk bij bovenaansluiting 1 Achterwand hitteschild demonteren 2 kruisschroeven M6 x 8 mm Afbeelding 4 4 Achterwand demonteren ...

Page 15: ...monteren 3 Het afdekplaatje uit de vorige stap monteren aan de rugzijde en deze met behulp van de zeskantschroeven en rondellen terug vastmaken Afbeelding 4 6 Afdekplaatje monteren aan de rugzijde 4 Vervolgens het aansluitstuk op de rugzijde vastschroeven met 2x zeskantschroef M6 x 20 2x zeskantmoer M6 4 x rondel U18 SW 10 mm Afbeelding 4 7 aansluitstuk op de bovenplaat monteren ...

Page 16: ...minuten na het ontsteken nog steeds terugslag is van de rookgassen door de weersomstandigheden mist storm dient men het aansteken te stoppen tot er weersverbetering is OPGELET Er mag in geen enkel geval lucht genomen worden in lokalen of kelders waar vluchtige of brandbare stoffen aanwezig zijn Klassieke systeem Wanneer de lucht voor de verbranding uit de ruimte wordt aangevoerd waarin de kachel s...

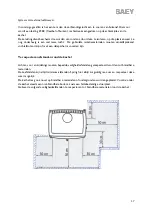
Page 17: ...vanzelfsprekend vochtafstotend zijn of met een dampscherm voorzien zijn Te respecteren afstanden rond de kachel Achter voor en zijdelings moeten bepaalde veiligheidsafstanden gerespecteerd worden tot brandbare materialen Deze afstanden zijn altijd minimum afstanden Spring hier altijd zorgvuldig mee om en respecteer deze waar mogelijk De kachel mag ook nooit op brandbare materialen of ondergronden ...

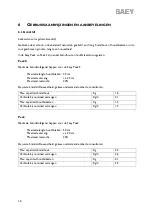
Page 18: ...vang ca 23 cm Maximaal restvocht 20 De juiste brandstofhoeveelheid gelieve onderstaande tabel te consulteren Max capaciteit brandhout Kg 1 6 Verbruik bij nominaal vermogen Kg h 2 1 Max capaciteit houtbriketten Kg 1 5 Verbruik bij nominaal vermogen Kg h 1 9 Peak Optimale brandstofeigenschappen voor de Saey Peak Maximale lengte houtblokken 50 cm Maximale omvang ca 30 cm Maximaal restvocht 20 De juis...

Page 19: ...grote oppervlakten kunnen effectief en zuiver branden Kleinere compactere blokken daarentegen branden slecht en langzaam De temperaturen die hierbij trouwens ontstaan zijn nauwelijks voldoende om een mooie verbranding te verzorgen met lage emissie uitstoot Deze kunnen de oorzaak vormen van vuile kachelruiten Droog Hout met een maximale vochtigheid van 20 Vochtig hout brandt doorgaans slechter en h...

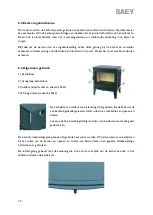
Page 20: ... aanraken 6 3 Algemeen gebruik 1 kacheldeur 2 handgreep kacheldeur 3 Vuldeur altijd rechts en enkel bij Peak 4 Sluiting vuldeur enkel bij Peak De kacheldeur en vuldeur zijn bij levering altijd gesloten Bij de Peak wordt een bedieningshendel geleverd zodat u de sloten makkelijk kan openen en sluiten Let erop dat bij inwerkingstelling de sloten van beide deuren steeds goed gesloten zijn De kachel en...

Page 21: ...slucht naar links zal staan Wanneer we hout willen bijvullen plaatsen we de verbrandingslucht weer helemaal open naar rechts U mag hout bijvullen via de vuldeur maar zorg ervoor dat er in het vlammenbeeld zo goed als geen vlammen meer zichtbaar zijn Bij het bijvullen laat u opnieuw de vuldeur een ietsje open staan tot de vlammen opnieuw voldoende opflakkeren Na een 5 tal minuten wordt de deur goed...

Page 22: ... en kunnen de platen een voor een uitgenomen worden Het is nu mogelijk de achterwand en rookafvoer te reinigen met een zachte borstel Onderaan zullen waarschijnlijk nog resten en roet voorkomen Deze kan u met een aszuiger makkelijk verwijderen Reinigen van kachelruit De Saey Peak en Peak S beschikken over een zelfreinigend systeem waarbij vervuiling van de kachelruit zo lang mogelijk uitgesteld wo...

Page 23: ...genoeg Alleen geschikt hout gebruiken Te veel hout Niet meer dan 2 3 stukken max bijvullen Te weinig verbrandingslucht Diameter circulatie controleren Extra leiding met verbrandingslucht voorzien Ventilatiesystemen van de woning uitzetten Rookontwikkeling bij eerste gebruik Uitdrogen van de gebruikte grondverf Verdwijnt na een tijdje Is ongevaarlijk Condensvorming Hoog temperatuurverschil Deur in ...

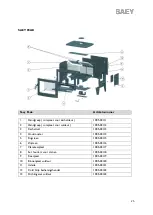
Page 24: ...nstallateur SAEY PEAK S Saey Peak S Artikelnummer 1 Handgreep compleet voor kacheldeur 1005 04111 2 Kachelruit 1005 04260 3 Houtrooster 1005 04261 4 Rugsteen zijkant 1005 04262 5 Rugsteen midden 1005 04263 6 Zijsteen 1005 04264 7 Vlamkeerplaat 1005 04265 8 Set houders voor stenen 1005 04118 9 Keerplaat 1005 04266 10 Aslade 1005 04267 11 Dichtingsset vuldeur 1005 04123 ...

Page 25: ...1005 04112 3 Kachelruit 1005 04113 4 Houtrooster 1005 04114 5 Rugsteen 1005 04115 6 Zijsteen 1005 04116 7 Vlamkeerplaat 1005 04117 8 Set houders voor stenen 1005 04118 9 Keerplaat 1005 04119 10 Binnenplaat vuldeur 1005 04120 11 Aslade 1005 04121 12 Cold Grip bedieningshendel 1005 04122 13 Dichtingsset vuldeur 1005 04123 ...

Page 26: ...s uw garantiebewijs Deze garantie beperkt zich tot de herstelling of vervanging van de onderdelen die gebreken vertonen bij normaal gebruik Deze garantie is niet geldig op gebreken die het gevolg zijn van een foutieve installatie verkeerd gebruik wijzigingen aan het toestel uit elkaar halen van het toestel slijtage of een gebrek aan onderhoud De garantieaanvragen dienen steeds via uw verkooppunt t...

Page 27: ...nt parfait de votre poêle et donc le plaisir de chauffer durant des années En enregistrant votre poêle vous pouvez compter sur une garantie et un service après vente impeccable Nous pourrons aussi vous ternir informé d éventuelles nouveautés sur votre appareil Nous sommes convaincus que vous allez profiter de votre nouveau poêle Saey et de pouvoir partager ensemble des moments privilégiés auprès d...

Page 28: ...0 Température fumées C 233 Tirage cheminée à puissance nominal g s 7 5 Limites tirage cheminée Pa 12 20 Arrivé air m h 28 Carburant Carburant Bûches ou briquette de bois Capacité max bûches Kg 1 6 Consommation à puissance nominal Kg h 2 1 Capacité max briquettes de bois Kg 1 5 Consommation à puissance nominal Kg h 1 9 Mesures Longueur max bûches Cm 33 Sortie dessus Sortie arrière ...

Page 29: ...mées C 267 Tirage cheminée à puissance nominal g s 8 8 Limites tirage cheminée Pa 12 20 Arrivé air m h 32 Carburant Carburant Bûches ou briquette de bois Capacité max bûches Kg 2 3 Consommation à puissance nominal Kg h 2 6 Capacité max briquettes de bois Kg 2 1 Consommation à puissance nominal Kg h 2 3 Mesures Longueur max bûches Cm 50 Sortie dessus Sortie arrière ...

Page 30: ...s d origine du fabricant Ce poêle ne peut être raccordé à un conduit de fumées auquel sont raccordés plusieurs poêles Le Saey Peak et Peak S sont uniquement approprié à brûler des bûches et briquettes de bois et seulement pour fonctionnement portes fermée 4 1 Risque d incendie Le poêle à bois Saey Peak Peak S peut être extrêmement chaud en particulier à la porte les vitres le haut et le conduit de...

Page 31: ...de longues périodes d inactivité de l appareil des obstructions peuvent se produire dans votre cheminée conduit de fumées ou autre N oubliez pas de contrôler régulièrement Un ramonage de votre cheminée par un professionnel est indispensable chaque année 4 7 Procédures en cas de feu de cheminée Nous recommandons de prendre les mesures suivantes en cas de feu de cheminée Fermez l arrivée d air Avert...

Page 32: ... capacité de charge Pour installer l appareil droit celui ci est équipé de pieds réglables vis de réglage Ajustez si nécessaire pour permettre à l appareil d être installé le plus droit possible Ceux ci peuvent être réglés avec une clé plate La cheminée Avant que le poêle soit raccordé à la cheminée on doit vérifier si les dimensions et qualités sont conformes aux réglementations locales Les mesur...

Page 33: ...heminée Si le tirage est trop élevé un régulateur doit être installé Le tuyau du poêle ne peut pas être plus grand que le diamètre de la cheminée cela empêchera la poussée verticale des fumées La cheminée ne peut avoir d amenée d une fausse prise d air Faites attention que la trappe d inspection dans la cave ou sur le toit est fermée Le conduit d évacuation doit bien être connecté sur la partie de...

Page 34: ...e 4 2 viser la pièce de raccordement à l arrière 4 Montez par la suite le panneau arrière bouclier thermique Figure 4 3 A nouveau monter le panneau arrière Montage de la pièce de raccordement pour sortie dessus 1 Démontez le panneau arrière bouclier thermique 2 vis cruciformes M6 x 8 mm Figure 4 4 démonter le panneau arrière ...

Page 35: ...ou sur le dessus 3 Le bouche trou de l étape précédente montez celle ci à l aide des vis à tête hexagonal et rondelle Figure 4 6 Monter le bouche trou à l arrière 4 visez par la suite la pièce de raccordement à l arrière avec 2x vis à tête hexagonal M6 x 20 2x hex M6 4x rondelles U18 SW 10 mm Figure 4 7 monter la pièce de raccordement sur le dessus ...

Page 36: ...é ATTENTION Dans aucun cas il est autorisé de prendre de l air dans un local ou cave ou des substances volatiles ou inflammables sont présentes Système classique Lorsque l air pour la combustion est fourni de la même pièce ou le poêle est installé celle ci doit être suffisamment aéré Si l arrivé d air est insuffisante cela peut entraîner une combustion incomplète et une rechute des gaz de combusti...

Page 37: ...aux inflammables Ces distances sont toujours des distances minimum Prenez soin de respecter ces distances Le poêle ne peut être installé sur des matériaux ou sol inflammable Prévoyez une plaque de protection comme une plaque résistante à la chaleur Veuillez respecter les distances de sécurités envers matériaux inflammable autour du poêle ...

Page 38: ...m Humidité maximal 20 La quantité correcte de combustible veuillez consulter le tableau ci dessous Capacité max de bûches Kg 1 6 Consommation puissance nominale Kg h 2 1 Capacité max de briquettes de bois Kg 1 5 Consommation puissance nominale Kg h 1 9 Peak Caractéristiques de combustible optimal pour le Saey Peak Longueur maximal bûches 50 cm Taille maximal ca 30 cm Humidité maximal 20 La quantit...

Page 39: ...brûler efficacement Des bûches plus petites et compactes brûlent plus lentement Les températures que l on obtient de cette façon sont à peine suffisantes pour assurer une bonne combustion avec de faibles émissions Ceux ci peuvent être la cause de fenêtres sales Sec Bois avec un taux d humidité de max 20 Du bois humide brûle moins bien est très salissant pour les vitres et le conduit de cheminée En...

Page 40: ...sage général 1 porte du poêle 2 poignée de la porte 3 porte de remplissage toujours à droite Peak 4 fermeture porte de remplissage Peak La porte du poêle et la porte de remplissage sont toujours fermées à la livraison Le levier est aussi livré avec le Peak pour ainsi ouvrir et fermer plus facilement Faites attention lors du fonctionnement les serrures des deux portes soient toujours fermées Le poê...

Page 41: ...on se mets vers la gauche Quand vous remplissez de bois mettez le réglage de l air de combustion à nouveau complètement ouvert vers la droite Vous pouvez remplir de bois par la porte de remplissage mais assurez vous qu il n y a plus de grandes flammes Laissez à nouveau la porte entre ouverte quand vous remplissez le poêle jusqu à ce que les flammes reprennent suffisamment Après 5 minutes refermez ...

Page 42: ...isses M6x20 1 Vous détachez les supports de pierre Ensuite vous retirez les pierres et vous retirez les plaques une à la fois Maintenant vous pouvez nettoyer l arrière et le conduit des fumées avec une brosse douce Sur le dessous il y aura encore des restes et de la suie Celle ci est facilement retirée avec un aspirateur à cendres Nettoyage de la vitre Le Saey Peak ou Peak S dispose d un système a...

Page 43: ... est assez petit utilisez que du bois Trop de bois Ne remplir que 2 3 bûches max Trop peu d air de combustion Contrôlez le diamètre de circulation Prévoir un conduit d air de combustion supplémentaire Eteindre la ventilation de l habitation Fumées au premier usage Séchage de la peinture Disparait après un moment N est pas nocif Condensation Différence de températures trop élevée Mettez la porte en...

Page 44: ...EAK S Saey Peak S Artikelnummer 1 Poignée complet pour port poêle 1005 04111 2 Vitre 1005 04260 3 Grille à bois 1005 04261 4 Pierre de dos latéral 1005 04262 5 Pierre de dos centre 1005 04263 6 Pierre latéral 1005 04264 7 Plaque de déviation 1005 04265 8 Set supports pierres 1005 04118 9 Brise flamme 1005 04266 10 Cendrier 1005 04267 11 Set de joints porte de remplissage 1005 04123 ...

Page 45: ...tre 1005 04113 4 Grille à bois 1005 04114 5 Pierre de dos 1005 04115 6 Pierre latéral 1005 04116 7 Plaque de déviation 1005 04117 8 Set supports pierres 1005 04118 9 Brise flamme 1005 04119 10 Plaque intérieur porte de remplissage 1005 04120 11 Cendrier 1005 04121 12 Levier main froide 1005 04122 13 Set de joints porte de remplissage 1005 04123 ...

Page 46: ... pièces que s avèrent défectueuses à la suite d un usage normal Cette garantie ne s applique pas aux défaillances résultant d une mauvaise installation d un usage abusif d une modification à l appareil d un démontage de l appareil d usure ou d un manque d entretien Les demandes de garantie doivent toujours être faites via votre point de vente 11 NUMÉRO DE SÉRIE Vous trouvez le numéro de série sur ...

Page 47: ...hase An undisputable efficiency and years of cozy heating times are the responsibility of our certified partners and Unifire We re convinced that many cozy days are ahead of you and wish you the best of luck in using your stove 2 PACKAGING AND DELIVERY CONTENT We have the utmost care of delivering your new stove in the best packaging possible in order to reduce any chance of damage Thanks for chec...

Page 48: ...ncy 80 Nominal power kW 6 0 Flue gas temperature C 233 Draft at nominal consumption g s 6 7 Draft limits Pa 12 20 Fresh air supply m h 28 Fuel Fuel Wood and briquettes Max capacity wood Kg 1 6 Nominal consumption Kg h 2 1 Max load wood briquettes Kg 1 5 Nominal consumption Kg h 1 9 Dimensions Max length logs Cm 33 Top connection Rear connection ...

Page 49: ... kW 8 0 Flue gas temperature C 267 Draft at nominal consumption g s 8 2 Draft limits Pa 12 20 Fresh air supply m h 32 Fuel Fuel Wood and briquettes Max capacity wood Kg 2 3 Nominal consumption Kg h 2 6 Max load wood briquettes Kg 2 1 Nominal consumption Kg h 2 3 Dimensions Max length logs Cm 50 Top connection Rear connection ...

Page 50: ...uring company This stove is not equipped to be connected with other ones on the same conduct De Saey Peak and Peak S are solely made to burn wood and briquettes and only to work in a closed environment 4 1 Risks of fire The main parts of the Saey Peak especially the door front upper side and fume conducts can become really hot A heat resistant glove should be used for controlling the stove Pay att...

Page 51: ...onducts for clogging Check this frequently The law prescribes to clean the fume conducts on annual basis 4 7 Things to do in case of chimney fire We advise you to take the following steps in case of chimney fire Seal off the air supply Call the fire brigade When cleaning entrances are foreseen make sure they are well accessible e g basement attic Remove all inflammable objects from the chimney Bef...

Page 52: ... the outlet of the stove A proper functioning of the stove can be guaranteed with a chimney draft between 12 and 20 Pa When the chimney draft is too high a draft valve must be built within Never reduce in diameter smaller than the diameter of the stove exit diameter Consider the next steps in case of insufficient chimney draft Make the chimney longer Improve the isolation of the chimney avoids coo...

Page 53: ...m 2 Remove the small round cover in the back wall Fig 4 1 Remove the back wall 3 Screw the stove adapter on the backside with 2 hex bolts M6 x 20 2 hex bolts M6 4x clout U18 SW 10 mm Fig 4 2 Install the stove adapter on the back side 4 Re install the back wall heat shield back in position Fig 4 3 Re install the back wall ...

Page 54: ... Fig 4 4 take off the back wall 2 Remove the small round cover on the top Go through the opening at the back side and screw off the hex bolts Fig 4 5 Remove the small round cover at the top 3 Install the small cover at the back side of the stove by using the hex bolts and clouts Fig 4 6 Install the cover at the back side ...

Page 55: ...rrives from the back and in best ways out of the premises HINT Bear in mind that the presence of other stoves or venting installations in the same room s will have disruptive effect on the functioning of your stove If there are still fumes coming back from the chimney due to bad weather conditions fog storm and within 15 minutes after detonating you should stop trying to light up the fire until be...

Page 56: ... flexible or tubes with Ø 80 is connected directly on the backside of the stove This conduct should be protected from moisture by isolating it in these places where it is still subject to hot air The isolation used must of course be repulsive to fluids or at least a protective screen must be present Safety distances around the stove to be respected Around the stove safety distances to inflammable ...

Page 57: ...iameter ca 23 cm Maximum moisture 20 The right fuel quantity please consult this table Max capacity wood Kg 1 6 Efficiency at nominal power Kg h 2 1 Max capacity briquettes Kg 1 5 Efficiency at nominal power Kg h 1 9 Peak Ideal features for the Saey Peak Maximum length of logs 50 cm Maximum diameter ca 30 cm Maximum moisture 20 The right fuel quantity please consult this table Max capacity wood Kg...

Page 58: ...se for those dirty windows of your stove Dry Wood with maximum moisture of 20 Humid wood burns much worse and very impure In general dry wood can be obtained by storing it 2 3 years in a well ventilated area When burning with briquettes use them that consist of clean wood Also bear in mind that burning with pressed wood or briquettes makes them gaining more volume 6 2 First use When first using th...

Page 59: ...h the ash tray The lever makes it possible for your to determine the amount of air needed to make the combustion It works with different positions When the control is al the way to the right the air supply is completely open To the left it is closed You can also position in the middle for a half open position Also the control handle can become really hot Please use heat resistant gloves Making fir...

Page 60: ...iddle Normally a full load of wood allows you to burn for over 60 minutes as long as it meets the right quantity and burning parameters Avoid to fill your stove with too much wood as in this way you will overheat your stove and it will have a detriment effect on the life expectancy of your stove Please respect all maximum quantities as prescribed in chapter 2 of this manual Extinguish When you dec...

Page 61: ... the brick holders and remove the bricks one by one You can now clean the back side and smoke discharge with a soft brush Use a suitable brush and vacuum cleaner for ashes to remove all remaining ash residue Cleaning the window The Saey Peak and Peak S have an auto cleaning system that allows dirty windows to be postponed as long as possible Yet there are different reasons that will help the windo...

Page 62: ... Too many wood Don t refill more than 2 3 pcs max Too little combustion air Check the diameter of the air supply Install an extra air supply conduct Shut down the ventilation system of the house Signs of smoke at first use of the stove The base paint is drying out Disappears after a while Is harmless Moisture High temperature difference Open the door of the stove a little when starting to heat up ...

Page 63: ...local installer SAEY PEAK Saey Peak S Artikelnummer 1 Handle complete 1005 04111 2 Glass 1005 04260 3 Grill 1005 04261 4 Back brick side 1005 04262 5 Back brick centre 1005 04263 6 Side brick 1005 04264 7 Baffle plate 1005 04265 8 Stone holders 1005 04118 9 Baffle plate 1005 04266 10 Ash tray 1005 04267 11 Clinch filling door 1005 04123 ...

Page 64: ...5 04112 3 Glass 1005 04113 4 Grill 1005 04114 5 Back brick 1005 04115 6 Side brick 1005 04116 7 Baffle plate 1005 04117 8 Stone holders 1005 04118 9 Baffle plate 1005 04119 10 Inner plate filling door 1005 04120 11 Ash tray 1005 04121 12 Handling tool 1005 04122 13 Clinch filling door 1005 04123 ...

Page 65: ...ase will apply as your warranty certificate This warranty is restricted to the repair or replacement of those parts which present faults during normal usage This warranty will not stand for faults that result from bad installation wrong usage modifications to the appliance disassembling the appliance wear or lack of maintenance Warranty requests need to be made via your point of sale 11 SERIAL NUM...

Page 66: ... te contacteren Veuillez contacter votre installateur en cas de problèmes d entretien ou de fonctionnement Please contact your installer in case of maintenance or operation problems Industriepark De Bruwaan 17 9700 Oudenaarde Belgium www belgofire be Versie 07 2021 ...

Reviews: