Register your product and get support at
www.saeco.com/welcome
Type HD8917, HD8918
Instruction manual
Read carefully before using the
machine.
ENGLISHITALIANGERMAN
Incanto_OTC_EN-IT-DE_Rev01.indb 1
27/03/15 12:10
Page 1: ...er your product and get support at www saeco com welcome Type HD8917 HD8918 Instruction manual Read carefully before using the machine ENGLISH ITALIAN GERMAN Incanto_OTC_EN IT DE_Rev01 indb 1 27 03 15...
Page 2: ...Incanto_OTC_EN IT DE_Rev01 indb 2 27 03 15 12 10...
Page 3: ...Register your product and get support at www saeco com welcome Type HD8917 HD8918 Instruction manual Read carefully before using the machine ENGLISH Incanto_OTC_EN IT DE_Rev01 indb 27 27 03 15 12 10...
Page 4: ...12 7 1 Machine cleaning 13 7 1 1 Machine cleaning when needed 13 7 1 2 Weekly cleaning of the machine 13 7 2 Brew group cleaning 13 7 2 1 Weekly brew group cleaning cycle 13 7 2 2 Monthly lubrication...
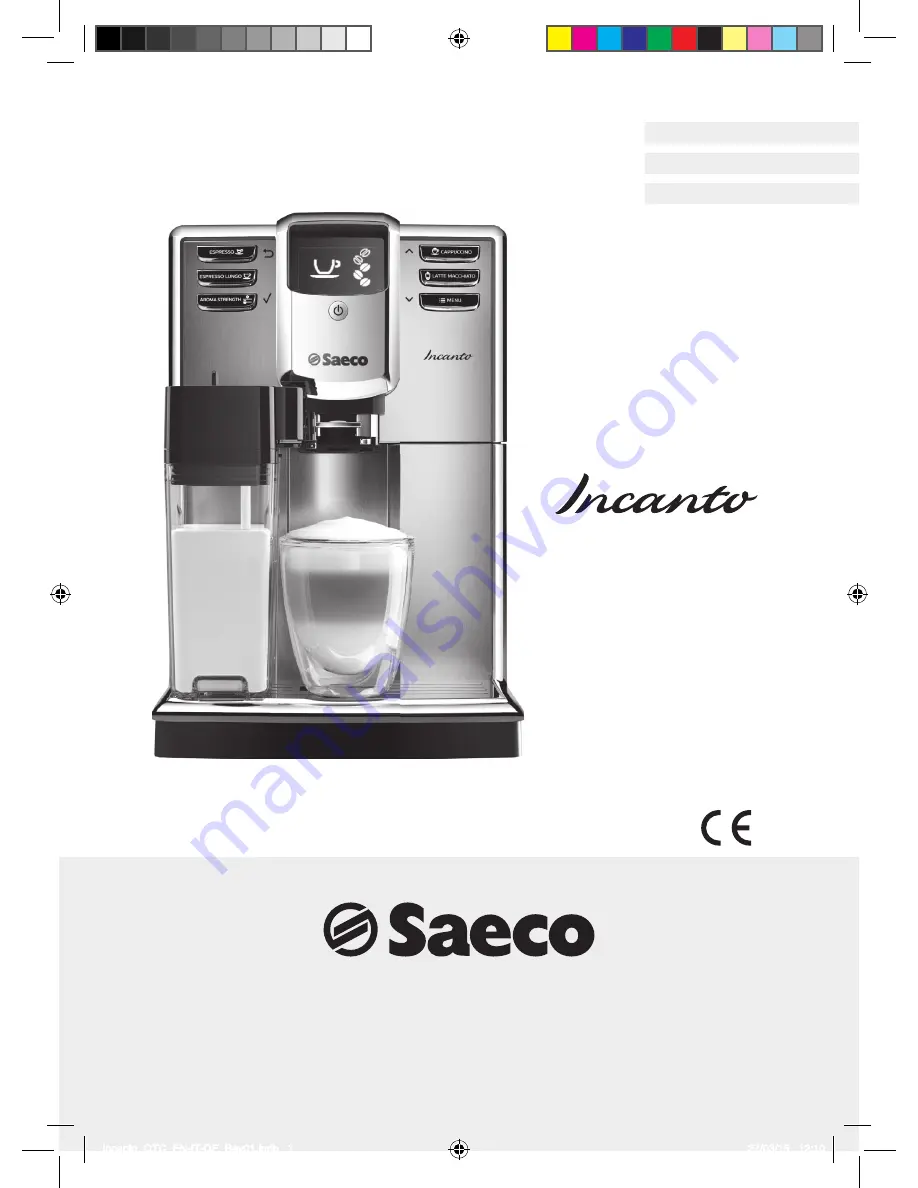
Page 5: ...coffee from whole beans and is equipped with a milk carafe to prepare the perfect cappuccino easily and quickly These are the machine s special features Saeco Adapting System Coffee is a natural produ...
Page 6: ...pout 8 Drip tray 9 Coffee grounds drawer 10 Drip tray full indicator 11 Hot water dispensing spout 12 Milk carafe lid 13 Milk carafe top 14 Milk frother dispensing spout 15 Milk container 2 5 Control...
Page 7: ...not let the power cord hang over the edge of a table or counter or touch hot surfaces Never immerse the machine mains plug or power cord in water danger of electrical shock Do not pour liquids on the...
Page 8: ...other work environments Always put the machine on a flat and stable surface Do not place the machine on hot surfaces directly next to a hot oven heater or similar sources of heat Only put roasted coff...
Page 9: ...r filling Lift the coffee bean hopper lid Do not place too many coffee beans in the coffee bean hopper so as to avoid damaging grinding performance Coffee powder soluble coffee raw coffee and other su...
Page 10: ...heating phase the machine launches an automatic clean water rinse self cleaning cycle of the internal circuits 5 2 2 Automatic rinse self cleaning cycle Place a container under the coffee dispensing s...
Page 11: ...of red squares value to be set water hardness 1 1 very soft water 2 2 soft water 3 3 hard water 4 4 very hard water Refer to the 8 2 Changing the default settings chapter to change the water hardness...
Page 12: ...e as described in the 5 2 2 Automatic rinse self cleaning cycle chapter 6 Use Make sure to read the 3 Safety chapter In order to preserve product quality every time the machine is turned on the 5 2 2...
Page 13: ...ine goes back to the main menu 6 1 4 Adjustment of coffee length in the cup during preparation It is possible to adjust the quantity of product brewed according to one s taste and the size of the cups...
Page 14: ...slide the dispensing spout to bring it back to the dispensing spout closed symbol Rotate the carafe upwards until it disengages from the drip tray Then remove it Emptying phase Perform the operations...
Page 15: ...leaning of the carafe ducts Please refer to the 7 4 1 Quick milk carafe ducts rinse cycle chapter 6 3 2 Adjustment of milk coffee length in the cup during preparation It is possible to adjust the quan...
Page 16: ...hapter Inserting phase Place a container under the hot water dispensing spout Burning hazard At the beginning of each product brewing hot water or steam sprays might be present Wait until the end of t...
Page 17: ...drawer and empty it Empty and wash the drip tray Put the coffee grounds drawer in the drip tray and put the latter back into the machine Further maintenance operations can be carried out only when the...
Page 18: ...If they do not match press the lever slightly downwards until it touches the base of the brew group so that the two check reference marks match Press the PUSH button hard Make sure that the brew group...
Page 19: ...e pre ground coffee compartment Select the pre ground coffee brewing function by pressing the AROMA STRENGTH button The machine is ready for brewing Press the ESPRESSO LUNGO button The machine starts...
Page 20: ...Quick milk carafe ducts rinse cycle chapter Disassemble the top of the carafe as shown in the 6 2 Milk carafe chapter Disassembly phase Remove the milk carafe lid Lift the milk frother dispensing spo...
Page 21: ...e top of the carafe as shown in the 6 2 Milk carafe chapter Disassembly phase Rinse all the components with lukewarm water Remove all milk residue Reassemble the milk carafe top Remove the lid and fil...
Page 22: ...he machine starts dispensing the descaling solution at intervals The bar shows the cycle progress status The cycle can be paused by pressing the ESC button and restarted by pressing the OK button This...
Page 23: ...ls please refer to the 5 3 1 Water hardness measurement and setting chapter WATER FILTER 0 8 FILTER 0 8 FILTER ON AquaClean water filter to be installed AquaClean settings For further details please r...
Page 24: ...ed Close the service door Turn the machine off and back on again The brew group automatically returns to the starting position Coffee grounds drawer full Empty the coffee grounds drawer as described i...
Page 25: ...ND BY button has been pressed for more than 8 seconds Turn the machine OFF and ON using the main switch The drip tray fills up quickly To guarantee a perfect coffee at every brewing the machine rinses...
Page 26: ...cle chapter The machine must perform the self adjustment Brew a few cups of coffee The frothed milk is too cold Cups are cold Warm the cups with hot water Milk does not froth The milk carafe is dirty...
Page 27: ...filter 8 times without the need for descaling This equals approx 5000 products Note It is however recommended to replace each filter at least after 3 months usage After having replaced the filter for...
Page 28: ...the series of 8 filter is over Perform the instructions described at the 7 5 Descaling cycle chapter otherwise Press the ESC button twice to exit the programming function The machine automatically exi...
Page 29: ...old waste Correct disposal of old products helps prevent negative consequences for the environment and human health 13 Warranty and service Warranty For detailed information on the warranty and its co...
Page 30: ...hite 23 first start 6 G grinding fineness 7 H hot water 12 hot water dispensing spout 12 inserting removing 12 I interruption descaling 19 L latte macchiato 11 length cappuccino 11 espresso 9 espresso...
Page 31: ...l prodotto ed ottieni assistenza su www saeco com welcome Type HD8917 HD8918 Manuale d istruzione Leggere attentamente prima di utilizzare la macchina ITALIANO Incanto_OTC_EN IT DE_Rev01 indb 27 27 03...
Page 32: ...acqua calda 12 6 5 1 Erogazione acqua calda 12 7 Pulizia e manutenzione 12 7 1 Pulizia della macchina 13 7 1 1 Pulizia della macchina al bisogno 13 7 1 2 Pulizia settimanale della macchina 13 7 2 Puli...
Page 33: ...montalatte classico per preparare un perfetto cappuccino in modo semplice e veloce Pu anche preparare vapore ed acqua calda Speciali caratteristiche della macchina sono Saeco Adapting System Il caff...
Page 34: ...Gruppo caff 7 Erogatore caff 8 Vasca raccogligocce 9 Cassetto raccoglifondi 10 Indicatore vasca raccogligocce piena 11 Erogatore acqua calda 12 Coperchietto caraffa latte 13 Coperchio caraffa latte 1...
Page 35: ...are che il cavo di alimentazione penda dal tavolo o dal piano di lavoro o che tocchi superfici calde Non immergere la macchina la presa di corrente o il cavo di alimentazione in acqua pericolo di shoc...
Page 36: ...a su una superficie piana e stabile Non posizionare la macchina su superfici calde in prossimit di forni caldi riscaldatori o analoghe sorgenti di calore Immettere nel contenitore sempre e soltanto ca...
Page 37: ...tore per il caff Sollevare lo sportello del contenitore caff in grani Non versare troppi chicchi di caff nel contenitore caff in grani per non diminuire le prestazioni di macinatura della macchina Caf...
Page 38: ...e del riscaldamento la macchina esegue un ciclo automatico di risciacquo autopulizia dei circuiti interni 5 2 2 Ciclo automatico di risciacquo autopulizia Posizionare un contenitore sotto l erogatore...
Page 39: ...ore quindi consultare la tabella numero bande rosse valore da impostare durezza dell acqua 1 1 acqua molto dolce 2 2 acqua dolce 3 3 acqua dura 4 4 acqua molto dura Consultare il capitolo 8 2 Come mod...
Page 40: ...utopulizia come descritto al capitolo 5 2 2 Ciclo automatico di risciacquo autopulizia 6 Utilizzo Si raccomanda di aver letto il capitolo 3 Sicurezza Al fine di preservare la qualit del prodotto ogni...
Page 41: ...cchina torna al menu principale 6 1 4 Regolazione lunghezza caff in tazza durante la preparazione La macchina consente di regolare la quantit di prodotto erogato in base ai propri gusti e alle dimensi...
Page 42: ...are l erogatore sul simbolo che indica erogatore chiuso Ruotare la caraffa verso l alto fino al naturale sgancio dall inserto posto nella vasca raccogligocce Quindi rimuoverla Fase di svuotamento Eseg...
Page 43: ...e una rapida pulizia dei condotti della caraffa Consultare il capitolo 7 4 1 Ciclo di risciacquo rapido dei condotti della caraffa latte 6 3 2 Regolazione lunghezza latte caff in tazza durante la prep...
Page 44: ...e di inserimento Posizionare un contenitore sotto l erogatore acqua calda Pericolo di scottature All inizio dell erogazione possono verificarsi brevi spruzzi di acqua calda o vapore Attendere fino al...
Page 45: ...are e lavare la vasca raccogligocce Reinserire il cassetto raccoglifondi nella vasca raccogligocce e riposizionare quest ultima nella macchina Ulteriori interventi di manutenzione possono essere effet...
Page 46: ...delicatamente la leva verso il basso fino a toccare la base del gruppo caff in modo tale che i due segni di riferimento si affianchino Premere con forza il tasto PUSH Assicurarsi che il gancio per il...
Page 47: ...sgrassante nel serbatoio del caff pre macinato Selezionare la funzione di erogazione del caff pre macinato premendo il tasto AROMA STRENGTH La macchina pronta per l erogazione Premere il tasto ESPRESS...
Page 48: ...lo di risciacquo rapido dei condotti della caraffa latte almeno una volta al giorno Smontare la parte superiore della caraffa latte come indicato nel capitolo 6 2 Caraffa latte Fase di smontaggio Rimu...
Page 49: ...iacquo Eseguire lo smontaggio della parte superiore della caraffa come indicato al capitolo 6 2 Caraffa latte Fase di smontaggio Risciacquare tutti i componenti con acqua tiepida Rimuovere ogni residu...
Page 50: ...re soluzione decalcificante ad intervalli La barra indica lo stato di avanzamento del ciclo Il ciclo pu essere messo in pausa premendo il tasto ESC e riavviato premendo il tasto OK Ci consente di svuo...
Page 51: ...dell acqua di utilizzo Per ulteriori dettagli consultare il capitolo 5 3 1 Misurazione e impostazione durezza acqua WATER FILTER 0 8 FILTER 0 8 FILTER ON Filtro acqua AquaClean da installare Impostazi...
Page 52: ...re e riaccendere la macchina Il gruppo caff ritorna automaticamente in posizione Cassetto raccoglifondi pieno Svuotare il cassetto raccoglifondi come descritto al capitolo 7 1 1 Pulizia della macchina...
Page 53: ...indirizzo www saeco com support 9 4 Tabella di risoluzione eventuali problemi Comportamento Causa Azione La macchina non si accende Macchina non collegata alla rete elettrica oppure interruttore gener...
Page 54: ...azione macinacaff in ceramica Il circuito non carico Caricare il circuito come descritto al capitolo 5 2 1 Caricamento del circuito dell acqua Il gruppo caff sporco Pulire il gruppo caff come descritt...
Page 55: ...e il filtro 8 volte prima che occorra procedere alla decalcificazione che l equivalente di circa 5000 prodotti Nota Si raccomanda tuttavia di sostituire il filtro almeno ogni 3 mesi di utilizzo Dopo a...
Page 56: ...da 8 filtri stata terminata Attenersi alle istruzioni riportate nel capitolo 7 5 Ciclo di decalcificazione oppure Premere due volte il tasto ESC per uscire dalla funzione di programmazione La macchina...
Page 57: ...revenire conseguenze negative per l ambiente e la salute umana 13 Garanzia ed Assistenza Garanzia Per informazioni dettagliate sulla garanzia e sulle condizioni ad essa collegate consultare il librett...
Page 58: ...emperatura erogazione 8 impostazioni di fabbrica 19 lista delle impostazioni 19 interruzione decalcificazione 19 L latte emulsionato 11 macchiato 11 lubrificazione gruppo caff 14 lunghezza cappuccino...
Page 59: ...en Sie den entsprechenden Support unter www saeco com welcome Type HD8917 HD8918 Bedienungsanleitung Lesen Sie diese Bedienungsanleitung vor dem Gebrauch des Ger ts aufmerksam durch DEUTSCH Incanto_OT...
Page 60: ...ng und Pflege 12 7 1 Reinigung des Ger ts 13 7 1 1 Reinigung des Ger ts bei Bedarf 13 7 1 2 W chentliche Reinigung des Ger t 13 7 2 Reinigung der Br hgruppe 13 7 2 1 W chentlicher Reinigungszyklus der...
Page 61: ...mit ganzen Bohnen und ist mit einer Milchkaraffe f r die einfache und schnelle Zubereitung eines perfekten Cappuccino ausgestattet Das Ger t verf gt ber folgende besondere Eigenschaften Saeco Adaptin...
Page 62: ...eeauslauf 8 Abtropfschale 9 Kaffeesatzbeh lter 10 Anzeige Abtropfschale voll 11 Hei wasserd se 12 Deckel Milchkaraffe 13 Abdeckung Milchkaraffe 14 Auslauft lle Milchaufsch umer 15 Milchbeh lter 2 5 Be...
Page 63: ...mit Erdungsanlage anschlie en Ein Herabh ngen des Netzkabels vomTisch oder derArbeitsfl che oder dieAuflage desselben auf hei en Fl chen sollte vermieden werden Das Ger t die Steckdose oder das Netzka...
Page 64: ...hen in der N he von hei en fen Heizger ten oder hnlichenW rmequellen abstellen In den Beh lter d rfen ausschlie lich ger stete Kaffeebohnen eingef llt werden Wenn Pulver oder Instantpulver Rohkaffee o...
Page 65: ...gesetzt wurde 4 3 Kaffeebohnenbeh lters Den Deckel des Kaffeebohnenbeh lters abnehmen F llen Sie nicht zu viele Kaffeebohnen in den Kaffeebohnenbeh lter um eine Beeintr chtigung der Mahlleistung zu ve...
Page 66: ...ischen Sp lzyklus Selbstreinigungzyklus der internen Systeme mit frischem Wasser durch 5 2 2 Automatischer Sp lzyklus Selbstreinigungszyklus Einen Beh lter unter den Kaffeeauslauf stellen Verbrennungs...
Page 67: ...ln ablesen und mit derTabelle vergleichen Anzahl rote Quadrate einzustellenderWert Wasserh rte 1 1 sehr weiches Wasser 2 2 weiches Wasser 3 3 hartes Wasser 4 4 sehr hartes Wasser Um die Default Wasser...
Page 68: ...2 Automatischer Sp lzyklus Selbstreinigungszyklus beschrieben 6 Bedienung Das Kapitel 3 Sicherheit sollte gelesen werden Um die Produktqualit t zu gew hrleisten wird der 5 2 2 Automatische Sp lzyklus...
Page 69: ...feemenge in derTasse w hrend der Zubereitung Bei diesem Ger t kann die ausgegebene Produktmenge je nach Geschmackspr ferenz und Tassengr e eingestellt werden Mit dieser Funktion kann die Default Einst...
Page 70: ...die Auslauft lle auf das Symbol Auslauft lle geschlossen zur ckschieben Die Karaffe nach oben drehen bis sie sich von der Abtropfschale l st Dann abnehmen Entleeren Die im Kapitel 6 2 Milchkaraffe De...
Page 71: ...das Ger t eine schnelle Reinigung der Karaffenkan le Hierzu nehmen Sie auf Kapitel 7 4 1 Schneller Sp lzyklus der Milchkaraffenkan le Bezug 6 3 2 Einstellung Milch Kaffeemenge in derTasse w hrend der...
Page 72: ...sgefahr Beim Start der Produktausgabe k nnen hei eWasserspritzer oder Dampf austreten Das Ende des Zyklus abwarten bevor die Wasserd se entfernt wird DieTaste MENU dr cken Die Funktion DRINKS anw hlen...
Page 73: ...lter abnehmen und leeren Die Abtropfschale leeren und auswaschen Den Kaffeesatzbeh lter in die Abtropfschale einsetzen und diese wieder in das Ger t einsetzen WeitereWartungsvorg nge d rfen erst dann...
Page 74: ...ebel vorsichtig nach unten dr cken bis er die Basis der Br hgruppeber hrt und die beiden Bezugspunkte bereinstimmen DieTaste PUSH kr ftig dr cken Sicherstellen dass sich der Haken f r die Sperre der B...
Page 75: ...n das Fach f r den vorgemahlenen Kaffee einwerfen Die Funktion Ausgabe vorgemahlener Kaffee durch Druck der Taste AROMA STRENGTH anw hlen Das Ger t ist nun ausgabebereit Die Taste ESPRESSO LUNGO dr ck...
Page 76: ...nkan le beschriebene Vorgang sollte mindestens einmal t glich aufgef hrt werden Die Abdeckung der Karaffe abnehmen wie im Kapitel 6 2 Milchkaraffe Abnahme gezeigt Den Deckel der Milchkaraffe abnehmen...
Page 77: ...einem Reinigungszyklus nur mit Wasser einfache Sp lung Die Abdeckung der Karaffe abnehmen wie im Kapitel 6 2 Milchkaraffe Abnahme gezeigt AlleTeile mit lauwarmem Wasser sp len Alle Milchr ckst nde ent...
Page 78: ...sgabe des Entkalkungsmittels in regelm igen Intervallen Der Balken zeigt den Fortschritt des Zyklus an Der Zyklus kann durch Druck derTaste ESC unterbrochen werden Um den Zyklus fortzusetzen wird die...
Page 79: ...4 3 2 1 Wasserh rte 4 sehr hartes Wasser Einstellung Wasserh rte Weitere Details werden im Kapitel 5 3 1 Messen und Programmierung der Wasserh rte aufgef hrt WATER FILTER 0 8 FILTER 0 8 FILTER ON Was...
Page 80: ...er leer Die entsprechenden Hinweise im Kapitel 4 3 F llung des Kaffeebohnenbeh lters beachten Br hgruppe nicht eingesetzt Die Servicet r schlie en Das Ger t aus und wieder einschalten Die Br hgruppe k...
Page 81: ...eft oder unter der Adresse www saeco com support genannt 9 4 Tabelle Probleml sung Verhalten Ursache Vorgehensweise Das Ger t schaltet sich nicht ein Das Ger t ist nicht angeschlossen oder der Hauptsc...
Page 82: ...chseln oder den Mahlgrad einstellen wie im Kapitel 5 3 3 Einstellung des Keramikmahlwerks beschrieben Das System ist nicht entl ftet Das System entl ften wie im Kapitel 5 2 1 Entl ftung des Wassersyst...
Page 83: ...ntkalken erforderlich ist Dies entspricht ca 5000 Produkten Hinweis Es wird empfohlen jeden Filter nach einer Benutzungszeit von maximal 3 Monaten zu wechseln Nachdem der Filter zum 8 Mal ausgetauscht...
Page 84: ...werden da die Reihe der 8 benutzten Filter abgeschlossen ist Die entsprechenden Hinweise im Kapitel 7 5 Entkalkungszyklus ausf hren oder DieTaste ESC zweimal dr cken um die Programmierungsfunktion zu...
Page 85: ...idung m glicher negativer Folgen f r die Umwelt und die menschliche Gesundheit 13 Garantie und Kundendienst Garantie F r ausf hrliche Informationen zur Garantie und der damit verbundenen Bedingungen i...
Page 86: ...nschaltung 8 Erste Einschaltung 6 Hauptbestandteile 2 Ausschalten 8 Inbetriebnahme 5 gro er Espresso 8 9 H Hei wasser 12 Hei wasserd se 12 Einsetzen Abnahme 12 I Inbetriebnahme 5 K Kaffee 8 Kaffeebohn...
Page 87: ...Incanto_OTC_EN IT DE_Rev01 indb 27 27 03 15 12 12...
Page 88: ...015 The manufacturer reserves the right to make changes without prior notice The official text of this publication is in English www saeco com welcome 421946025141 Incanto_OTC_EN IT DE_Rev01 indb 28 2...