


30
English
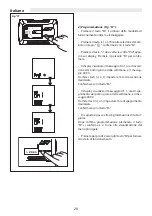
3. Remove the power board cover
The electronic board is supplied with the cables
connected.
4. Fix the power board using the 2 self-tapping
screws supplied.
5. Do the electrical motor connections
C
PE
A
0-10V
B
L1 - N
PE
D
D1
PE
WARNING!: CONNECT THE GROUNDING
CABLE "C" TO THE GROUND RIVET ON THE
SHOULDER OF THE MACHINE.
6. As regards the connection diagram, refer to the
corresponding section in this manual.
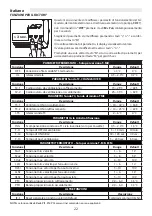
A
0-10V
C
PE
B
L1 - N
PE
D1
D
Summary of Contents for UP-ECO
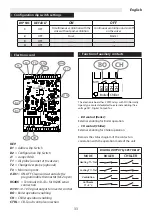
Page 4: ...4 Italiano Montaggio del comando CB E A B A B CTRL CTRL C ...
Page 8: ...8 Italiano Montaggio del comando CB Touch A B CTRL C CTRL B CTRL C CTRL A B ...
Page 27: ...27 English Installation of the CB E control A B A B CTRL CTRL C ...
Page 31: ...31 English Installation of the CB Touch control A B CTRL C CTRL B CTRL C CTRL A B ...
Page 50: ...50 Français Montage de la commande CB E A B A B CTRL CTRL C ...
Page 54: ...54 Français Montage de la commande CB Touch A B CTRL C CTRL B CTRL C CTRL A B ...
Page 73: ...73 Deutsch Montage der CB E Steuerung A B A B CTRL CTRL C ...
Page 77: ...77 Deutsch Montage der CB Touch Steuerung A B CTRL C CTRL B CTRL C CTRL A B ...
Page 96: ...96 Español Montaje del mando CB E A B A B CTRL CTRL C ...
Page 100: ...100 Español Montaje del mando CB Touch A B CTRL C CTRL B CTRL C CTRL A B ...


