


23
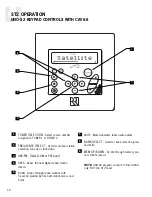
Press and Hold
TNR SEL button
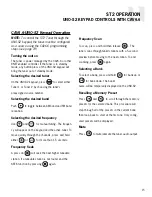
Source Number, Region, Factory Initialization,
Update Firmware and System Info Procedures
TNR
SEL
TNR
SEL
This
Procedure
returns the
ST2 Tuner
to its
Factory
settings
MEM
NAME
Procedure
BANK
NAME
Procedure
SOURCE
NUM
Procedure
Setup
Menu
REGION
Procedure
FACTORY
INIT
Procedure
UPDATE
FIRMW
Procedure
SYSTEM
INFO
Procedure
HOLD
BAND
After update
cycle Power
Start
Update
Cycle Power
TUNER
#
SOURCE
NUM
TNR
SEL
ST2 TUNER PROGRAMMING
ST2 TUNER SETUP MENU
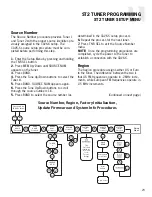
Source Number
The Source Number procedure provides Tuner 1
and Tuner 2 with the proper source identities pre-
viously assigned in the CAV6.6 setup. The
CAV6.6 source setup procedure must be com-
pleted before performing this step.
1.
Enter the Setup Menu by pressing and holding
the TNR SEL button.
2.
Press MEM Up/Down until SOURCE NUM
appears on the tuner.
3.
Press BAND.
4.
Press the Tune Up/Down buttons to select the
Tuner #.
5.
Press BAND. SOURCE NUM appears again.
6.
Press the Tune Up/Down buttons to scroll
through the source numbers 1-6.
5.
Press BAND to select the source number (as
determined in the CAV6.6 setup process).
6.
Repeat the process for the next tuner.
7.
Press TNR SEL to exit the Source Number
menu.
NOTE:
Once the programming procedures are
completed, cycle the power to the Tuner to
establish a connection with the CAV6.6.
Region
The Region procedure assigns either US or Euro
to the tuner. The difference between the two is
that US FM frequencies operate in .2 MHz incre-
ments, while European FM frequencies operate in
.05 MHz increments.
(Continued on next page)
Summary of Contents for ST2 REV 1
Page 1: ...ST2 Smart Tuner Dual AM FM Tuner INSTRUCTION MANUAL...
Page 27: ...27 NOTES...