background image

Before operating your new appliance please read this instruction 
manual carefully. It contains important information concerning the safe 
installation and operation of the appliance.
Please keep these operating instructions for future reference. Make 
sure that the instructions are kept with the appliance if it is sold, given 
away or moved.
Gas cookers must be disconnected and installed by a Gas Safe 
register engineer. This scheme has replaced the Corgi registration 
scheme. For details visit www.gassaferegister.co.uk or call 0800 408 
550.
The appliance must be installed by a qualified professional according 
to the instructions provided.
Any necessary adjustments or maintenance must be performed after 
the cooker has been disconnected from the electricity supply.
The producer is not responsible for any damage that might be caused 
by defective placement and installation by an unauthorised person.

CE Declaration of conformity

This 

appliance

 has been designed to be used only for 

home 

cooking. 

Any other


use (such as heating a room) is improper and dangerous.

This 

appliance

 has been designed, constructed, and marketed 

incompliance


with:

•     

Safety requirements of the "Gas" Directive 

2009

/

142

/EC;

•     

Safety requirements of the


"Low voltage" Directive 2006/95/EC;

•     

Safety requirements of the "EMC" Directive 

2004/108/EC;

•     

Requirements of the Directive 93/68/EC.

Summary of Contents for RHTGC1

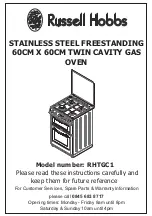
Page 1: ...S OVEN Model number RHTGC1 Please read these instructions carefully and keep them for future reference For Customer Services Spare Parts Warranty Information please call 0845 683 8717 Opening times Monday Friday 8am until 8pm Saturday Sunday 10am until 4pm ...

Page 2: ...d by a qualified professional according to the instructions provided Any necessary adjustments or maintenance must be performed after the cooker has been disconnected from the electricity supply The producer is not responsible for any damage that might be caused by defective placement and installation by an unauthorised person CE Declaration of conformity This appliance has been designed to be use...

Page 3: ...rmostat Yes Oven Safety Standard Oven Burner Thermostat Controlled W 2400 Minute Minder Yes Chromed Grid with Stoper 1 Grill Pan with Handle Set Yes Oven Type Gas Oven Volume lt 30 Cavity Dimensions mm 432 x 160 x 430 Oven Light 25W Yes Easy to Clean Enamel Standard Thermostat Yes Oven Safety Standard Oven Burner Thermostat Controlled W 2400 Total Power Depends on Model Maximum kW 12 3 Voltage V 2...

Page 4: ...OVEN 4 1 Use of gas burners 4 1 1 Control of oven burner 4 1 2 Control of grill burner 4 2 Using the digital minute timer 4 3 Digital timer sound adjustment 4 4 Accessories used in oven 5 CLEANING AND MAINTENANCE 5 1 Cleaning 5 2 Maintenance 6 SERVICE AND TRANSPORT 6 1 6 2 Information related to the transport Installing your appliance Basic troubleshooting before contacting service For Customer Se...

Page 5: ...andle 5 Support Leg 6 Oven Door 7 Wire Grid 8 Grill 9 Oven Lamp 10 Semi Rapid Burner 11 Rapid Burner 12 Auxillary Burner 13 Hob Grids 14 Semi Rapid Burner 10 11 12 13 14 1 2 3 4 5 6 9 8 7 2 Rack 2 Rack 3 Raf 3 Rack 4 Rack 5 Rack 1 Rack 1 Rack For Customer Services Spare parts Warranty Information please call 0845 683 8717 2 ...

Page 6: ...on the label This appliance is not connected to a combustion product evacuation device It should be installed and connected in accordance with current installation regulations Particular attention should be given to the relevant requirements regarding ventilation If you do not use the appliance for a long time un plug it Keep the main control switch off Also when you do not use the appliance keep ...

Page 7: ... use the grill burner with the oven door closed This appliance is not intended for use by persons including children with reduced physical sensory or mental capabilities or lack of experience and knowledge unless they have been given supervision or instruction concerning use of the appliance by a person responsible for their safety WARNING Ensure that the appliance is switched off before replacing...

Page 8: ...tion ensure that the local distribution conditions nature of the gas and gas pressure and the adjustment of the appliance are compatible The adjustment conditions for this appliance are stated on the label This appliance is not connected to a combustion products evacuation device It shall be installed and connected in accordance with current installation regulations Particular attention shall be g...

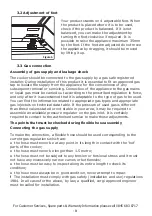
Page 9: ...ance must be performed after the cooker has been disconnected form the electricity supply The producer is not responsible for any damage that might be caused by defective placement and installation by an unauthorised person 3 1 Environment where your appliance will be installed This unit may be installed and used only in permanently ventilated rooms according to the British Standards Codes Of Prac...

Page 10: ...ual for the hoods themselves If the cooker in installed beneath a wall cabinet the latter must be situated at a minimum of 420mm above the hob The minimum distance between the worktop and kitchen units made of combustible material is 700mm Fig 5 The wall in direct contact with the back panel of the cooker must be made of non flammable materials Pay attention not to place the cooker near the refrig...

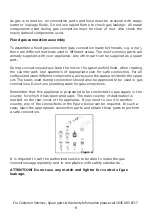
Page 11: ...the feet are adjusted do not move the appliance by dragging it should be moved by lifting it up Assembly of gas supply and leakage check The cooker should be connected to the gas supply by a gas safe registered installer During installation of this product it is essential to fit an approved gas tap to isolate the supply from the appliance for the convenience of any subsequent removal or servicing ...

Page 12: ...n different components always use the seals provided in the spare set The seals used during connection should also be approved to be used in gas connections Do not use plumbing seals for gas connections Remember that this appliance is prepeared to be connected to gas supply in the country for which it has been produced The main country of destination is marked on the rear cover of the appliance If...

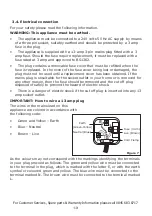
Page 13: ...moved for any other reason then the fuse should be removed and the cut off plug disposed of safely to prevent the hazard of electric shock There is a danger of electric shock if the cut off plug is inserted into any 13 amp socket outlet IMPORTANT How to wire a 13 amp plug The wires in the mains lead on this appliance are colored in accordance with the following code Green and Yellow Earth Blue Neu...

Page 14: ... turn the cooker off The oven and heat adjustment switches must be adjusted for cooking in your oven Otherwise the oven does not operate When the door of oven is open do not leave anything on it You may unbalance your appliance or break the cover Do not put heavy things or flammable or ignitable goods nylon plastic bag paper cloth etc into the lower drawer This includes cookware with plastic acces...

Page 15: ...ding diameters suitable to the type of gas that is going to be used according to the information chart which is also supplied in the gas conversion kit Oven Grill Injectors Grill Injector The oven and grill injectors are assembled by a single screw that is placed on the tip of the burner For grill burners this screw is already visible Figure 10 Remove the screw pull the grill burner to yourself an...

Page 16: ...Figure 14 Repeat the same procedure for both Main and Top Oven if present burners Remove the injectors with a 7mm spanner and replace the injector with the ones from the spare set with corresponding diameters suitable to the type of gas that is going to be used according to the information chart which is also supplied in the gas conversion kit Figure 11 Figure 10 Screw Figure 12 Screw Injector Fig...

Page 17: ...f a small screwdriver fasten or loosen the by pass screw around 90 degrees When the flame has a length of at least 4mm the gas is well distributed Make sure that the flame does not die out when passing from the maximum position to the minimum position Create an artificial wind with your hand toward the flame to see if the flames are stable For oven burner operate the oven burner at min position fo...

Page 18: ... so that the knob is in maximum position then press the ignition button immediately because if you wait there will be a build up of gas and this may cause the flame to spread If the flame does not ignite continue to press the ignition button until you see a stable flame on the burner For Oven Burner To ignite the oven burner press and turn the oven grill control knob counter clockwise so that the ...

Page 19: ...Wait 90 seconds before re igniting an extinguished gas burner Regardless of the model of your appliance all oven burners are equipped with a gas safety device For this reason during ignition keep the oven knob pressed until you see stable flames If the flames are cut out after you release the knob repeat the procedure again If the oven burner does not ignite after you keep the burner knob pressed ...

Page 20: ...on for 90 sec When turning the hob off turn the knob in the clockwise direction so that the knob shows 0 position or the marker on the knob points upwards Your hob has burners of different diameters The most economic way of using gas is to choose the correct size gas burners for your cooking pan size and to bring the flame to minimum position once the boiling point is reached It is recommended to ...

Page 21: ...en burner as explained before you can adjust the temperature inside the oven as you require using the numbers on the control panel or knob ring Bigger numbers mean higher temperatures while smaller numbers mean lower temperatures If your oven is equipped with an oven thermostat refer to the temperature table below for the temperature references of those numbers Do not operate the appliance between...

Page 22: ...ware dark heavy or non stick utensils increase base browning Shiny aluminum or polished steel trays reflect the heat away and give less base browning When cooking more than one dish in the oven place dishes centrally on different shelves rather than cluster several dishes on one shelf this will allow the heat to circulate freely for the best cooking results If you are cooking more than one tray of...

Page 23: ...d Food should be thoroughly dried before grilling to minimize splashing Brush lean meats and fish lightly with a little oil or melted butter to keep them moist during cooking Foods should be placed on the center of the grid to allow maximum circulation of air Never cover the grill pan or grid with foil as this can lead to grill fires If your appliance has a grill pan and handle set as an accessory...

Page 24: ...In order to turn the oven off you must move the switch and thermostat of the oven to off position 4 3 DIGITAL TIMER SOUND ADJUSTMENT While the timer shows the time of day if the button on the left minus button is pressed and held in for 1 2 sec the timer will give an audible signal beep After that each time the button is pressed the timer will give three different types of signal beep Do not press...

Page 25: ... of the high heat that occurs during cooking or roasting The tray will return to its old form only when the tray has cooled after cooking This is a normal physical event that occurs during heat transfer Do not allow glass objects to change temperature suddenly If grilling in the oven we recommend you use the grill that was supplied with the product If you use the big wire grill put a tray onto one...

Page 26: ... may be different due to the model of your product Grill pan set is used to grill bread bacon sausages steaks etc WARNING The grill pan has a detachable handle Ensure when using the grill pan handle that it is centralised and securedas seen in the picture Do not leave the handle in position when grilling Grill Pan and Handle Set For Customer Services Spare parts Warranty Information please call 08...

Page 27: ...al from time to time and make a complete cleaning Do not clean with dry powder cleaners or steam cleaners Cleaning of Your Oven Cover In order to clean the cover of your oven from inside and outside use a glass cleaner Then rinse and dry it with a dry cloth Cleaning of Gas Cooker Hob Part Lift up the saucepan supports caps and crowns of hob burners Wipe and clean the back panel with a soapy cloth ...

Page 28: ...r abrasive cleaning metarials Do not leave vinegar coffee milk salt water lemon or tomato juice to remain in contact with stainless steel parts long periods of time 5 2 Maintenance Change of Oven Lamp Unplug the oven from plug socket and make sure that oven is cool Remove the bulb after removing the cover in front of lamp Assemble the new bulb resistant to 300 C the place of the bulb that you remo...

Page 29: ...ave any problem with your product please call to the Authorized Service 6 2 Information related to transport If you need to transport keep the original packaging of the product and transport it in this Follow the transport signs on case Tape the cooker on upper parts caps and crowns and pan supports to the cooking panels Place paper between the upper cover and cooking panel cover the upper cover t...

Page 30: ...ion in 1h 0 at 15 C and 1013mbar press TOP OVEN BURNER Injector Diameter mm Nominal Rating kW Min Rating kW Consumption in 1h Consumption in 1h 0 at 15 C and 1013mbar press GRILL BURNER Injector Diameter mm Nominal Rating kW Min Rating kW Consumption in 1h Consumption in 1h 0 at 15 C and 1013mbar press 3 0 85 218 13 gr h 50 1 0 4 72 71 gr h 65 1 75 0 65 127 25 gr h 75 2 4 1 65 174 5 gr h 75 2 4 1 ...

Page 31: ...ans that the product batteries should not be disposed of with your general household waste Only discard electrical electronic battery items in separate collection schemes which cater for the recovery and recycling of materials contained within Your co operation is vital to make sure the success of these schemes and for the protection of the environment For your nearest disposal facility visit www ...

Reviews: