background image


For Customer Services & Spare Parts please call 

01204 664 084 

Opening times: Monday – Friday 9am – 5pm 


Q

UICK START


Use this feature to program the oven to microwave food at 100% power 
conveniently. 
Press START/QUICK START button in quick succession to set the cooking time. 
The oven will auto-start immediately. The longest time you can set is 10 minutes. 
 

S

YSTEM PROTECTION


Overheating protection 

During cooking, when the temperature of the cavity reaches over 300 

, the 

display will show E-1 with buzzer sounding, after eliminating the problem, 
press the STOP/CANCEL button,  the system resume to normal. 


Sensor malfunction protection 

In case of short or open circuit, the system enters into malfunction protection. 
The display shows E-3 with buzzer DE-DE until pressing the STOP/CANCEL 
button, the oven will be back to normal. 
 

Cooling Feature 

The controlling system of the microwave oven has the feature of cooling. As for 
any cooking mode which cooking time above 2 minutes, after cooking, the oven 
fan will work about 3 minutes automatically to cool the oven for prolonging the 
life of the oven. 


C

HILD PROOF LOCK 


The child proof lock prevents unsupervised operation by little children.  
To set the child proof lock: Press STOP/CANCEL button for 3 seconds, then a 
beep will sound and the indicator light will turn on. In the lock state, all buttons 
are disabled. 
To cancel the child proof lock: Press STOP/CANCEL button for three seconds, 
then a beep will sound and the indicator light will turn off. 
 

Summary of Contents for RHM2506

Page 1: ...g times Monday Friday 9am 5pm 23 Litre Digital Microwave Instruction Manual Model Number RHM2506 Please read these instructions carefully and keep them for future reference For Customer Services Spare Parts please call 01204 664 084 Opening times Monday Friday 9am 5pm ...

Page 2: ...o the mains supply 6 Control panel 7 Operating instructions 8 Setting the clock 8 Microwave cooking 8 Grill Cooking 9 Combination Cooking I 9 Convection Cooking II 10 Micro Convection 11 Jet defrost 11 Multi Stage Cooking 11 Auto Cooking Menu 12 Quick Start 13 System protection 13 Child safety lock 13 Cleaning and care 14 Problem solving 15 Important utensil information 15 Non rewireable mains plu...

Page 3: ...ehold electrical socket Inside the microwave oven is the magnetron which turns the electrical energy into microwaves Microwaves cannot go through metal so the inside of the oven is lined with metal The door is lined with a fine metal mesh which stops microwaves getting through This means that when the microwave oven door is shut there is no possibility that microwaves can be released This is why t...

Page 4: ...ode Do not operate the microwave if damaged or after it malfunctions In the event the supply cord is damaged it must only be replaced by a qualified service engineer with a suitably approved part Keep the microwave cable and plug dry never immerse in water When heating food in plastic or paper containers keep an eye on the oven due to the possibility of ignition Only use the oven for preparing foo...

Page 5: ... bags before putting the bag in the oven If materials inside the oven catch fire keep the oven door closed turn the oven off at the wall switch or shut the power off at the fuse or circuit breaker panel FOOD SAFETY Do not cook raw meat or raw shellfish in a microwave due to the possibility for uneven heating Do not use the microwave oven for home canning or bottling Improperly canned or bottle foo...

Page 6: ...e mains supply WARNING THIS APPLIANCE MUST BE EARTHED This appliance is designed to operate from a mains supply of AC230 240V 50HZ Check that the voltage marked on the product corresponds with your supply voltage This product is fitted with a 13A plug complying with BS1363 If this plug is unsuitable or needs to be replaced please note the following Important The wires in the mains lead are coloure...

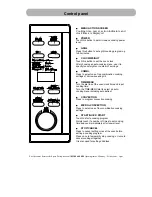
Page 7: ...lect one of two combination cooking settings of microwave and grill Q TIME MENU Turn the dial to set the oven clock time and input cooking time Turn the TIME MENU dial to select an auto cooking menu including auto defrost Q CONVECTION Press to program convection cooking Q MICRO CONVECTION Press to select one of four combination cooking settings Q START QUICK START Touch to start a cooking program ...

Page 8: ...hour clock you can press the CLOCK WEIGHT button once or twice to select it FOR EXAMPLE Suppose you want to set the oven clock time to 8 30 1 Press CLOCK WEIGHT button once or twice 2 Turn TIME MENU to set 8 o clock 3 Press CLOCK WEIGHT button 4 Turn TIME MENU to set 30 minutes 5 Press CLOCK WEIGHT to confirm the setting Note you can press CLOCK WEIGHT button to check the clock during cooking MICR...

Page 9: ...eaks chops kebabs sausages of piece of chicken It is also suitable for hot sandwiches and au gratin dishes For example suppose you want to grill for 12 minutes 1 Press STOP CANCEL button 2 Press GRILL button the display shows ENTER GRILL TIME and 3 Turn the TIME MENU to 12 00 4 Press START QUICK START button the display shows GRILL COOK Combination Cooking COMBINATION COOKING I This feature allows...

Page 10: ...e Suppose you want to cook at 160 for 40 minutes 1 Press CONVECTION button to select temperature 2 Rotate the TIME MENU dial until the correct cooking time is displayed 3 Press START QUICK START button Note You can check the convection temperature while cooking is in progress by pressing the CONVECTION button To Preheat and Cook with Convection Your oven can be programmed to combine preheating wit...

Page 11: ...select temperature the displays shows MICRO and CONV 2 Rotate the TIME MENU dial until the correct cooking time is displayed 3 Press START QUICK START button to start the display shows MICRO CONV and COOK Note You can check the combination cooking power while cooking is in progress by pressing the MICRO CONVECTION button JET DEFROST Suppose you want to defrost frozen food for five minutes 1 Rotate...

Page 12: ...ant to cook as well as the weight of this food 1 In standby mode rotate the digital knob TIME MENU in anti clockwise direction once and then rotate it in another direction to select food code to specify the food to be cooked 2 Press CLOCK WEIGHT to enter the food weight or the number of serving 3 Press START QUICK START Code Food 1 The user is required to set weight by pressing CLOCK WEIGHT button...

Page 13: ... or open circuit the system enters into malfunction protection The display shows E 3 with buzzer DE DE until pressing the STOP CANCEL button the oven will be back to normal Cooling Feature The controlling system of the microwave oven has the feature of cooling As for any cooking mode which cooking time above 2 minutes after cooking the oven fan will work about 3 minutes automatically to cool the o...

Page 14: ... cloth and polish dry with a soft dry cloth Do not allow water to seep into the ventilation openings Wipe the door and window on both sides the door seals and adjacent parts frequently with a damp cloth to remove any spills or spatters Do not use an abrasive cleaner Do not allow the control panel to become wet Clean with a soft damp cloth Do not use detergents abrasives or spray on cleaners on the...

Page 15: ...with another appliance If the microwave power will not work Make sure the door is securely closed Otherwise the microwave energy will not flow into the oven Important utensil information Use only cookware that is approved to be used in a microwave oven Do not use metal pans or dishes with metal handles Do not use anything with a metal trim Do not use paper covered wire twist ties on plastic bags D...

Page 16: ...For Customer Services Spare Parts please call 01204 664 084 Opening times Monday Friday 9am 5pm Please use this page for your notes and recipes ...

Page 17: ...g to BS1362 of the same rating If the fuse cover is lost the plug must not be used until a replacement is obtained from an electrical supplier If you need to remove the plug cut it from the mains lead and dispose of it Never attempt to re use this plug or insert it into a socket outlet as there is a very great risk of an electric shock SPECIFICATIONS Rated voltage 230 240V 50Hz Operating frequency...

Page 18: ...product batteries should not be disposed of with your general household waste Only discard electrical electronic battery items in separate collection schemes which cater for the recovery and recycling of materials contained within Your co operation is vital to make sure the success of these schemes and for the protection of the environment For your nearest disposal facility visit www recycle more ...

Reviews: