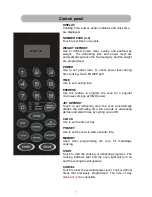
Russell Hobbs RHM1719B User Manual Download Page 6


6

Feature diagram 


1  Door safety lock system 
2 Oven 

window 

3  Wave guide cover (do not remove) 
4 Turntable 

roller 

5 Glass 

tray 

6 Control 

panel 

7  Door release button 


Connection to the mains supply


WARNING 

- THIS APPLIANCE MUST BE EARTHED 

This appliance is designed to operate from a mains supply of AC230 - 240V ~ 50HZ.  
Check that the voltage marked on the product corresponds with your supply voltage.  
This product is fitted with a 13A plug complying with BS1363. 
If this plug is unsuitable or needs to be replaced, please 
note the following: 
Important: The wires in the mains lead are coloured in 
accordance with the following code:  
GREEN/YELLOW-EARTH 
BLUE-NEUTRAL  
BROWN-LIVE 

7


Summary of Contents for RHM1719B

Page 1: ...17 Litre Digital Microwave Oven User s Manual Model number RHM1719B DCP 0587 062 0001 SKU 7227033 Please read these instructions carefully and keep them for future reference...

Page 2: ...6 Control panel 7 Operating instructions 8 Setting the clock 8 Setting the timer 8 Microwave cooking 8 Delayed start cooking 9 Quick start 9 Jet defrost 9 Weight defrost 10 Multistage cooking 10 Hint...

Page 3: ...n is the magnetron which turns the electrical energy into microwaves Microwaves cannot go through metal so the inside of the oven is lined with metal The door is lined with a fine metal mesh which sto...

Page 4: ...maged it must only be replaced by a qualified service engineer with a suitably approved part Keep the microwave cable and plug dry never immerse in water When heating food in plastic or paper containe...

Page 5: ...f at the wall switch or shut the power off at the fuse or circuit breaker panel FOOD SAFETY Do not cook raw meat or raw shellfish in a microwave due to the possibility for uneven heating Do not use th...

Page 6: ...This appliance is designed to operate from a mains supply of AC230 240V 50HZ Check that the voltage marked on the product corresponds with your supply voltage This product is fitted with a 13A plug co...

Page 7: ...m the oven for 4 popular microwave timings at HIGH power JET DEFROST Touch to set defrosting time the oven automatically divides the defrosting time into periods of alternating defrost and stand times...

Page 8: ...ne for hour and two for the minutes 4 Touch CLOCK pad again to confirm the setting NOTE To check clock time during cooking press the CLOCK pad once SETTING THE TIMER To use the clock as a kitchen time...

Page 9: ...istage cooking may be programmed in combination with delayed start function QUICK START This program allows you to cook food at 100 power at four popular microwave timings With each touch of the EXPRE...

Page 10: ...cooking for 10 minutes at 50 power 1 Place the food in a container suitable for use with microwave ovens put it into the microwave oven and close the door 2 Touch JET DEFROST pad and use the number p...

Page 11: ...clean at all times To do this wipe with mild detergent and water then dry Do not remove the waveguide cover You should clean the outside of the oven with a damp cloth and polish dry with a soft dry c...

Page 12: ...ll not work Make sure the door is securely closed Otherwise the microwave energy will not flow into the oven Important utensil information Use only cookware that is approved to be used in a microwave...

Page 13: ...13 Please use this page for your notes and recipes...

Page 14: ...supplier If you need to remove the plug cut it from the mains lead and dispose of it Never attempt to re use this plug or insert it into a socket outlet as there is a very great risk of an electric sh...

Reviews: