Russell Hobbs RHEM29L Instructions And Warranty Download Page 5


SPECIFICATIONS 


Model: 

RHEM29L 

Rated Voltage: 

230V~ 50Hz 

Rated Input Power(Microwave): 

1450W 

Rated Output Power(Microwave): 

900W 

Oven Capacity: 

28L 

Turntable Diameter: 

315mm 

External Dimensions: 

513 x 395 x 307mm 

Net Weight: 

Approx.  14 kg 


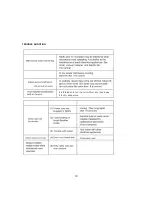
PRECAUTIONS TO AVOID POSSIBLE EXPOSURE TO EXCESSIVE MICROWAVE ENERGY 


Do not attempt to operate this oven with the door open since open door operation can result in 

harmful  exposure  to  microwave  energy.  It  is  important  not  to  break  or  tamper  with  the  safety 

interlocks. 


Do not place any object between the oven front face and the door or allow soil or cleaner residue 

to accumulate on sealing surfaces. 


Do  not  operate  the  oven  if  it  is  damaged.  It  is  particularly  important  that  the  oven  door  close 

properly and that there is no damage to the 

a. 

Door (bent), 

b. 

Hinges and latches (broken or loosened), 

c. 

Door seals and sealing surfaces. 


The  oven  should  not  be  adjusted  or  repaired  by  anyone  except  properly  qualified  service 

personnel. 


If the microwave appliance is not maintained in a good state of cleanliness, its surface 

could become degraded, its lifespan affected and could result in a possibly hazardous 

situation.  


INSTALLATION 

1.  Make sure that all the packing materials are removed from the inside of the door. 

2.  WARNING: Check the oven for any damage, such as misaligned or bent door, damaged door seals and 

sealing surface, broken or loose door hinges and latches and dents inside the cavity or on the door. If 

there is any damage, do not operate the oven and contact qualified service personnel.  

3.  This microwave oven must be placed on a flat, stable surface to hold its weight and the heaviest food 

likely to be cooked in the oven.  

Summary of Contents for RHEM29L

Page 1: ...INSTRUCTIONS AND WARRANTY MODEL NO RHEM29L RUSSELL HOBBS 28L ELECTRONIC MICROWAVE OVEN...

Page 2: ...warranty 1 year retail 1 year extended upon online registration of product visit www russellhobbs co za IMPORTANT SAFEGUARDS When using any electrical appliance basic safety precautions should always...

Page 3: ...es Do not use the cavity for storage purposes Do not leave paper products cooking utensils or food in the cavity when not in use WARNING Liquid or other food must not be heated in sealed containers si...

Page 4: ...pliance to avoid overheating of the extension cord appliance or plug point Do not place the extension cord in a position where it can be pulled on by children or animals or tripped over 32 This applia...

Page 5: ...properly and that there is no damage to the a Door bent b Hinges and latches broken or loosened c Door seals and sealing surfaces The oven should not be adjusted or repaired by anyone except properly...

Page 6: ...always to be placed on the glass tray for cooking 14 If the glass tray or turntable ring assembly cracks or breaks contact your nearest authorized service center RADIO INTERFERENCE Operation of the mi...

Page 7: ...nes are recommend as food in corners tends to overcook Narrow strips of aluminium foil may be used to prevent overcooking of exposed areas But be careful don t use too much and keep a distance of 1 in...

Page 8: ...8 PARTS DIAGRAM TURNTABLE INSTALLATION...

Page 9: ...s you have used are not within the range of 1 00 12 59 the setting will be invalid until valid numbers are inputted 5 Note 1 In the process of clock setting if the STOP CANCEL button is pressed or if...

Page 10: ...ng a cooking time from 1 to 6 minutes by pressing number pads 1 to 6 Press START 30SEC to increase the cooking time The maximum cooking time is 99 minutes and 99 seconds 2 In waiting state instant coo...

Page 11: ...proximate 690 gram For example press POTATO once 1 appears 3 Press START 30 SEC to cook buzzer sounds once When cooking has finished buzzer sounds five times and then turns back to waiting state FROZE...

Page 12: ...and then press 8 and PL8 displays d Press START 30 SEC to save the setting Buzzer sounds once and 2 displays If you press START 30SEC again the procedure will be saved as the memory 2 and operated e...

Page 13: ...nwhile LED will display 2 Lock quitting In locked state press STOP CANCEL for 3 seconds there will be a long beep denoting that child lock is released CYCLE REMINDER FUNCTION 1 When the cycle has fini...

Page 14: ...14 TROUBLE SHOOTING It is forbidden to run the unit without any food inside It is very dangerous...

Page 15: ...n both sides the door seals and adjacent parts frequently with a damp cloth to remove any spills or spatters Do not use abrasive cleaner Do not allow the control panel to become wet Clean with a soft...

Page 16: ...this appliance If the unit is not operating correctly please check the following You have followed the instructions correctly That the unit has been wired correctly and that the wall socket is switch...

Page 17: ...ions below This unit is designed to operate on 230V 240V current only Connecting to other power sources may damage the appliance Connect a three pin plug as follows The wires in this mains lead are co...

Page 18: ...harges may be payable by the customer to the supplier 4 The faulty product must be taken to the supplier s service centre to exercise the warranty 5 The supplier will refund repair or exchange the pro...

Page 19: ...the warranty Such impact damage can occur either from the outside if for example it is dropped or knocked against a hard surface or from within if for example foreign objects are placed within the ac...

Reviews: