background image

16

CLEANING AND CARE:

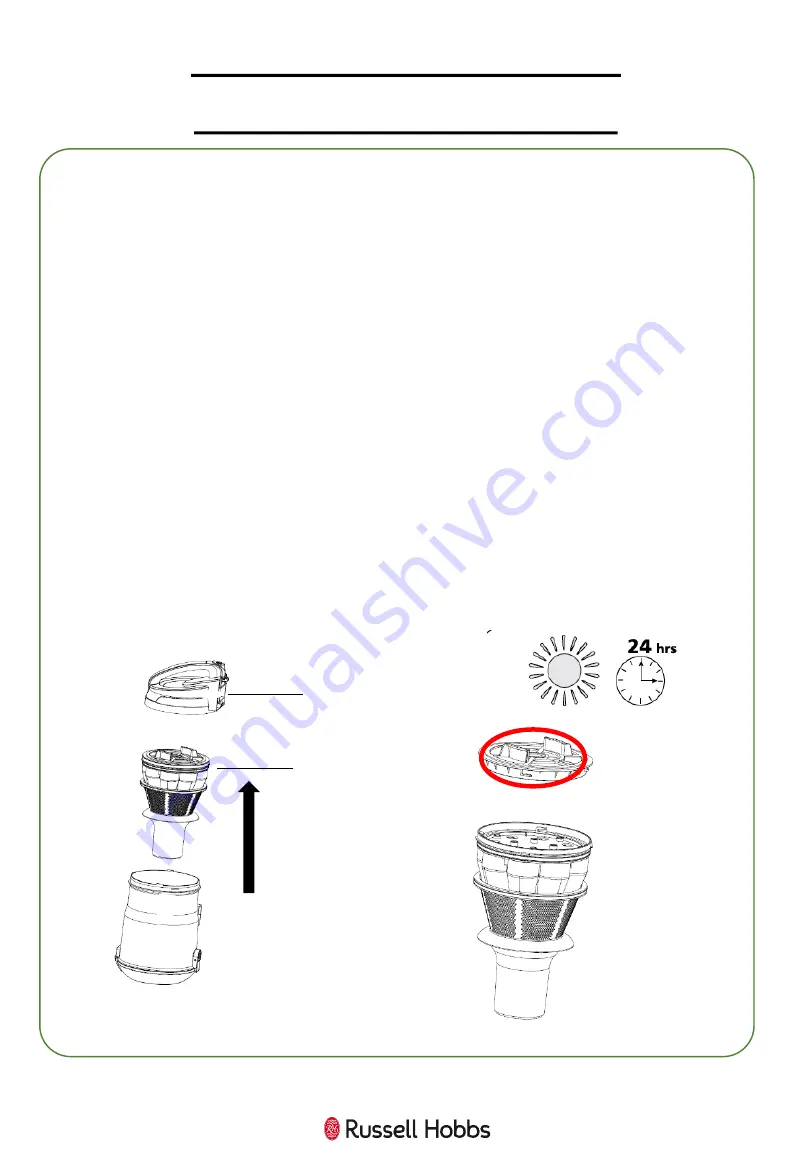
CLEANING THE FILTER

1. Remove the dust container from the main vacuum cleaner unit.
2. Over a bin, push the release button to empty the dust container.
3. Open the dust container lid and remove the dust container filter and 
cyclonic filter.
4. Remove the sponge filter, which is located in the main vacuum cleaner 
unit circled in the diagram below.
5. Wash the all three filters and the dust container unit in water and allow 
to thoroughly dry for 24 hours before reusing.
6. Once dry, fit both the dust container filter and cyclonic filter back into 
the dust container and lock the lid.
7. Place the exhaust filter back in the main vacuum unit and click the dust 
container back into place.
Note: The cyclonic filter fits back into the dust container with the rib of 
the filter slotting into the groove of the container. Make sure the dust 
container filter is fitted back into the top of the assembly with the lip 
facing downwards.

Dust container filter 

Cyclonic filter

Summary of Contents for RHCV4001

Page 1: ...0Hz 800W Titan 3L Bagless Cylinder Vacuum Cleaner For Customer Services Spare Parts please call 0345 209 7461 Opening times Monday Friday 8am 8pm Saturday 9am 1pm Or visit us at www productcare co uk...

Page 2: ...3 Disposal information 24 CONTENTS 2 For Customer Services Spare Parts please call 0345 209 7461 Opening times Monday Friday 8am 8pm Saturday 9am 1pm Or visit us at www productcare co uk Thank you for...

Page 3: ...o avoid a hazard This product is intended for household use only Do not use outdoors This appliance can be used by children aged from 8 years and above and persons with reduced physical sensory or men...

Page 4: ...et wet If unit is wet do not plug unit into wall socket or turn unit on Do not handle the vacuum cleaner with wet hands Do not pull or carry by cord use cord as a handle close door on cord pull cord a...

Page 5: ...your fingers or other objects into any part of the cleaner Be aware that loose clothing or hair may become trapped in the cleaner if improperly used Before use ensure that all of the air vents of the...

Page 6: ...y in case of over heating If the safety device has switched the cleaner off unplug from the mains allow the cleaner to cool down and check for any blockages Once the cleaner has cooled it can be plugg...

Page 7: ...ual energy usage the amount of energy used over a year 3 Emissions the amount of dust in the air emitted from the machine s exhaust 4 Noise the noise level produced by the machine measured in decibels...

Page 8: ...dicative annual energy consumption kWh year based on 50 cleaning tasks Actual annual energy consumption will depend on how the appliance is used 26 1 Carpet cleaning performance class C Hard floor cle...

Page 9: ...tch 6 Hose Handle 17 HEPA Filter Exhaust 7 Airflow Regulator 18 Filter Cover 8 Telescopic Tube 19 Sponge Filter 9 Floorhead 20 Multi Cyclonic Filter 10 2 in 1 Crevice Brush 21 Dust Bin Opening Button...

Page 10: ...ual damage such as Misaligned or damaged parts Damage to the main body and separate components Damage to the plug or cable If you can see any damage do not use the vacuum cleaner and contact customer...

Page 11: ...tilt forward to engage the top 2 Insert the hose connector into the hose outlet aligning the grooves in the outlet with the clips on the connector Push in until it clicks to secure 3 Insert the extens...

Page 12: ...wind the cord back until only the yellow tab is visible 2 Plug the cable into a wall socket and press the switch on 3 Press the power button to start vacuuming 4 Move the vacuum cleaner floor head in...

Page 13: ...indicated For maximum suction power close the tab The 2 in 1 crevice tool is for narrow gaps and hard to reach places 7 Both attach to either the extension tube or the hose connector in the same mann...

Page 14: ...ner away from the unit base 2 Locate the bin release button on the cover at the back of the container Over a bin push the release button to open the base of the container You may need to tap the sides...

Page 15: ...e back of the cleaner by pushing the tab on the side of the filter cover and pulling the cover away Press and pull the filter out and tap over a bin to remove any excess dust Wash in warm water and al...

Page 16: ...ers and the dust container unit in water and allow to thoroughly dry for 24 hours before reusing 6 Once dry fit both the dust container filter and cyclonic filter back into the dust container and lock...

Page 17: ...are Parts please call 0345 209 7461 Opening times Monday Friday 8am 8pm Saturday 9am 1pm Or visit us at www productcare co uk 1 2 3 4 Before you clean the appliance disconnect the mains plug from the...

Page 18: ...n them following the instructions in this booklet Automatic power cord rewind does not fully rewind the power cord Pull the power cord fully out and press the rewind button again Dust is coming out of...

Page 19: ...ent is at the discretion of the retailer The following conditions apply The product must be returned to the retailer with the original proof of purchase The product must be installed and used in accor...

Page 20: ...t www productcare co uk To check the availability of the following spare parts simply contact our friendly Customer Services team using the details provided at the bottom of this page 1 Hose 2 Extensi...

Page 21: ...t the end of a screwdriver into the recess in the fuse holder of the plug 2 Pull the fuse holder upwards until free of the plug and slide the fuse out 3 Replace the fuse and replace fuse holder pushin...

Page 22: ...22 NOTES...

Page 23: ...23 NOTES...

Page 24: ...ation is vital to ensure the success of these schemes and for the protection of the environment For your nearest disposal facility visit www recycle more co uk or ask in store for details We reserve t...

Reviews: