


9
SAFETY WARNINGS APPLICABLE TO SANDING OPERATIONS
If the use of an electrical tool in a damp area cannot be avoided,
use a power supply fitted with a differential switch (RCD).
This type of switch reduces the risk of electrical shocks.
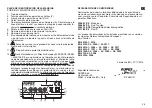
PARTS OF THE TOOL
1 - Identification plate
2 - ON/OFF switch
3 - Speed control
4 - Dust extraction flow control
5 - Auxiliary handle
6 - Rubber drilled velcroed plate,
7 - Paper clamping lever
8 - Abrasive paper punching device
9 - Motor ventilation slots
10 - 29 mm Ø suction port
11 - Heat shield
12 - Heat shield fixing screws
STARTING UP
Before starting-up the tool, ensure that:
- the packaging is complete and does not show signs of having been
damaged during storage or transport;
- the tool is complete; check that the number and type of
components comply with that reported in this instruction booklet;
- the power supply and socket outlet can support the load reported in
the table and that indicated on the tool identification plate
reproduced and explained on page 11.
ASSEMBLING THE TOOL
Connect the extraction device by the suction pipe in the nozzle (10).
INSERTING THE ABRASIVE PAPER
ABRASIVE VELCRO PAPER
- Press the velcro backed abrasive paper in position, ensuring that the
holes in the paper coincide with the suction holes in the rubber plate;
- make sure that there is no dust or other matter on the velcro pad.
ABRASIVE PAPER
- Lift the paper clamping lever (7) by pressing the lever release;
- insert the abrasive paper under the lever until it rests against the stop,
then release the lever;
- repeat this operation on the opposite side of the plate, keeping the
paper taut and checking that the edges are parallel with the edges of
the plate before releasing the lever;
- punch the paper using the tool supplied (8).
BEFORE STARTING THE TOOL
Ensure that:
- the power supply conforms with the characteristics of the tool;
- the power supply cable and plug are in perfect condition;
- the ON/OFF switch works properly though with the power supply di-
sconnected;
- all the parts of the tool have been assembled in the proper manner
and that there are no signs of damage;
- the ventilation slots are not obstructed (9);
- the tool must be connected to a suitable and efficient dust extraction
system (10).
STARTING AND STOPPING
- Starting: push the slide of the switch (2) forward; if the tool is to be
locked in the ON position, apply pressure to the front part of the slide
switch at the same time.
- Stopping: release the slide or, if locked in position, apply pressure to
the back part of the switch and allow it to return to the stop position.
TEST RUN
Start the tool and check that there are no unusual vibration, no dismat-
ching of the abrasive paper.
Otherwise switch-off the tool immediately and eliminate the cause.