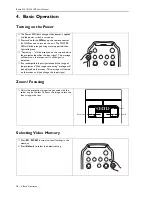
background image

6. Additional Information

Runco CL-510/ CL-510LT User’s Manual

28

Troubleshooting

7.

Put on the front 
lamp cover.

8.

Tighten the screw of 
front lamp cover.

9.

 Turn on the power and 
go into the Set Up menu 
to reset the "Lamp 
Timer" item.

Problem

Possible Cause

Remedy

This unit does not 
turn on.

There is no power from power cable.

Plug the power cord into the AC inlet on the 
rear of this unit, and plug the power cord into 
to the power inlet.

The power switch is not turned on.

Turn on the power switch.

Turn on this unit again within the 
cooling down procedure.

Wait until this unit completes the cooling down 
procedure.

Front lamp cover is not attached well.

Correctly attach the front lamp cover.

No picture

The front lamp cover is not correctly 
attached.

Correctly attach the front lamp cover.

This unit is not correctly connected to 
the input source device.

Check the connection.

The input signal has not been correctly 
selected.

Select the correct input signal with the input 
keys: Video, S-Video, Component, Component 
HD, RGB HD and DVI-I on the remote control.

POWER LED or LAMP LED blinking.

Please contact your Runco dealer for 
assistance.

Image is unstable

The connection cables are not 
connected to this unit.

Correctly connect the cables to the 
appropriate terminals.

Picture is blurred

The projection lens is not correctly 
focused.

Adjust the focus of projection lens with the 
focus ring.

This unit and the screen are not 
aligned squarely.

Adjust the projection angle and direction, and 
the height of this unit.

Remote control does 
not work correctly

The batteries are exhausted.

 Replace both batteries with new ones.

LAMP LED blinks in 
red

The front lamp cover is not correctly 
attached.

Correctly attach the front lamp cover.

The cooling fan does not work well.

Please contact your Runco dealer for 
assistance.

The temperature inside this unit is 
extremely high.

Check that the ventilation holes are not 
blocked.

POWER LED blinks in 
orange and green 
sequentially

The lamp has exceed its specified 
usage hours.

Replace the lamp with a new one.

The lamp has burned out.

Replace the lamp with a new one.

Summary of Contents for REFLECTION CL-510

Page 1: ...OWNER S OPERATING MANUAL CL 510 CL 510LT...

Page 2: ...aulty or improper installation or setup adjustments improper maintenance alteration improper use of any input signal damage due to lightning or power line surges spikes and brownouts damage that occur...

Page 3: ...nd normal operating distance of the closest Runco Authorized Service Center it is the owner s responsibility to arrange for shipment of the product for repair These arrangements must be made through t...

Page 4: ...nect the RJ 11 RS 232 jack to a telephone line connection 10 The 12V trigger outputs 12V DC for triggering Do not connect to any other power input or output This could cause damage to this unit 11 Onl...

Page 5: ...nce Chart For CL 510LT With 2 30 3 00 Lens 14 3 Connecting 15 Connecting Video Inputs 15 Video S Video Component Interlaced Video 15 Progressive Component DTV Y PB PR 16 RGBHV DTV RGB 16 Connecting a...

Page 6: ...nent DTV Y PB PR DTV RGB and Computer signals The HDTV input DTV Y PB PR and DTV RGB is input through RGB BNC connectors providing the least amount of signal degradation caused by longer cable runs HD...

Page 7: ...LED and Lamp LED Show the status of power and lamp For more details see Control Panel on page 5 8 Top IR Sensor 9 Runco Logo Can be turned off see Options on page 24 1 Connector Panel For more details...

Page 8: ...al mode Flashing Orange for the first 45 seconds after power up indicating that the lamp is warming up Flashing Green for 90 seconds after the projector is powered off indicating that the lamp is cool...

Page 9: ...mponent RCA Jacks 480i Component Y CB CR video signal input 4 RGB HDTV BNC or Progressive Scan DVD players DTV Y PB PR or DTV RGB video signal input 5 DVI HDCP Digital Analog signal input 6 RS 232C RJ...

Page 10: ...ity Brightness Adjust picture brightness Contrast Adjust picture contrast Tint Adjust color tones Anamorphic For 16 9 DVDs 4 X 3 The input signal will be scaled to fit 4 3 display mode in the center o...

Page 11: ...PIP Picture in Picture Enable the PIP function Use ARROW keys to adjust the position of the PIP window see PIP PBP function on page 20 PIP Enlarge the size of PIP window PIP Shrink the size of PIP wi...

Page 12: ...the remote control and the IR receiver on the projector The useable range is between 3m 9 8 feet from the front of the projector and 4m 13 1 feet from the top of the projector within a 30 degree hori...

Page 13: ...e height Adjust the projected image size you need with the zoom ring on the lens To focus the image rotate the focus ring on the lens There are 4 screw adjusters on the bottom of this unit You can adj...

Page 14: ...th 1 75 2 00 Lens Screen __________ H x __________ W C VERTICAL OFFSET Screen width x 0 12 _________ inches from the center of the lens B THROW DISTANCE CL 510 16 x 9 Screens Minimum screen width x 1...

Page 15: ...00 10 44 50 89 155 75 178 00 10 68 51 5 92 161 00 184 00 11 04 52 93 162 75 186 00 11 16 54 96 168 00 192 00 11 52 56 100 175 00 200 00 12 00 58 103 180 25 206 00 12 36 58 5 104 182 00 208 00 12 48 60...

Page 16: ...th 2 30 3 00 Lens Screen __________ H x __________ W C VERTICAL OFFSET Screen width x 0 10 _________ inches from the center of the lens B THROW DISTANCE CL 510LT 16 x 9 Screens Minimum screen width x...

Page 17: ...00 10 261 00 8 70 50 89 204 70 267 00 8 90 51 5 92 211 60 276 00 9 20 52 93 213 90 279 00 9 30 54 96 220 80 288 00 9 60 56 100 230 00 300 00 10 00 58 103 236 90 309 00 10 30 58 5 104 239 20 312 00 10...

Page 18: ...all equipment before making any connections 2 Use the correct signal cables for each source 3 Ensure the cables are firmly connected 4 Connect all audio signals to external speakers This projector is...

Page 19: ...User s Manual 16 Progressive Component DTV Y PB PR RGBHV DTV RGB The RGB BNC input supports two kinds of HDTV formats Progressive component DTV Y PB PR and DTV RGB The unit will detect the resolution...

Page 20: ...3 Connecting Runco CL 510 CL 510LT User s Manual 17 Connecting a Computer DVI HDCP This unit is compatible with the following computer resoultions 1280x720 1024x768 800x600 640x480 PC or Notebook...

Page 21: ...isplayed on the screen before the projector identifies the input signal This message will remain on the screen until a valid signal is detected If an incompatible input signal exceeds the range of the...

Page 22: ...e cropped VirtualWide This transforms a 4x3 image to a 16x9 image LPos LPos Adjust Letterbox image vertical position Press Color to adjust color intensity Press Brightness to adjust picture brightness...

Page 23: ...s Graphic Group HDTV input and Computer input The PIP can show one input from the Graphic Group within one input from the Video Group or show one input from Video Group within one input from the Graph...

Page 24: ...the unit The POWER LED will blink green and the fans will speed up for a quick cool down The projector will not respond to any command for 90 seconds The POWER LED will light solid orange once the coo...

Page 25: ...items in the menu or press the Exit button to leave and save the setting of items in the menu Main Menu When the Menu button is pressed on the remote control the main menu will appear on screen An exa...

Page 26: ...load up to three different memories There are three memories Memory 1 Memory 2 and Memory 3 Aspect Ratio There are four aspect ratios available that can be selected for video signal inputs 16 9 Scree...

Page 27: ...rrent source back to factory default Language There are 4 different menu languages available English Spanish French and German Picture Orientation The projector can be installed on a ceiling or in a r...

Page 28: ...vice All items below which are printed in italic are intended for service personnel only Non italic items can be modified by the projector owner The CL 510 has four memory settings for color temperatu...

Page 29: ...function to reset lamp usage counter Reset only if you replace the lamp Background Color To adjust background color to blue or white White Balance Red Gamma Green Gamma Blue Gamma Red Gain Green Gain...

Page 30: ...has operated for 980 hours And the number will count down continuously Please change the lamp message will display on the screen all the time and the POWER LED will blink in orange and green sequentia...

Page 31: ...ut signal with the input keys Video S Video Component Component HD RGB HD and DVI I on the remote control POWER LED or LAMP LED blinking Please contact your Runco dealer for assistance Image is unstab...

Page 32: ...ications Home Theater Calibration 471 ANSI Lumens 17 8 Foot Lamberts fL Contrast Ratio 1700 1 CSMS Contrast Ratio 149 1 Lamp 210W Lamp Life 1000 hours 6500o Kelvin Inputs 1 Composite Video 1 S Video 1...

Page 33: ...standard for reproducing video CSMS Home Theater Calibration foot Lambert fL Specification This is the unit of measurement used in commercial movie theaters to express image brightness The Society of...

Page 34: ...6 Additional Information Runco CL 510 CL 510LT User s Manual 31 Dimensions Unit in mm...

Page 35: ...mory 3 settings X55 Switch active source X56 Picture in picture display X57 Picture in picture display X60 Switch language English X61 Switch language French X62 Switch language Spanish X85 PC Input a...

Page 36: ...Runco International 2900 Faber Street Union City CA 94587 ph 510 324 7777 fax 510 324 9300 www runco com RUMA 010300 rev 7 03...

Reviews: