


14
AC power adapter must attach to tablet in order to avoid battery power
lost during below BIOS/EC re-flash and OS recovery.
Q:How to do BIOS/EC Re-flash
A:
Because BIOS re-flash must be done under system Internal Shell environment. So, please well prepare
a FAT32 formatted USB pen drive. AC power adapter must attach to tablet in order to avoid battery power lost
during re-flash.
1.
Copy all the downloaded BIOS files to USB pen drive.
2.
Press & hold tablet’s
HOME
button first then press power button.
3.
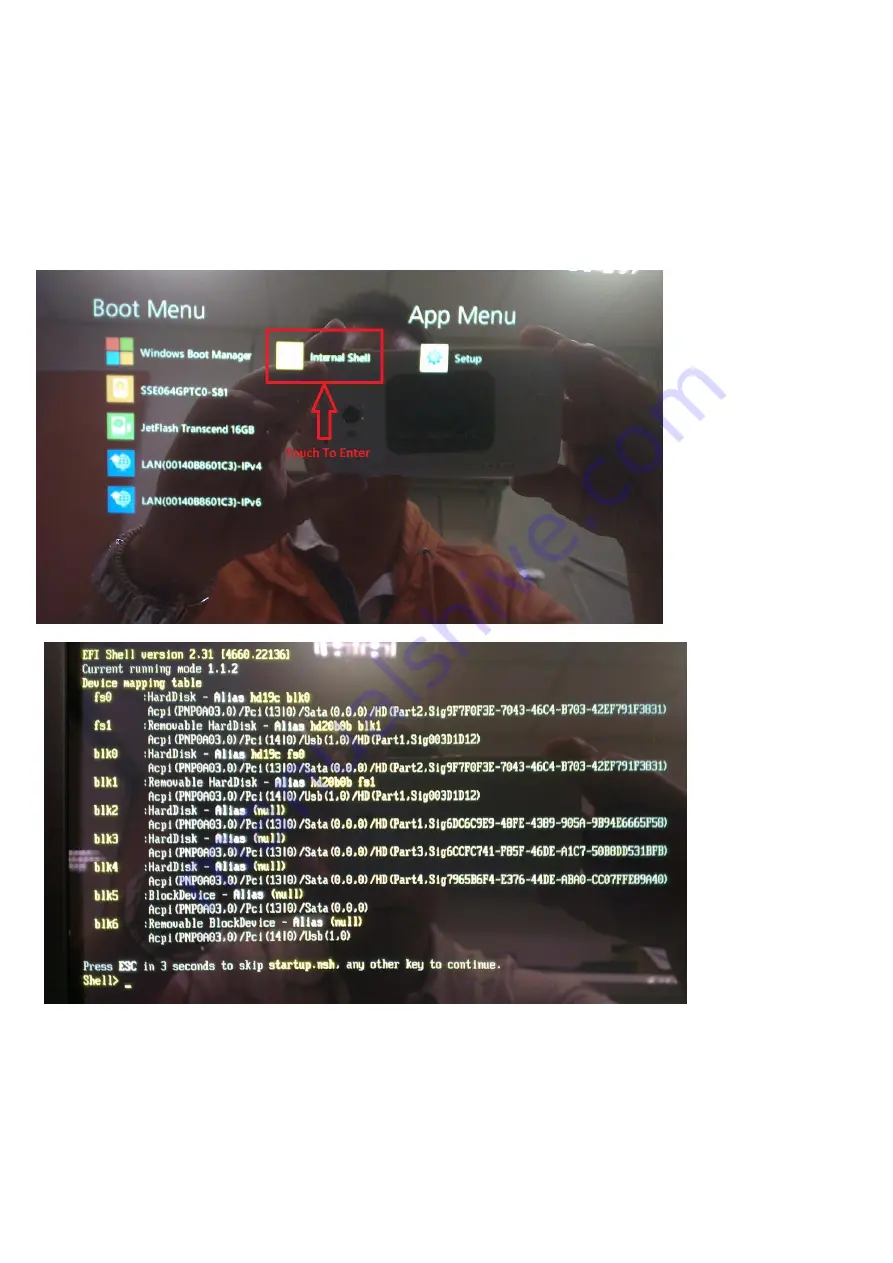
Once Boot Menu show up, just simply touch to enter
Internal Shell
.
4.
Internal Shell Operating Command:
fs1:->change drive path to USB pen drive
dir:Display data folder
cd BIOS file folder
cd EFI64
WB
You can also find a .pdf file of System BIOS Update Procedure in downloaded BIOS file folder to flash the
BIOS under Windows. Please be reminded again, EC doesn’t support Windows mode flash.
**Once the BIOS re-flash done, you must power Off->On to restart the system as well.
Summary of Contents for RUGGPAD PX-501
Page 1: ...1 PX 501 FAQ Troubleshooting Guide...
Page 2: ...2 Table of Contents Display Touch 3 Peripherals 4 BIOS OS General Software 10 Power Battery 17...
Page 8: ...8 SnapOn NFC...
Page 9: ...9...
Page 11: ...11 3 1 REAL Outdoor GPS Working Situation...
Page 21: ...21 Appendix Barcode Scanner Setup...
Page 22: ...22...
Page 23: ...23...
Page 24: ...24...
Page 25: ...25...
Page 26: ...26...
Page 27: ...27...
Page 28: ...28...
Page 29: ...29...
Page 30: ...30...
Page 31: ...31...
Page 32: ...32...
Page 33: ...33...
Page 34: ...34...